


Struggling with a cold garage floor? Learn the expert secrets to properly insulate your garage floor and create a comfortable, energy-efficient space year-round.
Understanding Garage Floor Insulation Basics
Insulating your garage floor is a crucial step in creating a comfortable and energy-efficient workspace. A properly insulated garage floor can reduce heat loss by up to 70% and significantly lower your energy bills. The concrete slab that forms your garage floor naturally conducts cold from the ground, making it essential to create an effective thermal barrier. Modern insulation techniques have evolved significantly, with new materials and methods making DIY installation more accessible than ever before.
Benefits of Insulating Your Garage Floor
- Reduces energy costs by up to 25% annually
- Creates a more comfortable working environment
- Prevents moisture-related issues and mould growth
- Increases property value by improving garage functionality
- Protects stored items from ground moisture damage
- Enables year-round use of the garage space
Common Insulation Materials and Their Properties
- Rigid Foam Insulation (XPS/EPS): R-value of 4-5 per inch, excellent moisture resistance
- Polyisocyanurate (PIR) Boards: Highest R-value of 6-8 per inch
- Mineral Wool: R-value of 3-4 per inch, good sound insulation
- Spray Foam: R-value of 6-7 per inch, excellent air sealing properties
Preparing Your Garage Floor for Insulation
Proper preparation is essential for successful garage floor insulation. Begin by thoroughly cleaning the concrete surface and addressing any existing damage. The floor should be completely dry and level before installation, with any cracks or holes properly repaired. A moisture test is crucial – place a plastic sheet on the floor for 24 hours to check for condensation underneath.
Assessing Your Current Floor Condition
Start with a comprehensive inspection of your garage floor. Look for cracks, uneven areas, and signs of moisture problems. Use a level to check for slopes and dips that might need attention. Document any areas requiring repair and measure the total square footage accurately, adding 10% extra for waste and cuts.
Dealing with Moisture Issues
- Test for moisture levels using a concrete moisture meter
- Apply concrete sealer to prevent moisture migration
- Install a quality vapour barrier rated at minimum 6-mil thickness
- Address any external drainage issues around the garage
- Consider installing a French drain if necessary
Essential Tools and Materials Needed
- Moisture meter and level
- Concrete repair materials
- Vapour barrier membrane
- Chosen insulation material
- Utility knife and measuring tape
- Safety equipment (gloves, goggles, dust mask)
- Flooring adhesive (if required)
Step-by-Step Installation Guide
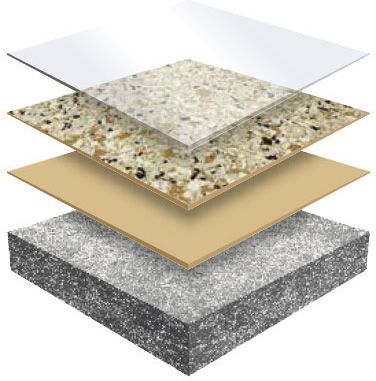
Following a systematic approach ensures optimal results when insulating your garage floor. The installation process typically takes 2-3 days to complete properly, including preparation and curing time. Each layer plays a crucial role in creating an effective insulation system.
Installing the Vapor Barrier
Begin by rolling out the vapor barrier, overlapping seams by at least 6 inches. Use waterproof tape to seal all joints and ensure the barrier extends up the walls by 4-6 inches. This creates a continuous moisture barrier beneath your insulation system.
Laying Rigid Foam Insulation
- Cut boards to fit with a 1/4-inch gap around perimeter
- Stagger joints for maximum stability
- Use adhesive between layers if stacking multiple boards
- Tape seams with foil tape for air-tightness
Creating a Floating Subfloor
Install a floating subfloor system over the insulation layer to distribute weight evenly and protect the insulation. Use tongue-and-groove plywood or OSB boards, maintaining proper expansion gaps around the perimeter.
Installing Interlocking Panels
For the final layer, consider interlocking floor panels designed specifically for garage use. These provide additional insulation and create a durable, attractive surface that can withstand vehicle traffic and workshop activities.
Special Considerations and Tips
Every garage presents unique challenges that require careful consideration during the insulation process. Height restrictions, existing fixtures, and local climate conditions all play important roles in planning your installation.
Managing Height Clearance Issues
- Measure door clearances carefully before adding new layers
- Consider thinner insulation options if height is limited
- Account for vehicle clearance requirements
- Plan for transitions to adjacent spaces
Dealing with Uneven Surfaces
Level significant depressions using self-leveling compound before installation. For minor irregularities, use a leveling sand layer beneath the vapor barrier. This ensures proper support for the insulation system and prevents future issues.
Temperature Control Solutions
Complement your floor insulation with additional temperature control measures such as weather stripping, wall insulation, and proper ventilation to create a completely comfortable space.
Maintaining Your Insulated Garage Floor
Regular maintenance ensures the longevity of your insulated garage floor system. Inspect the surface quarterly for signs of wear or damage, and address any issues promptly to prevent more serious problems.
Regular Maintenance Requirements
- Inspect for moisture signs every 3-4 months
- Clean surface regularly with appropriate cleaners
- Check seals and transitions annually
- Monitor for any shifting or separation
Troubleshooting Common Issues
Address common problems like condensation, squeaking, or soft spots immediately. Most issues can be resolved with simple repairs if caught early, preventing more extensive damage to the insulation system.
Professional Installation vs. DIY
While DIY installation is possible for many homeowners, some situations warrant professional installation. Consider your skills, available time, and project complexity when making this decision.
Cost Comparison
- DIY Installation: £15-25 per square metre for materials
- Professional Installation: £35-50 per square metre including labour
- Tool rental costs: Approximately £100-200 if needed
- Additional materials: £5-10 per square metre
When to Call a Professional
Consider professional installation if you encounter significant moisture issues, structural concerns, or complex installation requirements. Professionals can ensure proper installation and often provide warranties for their work.
Conclusion: Creating Your Comfortable Garage Space
Insulating your garage floor is a valuable investment that improves comfort, energy efficiency, and property value. By following this comprehensive guide and choosing the right materials and methods for your specific situation, you can transform your cold garage into a comfortable, year-round usable space. Remember to prioritize proper preparation and moisture control for the best long-term results.
FAQ
What happens if you don’t put plastic under concrete?
“Without a vapor barrier, concrete will deteriorate much faster through water vapor intrusion which degrades the quality of the concrete over time and can lead to foundation and building failures, like Surfside Condominium Collapse in Miami, Florida,” says vapor barrier plastic sheeting expert and Americover account …
What is the best moisture barrier for concrete floors?
Polyethylene sheeting: This is a popular and cost-effective vapor barrier. It comes in rolls and is laid over the subfloor before installing the flooring. This plastic sheeting effectively prevents moisture from rising through the floor, making it a common choice for concrete subfloor installations.
Does garage floor need vapor barrier?
If the garage is heated, you will need a vapor barrier, otherwise you will get frost and mold.
What is the cheapest way to insulate a concrete floor?
Lining a concrete floor with chipboard sheets and carpeting over it is a less expensive and easier way to insulate it.
Sources
[1] https://www.insofast.com/resources/interiors-resources/garages-floors-ceilings/insulating-garage-floors
[2] https://www.greenbuildingadvisor.com/question/insulation-under-a-new-garage-floor
[3] https://www.ronhazelton.com/projects/how_to_insulate_and_level_a_garage_floor