


Tiling a bathroom floor looks simple until you reach the toilet, the soil pipe and the awkward sliver of tile by the door. The fixing itself is the easy part. What separates a floor that lasts twenty years from one that lifts and cracks within a season is what happens underneath: the substrate, the preparation and the adhesive. This guide walks through the whole job for a UK home, including the cuts around the WC that catch most people out, and is honest about the points where paying a tiler is the better call.
Check the substrate before you buy a single tile
Tiles are rigid and brittle. They do not bend, so anything they sit on has to be stable enough that it does not bend either. The technical word for that movement is deflection, and excess deflection is the most common reason bathroom floor tiles crack or debond.
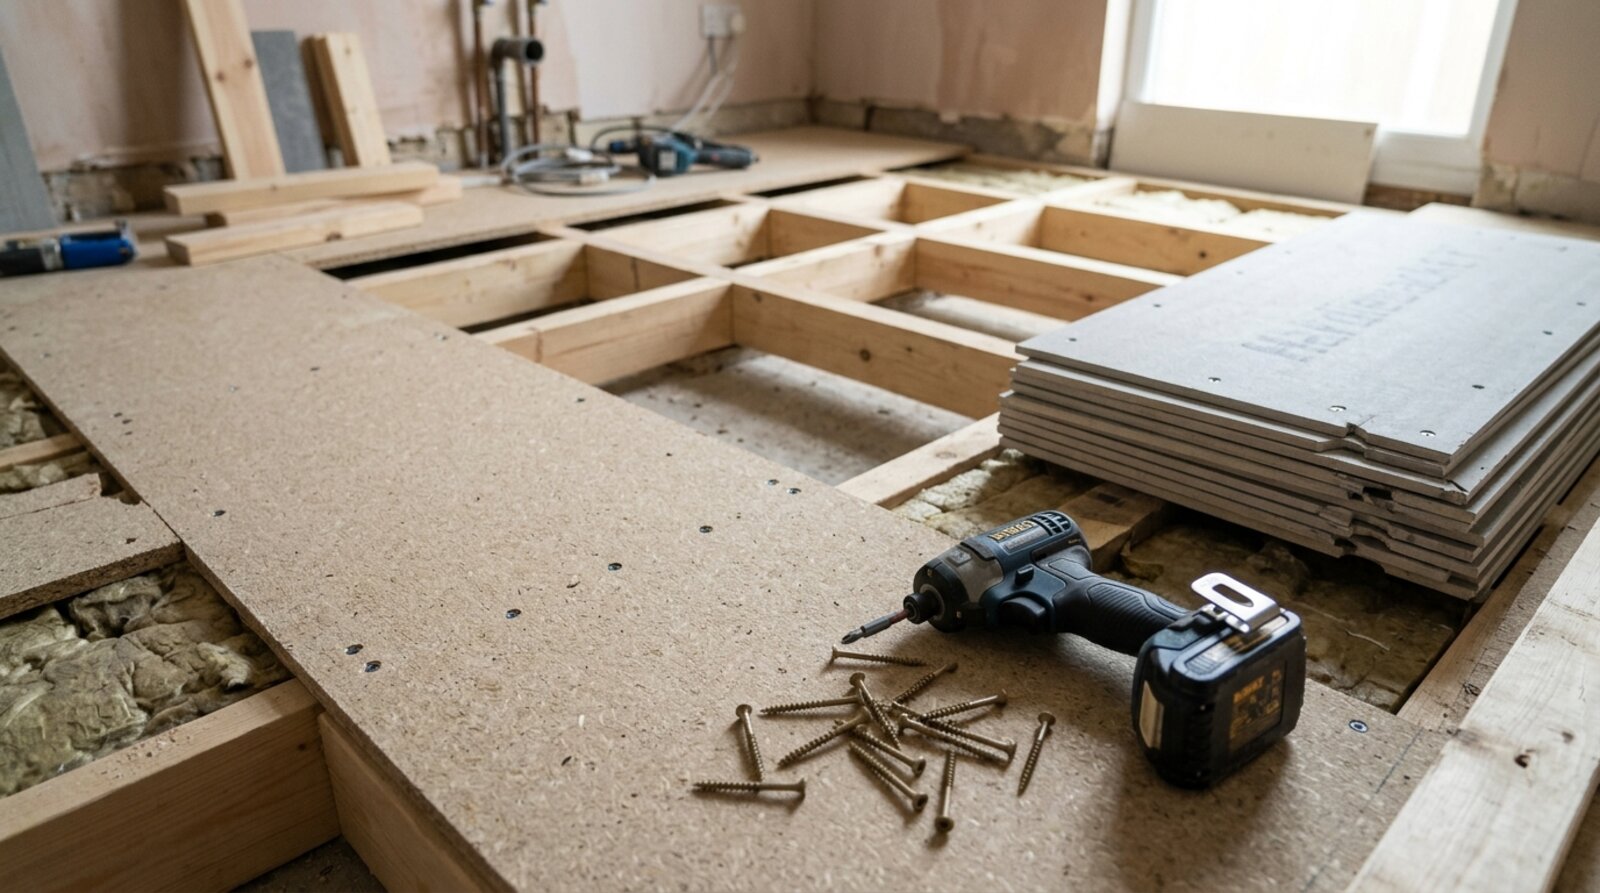
You will be working over one of two substrates. A solid concrete or sand-cement screed floor is the easier starting point: as long as it is sound, dry, flat and free of dust, paint and old adhesive, you can prime and tile straight onto it. A suspended timber floor (chipboard or plywood on joists) is the one that needs thought. Walk across it. If the boards flex, bounce or creak, the floor is not ready.
For a timber floor, first make sure the existing boards are well screwed down into the joists, not just nailed, because nails work loose and let the boards move. Standard domestic chipboard, often P5 moisture-resistant grade, is not a tiling surface on its own. It moves with footfall and with changes in humidity, and that movement transfers straight into the tiles. You have two routes to fix this, and they solve different problems.
Tile backer board or uncoupling membrane?
A tile backer board is a rigid cement-based sheet, usually 6mm or thicker for floors, bedded onto the timber with flexible adhesive and then screwed down at the spacings the manufacturer specifies. It adds stiffness and gives you a stable, waterproof-friendly surface to tile onto. This is the more forgiving choice on a floor that is a little springy.
An uncoupling membrane (the matting type, such as a studded polyethylene sheet) does something different. It separates the tile layer from the substrate so that small horizontal movements in the timber are not passed up into the tiles. It is excellent at handling lateral movement, but it does not stiffen the floor and it does not cure deflection. If your joists or boards visibly bounce, a membrane will not save you; the floor needs strengthening first, with an overlay of WBP plywood (commonly 15mm or more) screwed down, or with attention to the joists themselves.
Get the diagnosis right: backer board adds stiffness, a membrane manages movement. On a marginal timber floor, many tilers use a board for rigidity and accept that the real cure is reducing the bounce before anything goes down.
Prime the floor properly
Priming is not optional on porous or board substrates. An unprimed timber or screed surface sucks water out of the adhesive too quickly, which weakens the bond and can leave you with a hollow, drummy floor. The right primer for floors in wet areas is an SBR (styrene-butadiene rubber) based primer, which seals the surface, improves adhesion and helps protect the board from moisture. Two thin coats work better than one heavy one; let each dry before the next.
One firm rule: do not use PVA as a tiling primer. PVA re-emulsifies when it gets wet, which in a bathroom it will, and the bond fails. It belongs nowhere near a tiled floor.
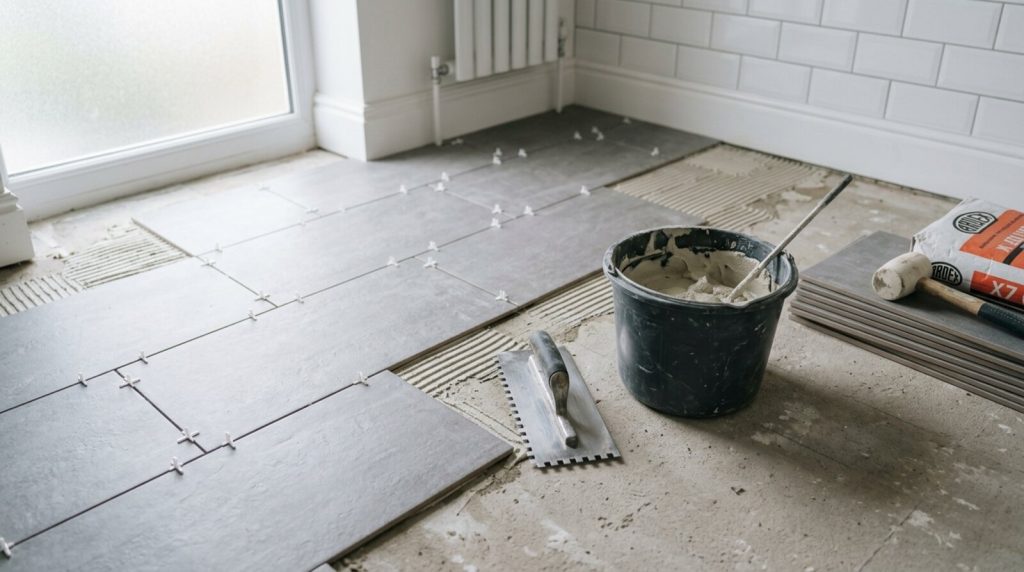
Plan the layout from the centre
Resist the urge to start tiling from a wall. Bathroom walls are rarely square, and starting from one means the error compounds across the room until you get an ugly tapering line on the far side. Instead, find the centre of the room by snapping two chalk lines between the midpoints of opposite walls so they cross at the middle.
Then dry-lay a row of tiles along each line, spacers included, before you mix any adhesive. This tells you where the cuts will land. The goal is to avoid thin slivers, anything under roughly a third of a tile width, especially at the doorway and along the most visible wall, because slivers look poor and are fragile to cut. If a dry run throws up a sliver at the door, shift your starting point by half a tile and check again. Spend the time here; you cannot fix it later. Bear in mind the floor often needs a fall (a slight slope) towards a drain in a wet room or shower area, and setting falls accurately is a job in itself.
Choose the right floor tile
For a bathroom floor, porcelain is the sensible default. It absorbs very little water, it is hard-wearing, and it suits a wet, frequently mopped room far better than softer wall tiles. Glazed ceramic floor tiles can work too, but check they are rated for floor use, not wall-only.
Slip resistance matters more on a bathroom floor than anywhere else in the house. Tiles carry an R rating from R9 to R13 describing grip underfoot. R10 is generally treated as a sensible minimum for a domestic bathroom floor, and many people prefer R11 for the area right beside a bath or shower where water pools. Avoid polished porcelain on the floor: it looks smart dry and turns into a hazard wet. A matt or lightly textured finish is the safer choice. The R rating is a useful guide rather than a legal threshold for a home, so think about who uses the room, including children and older relatives.
Use the correct adhesive and trowel
For a bathroom floor, use a flexible, cement-based powder adhesive that you mix with water, classified C2 under BS EN 12004, and ideally with an S1 (deformable) rating. The C2 part means improved bond strength; the S1 part means the adhesive can absorb a little movement without cracking, which is exactly what you want on a timber floor or over a membrane.
Do not use a ready-mixed tub adhesive on a floor. Ready-mixed (dispersion) adhesives are fine for light wall tiles, but they cure by losing water to the air. Under a floor tile there is nowhere for that water to go, so the centre may never set properly. Floors need a cement-based adhesive.
Spread the adhesive with a notched floor trowel sized for your tile, comb it out in one direction, and aim for solid bed fixing with as close to full coverage under each tile as you can manage. UK practice for floors, and for all tiling in wet areas, follows the principle in the British Standard BS 5385 that voids behind tiles should be eliminated as far as possible, so back-buttering each tile as well as combing the floor is good habit on larger tiles. To check coverage on the first few tiles, lift one straight back up: the back should be almost completely coated, with no large bare patches. The Tile Association sets out the recognised codes of practice for this work and is a useful reference point; see tiles.org.uk for guidance and to find accredited installers.
Cutting around the toilet and pipework
This is the part that defeats most first-timers. Tile up to the easy areas first and leave the cuts around the WC and pipes until you are confident with the straightforward field tiles.
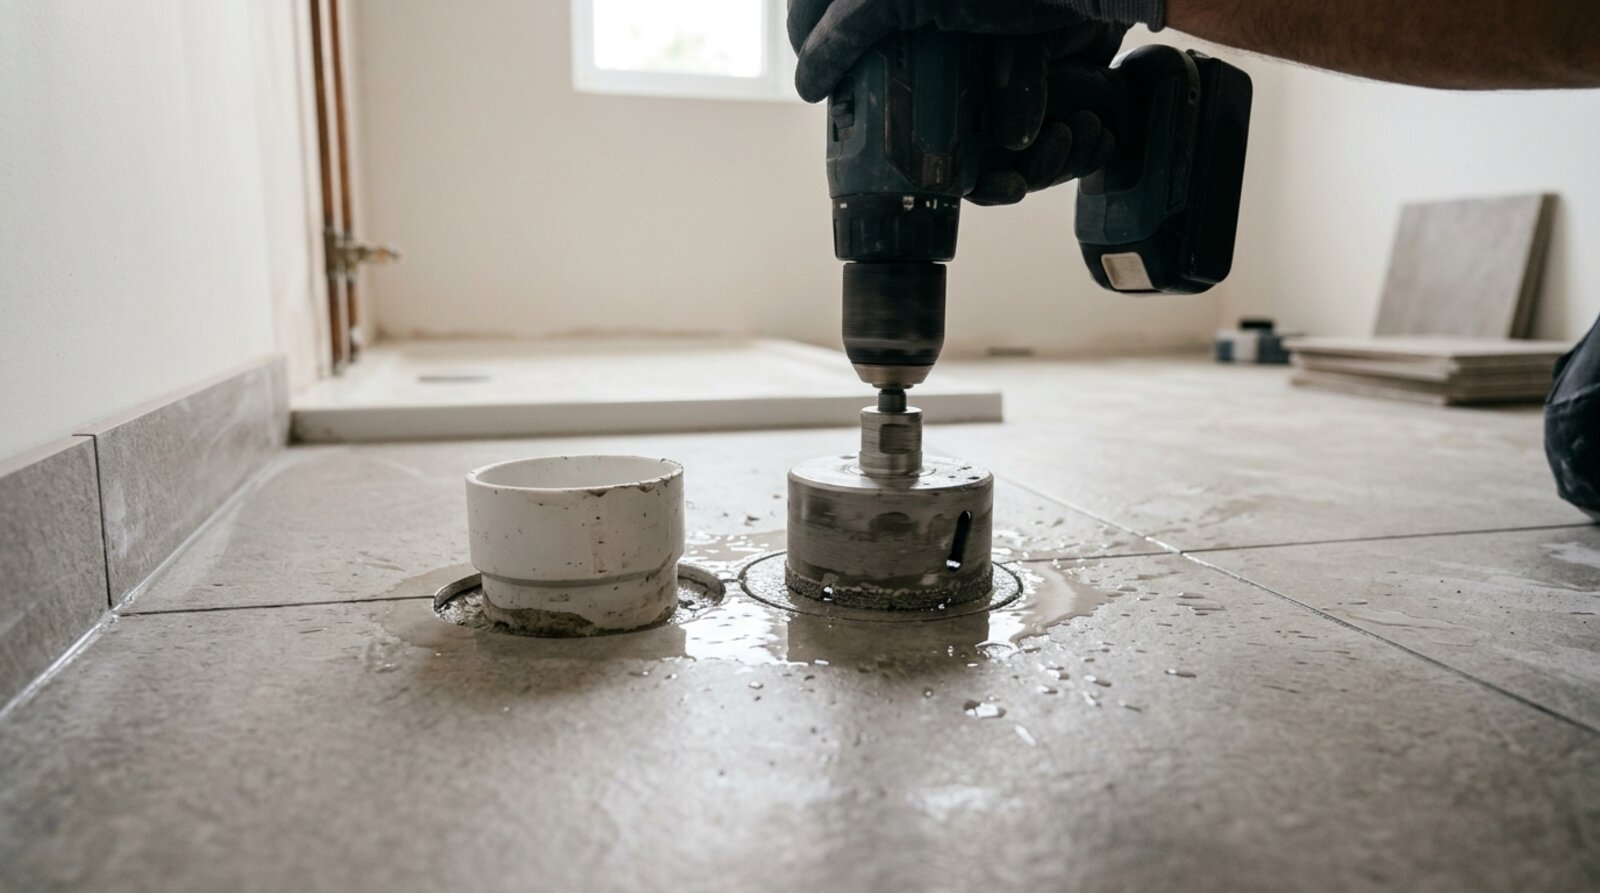
For the round soil pipe behind or beneath the toilet, and for any pipes coming up through the floor, do not try to nibble a circle with tile nippers. Use a diamond hole cutter (a core bit) in a drill, sized a few millimetres larger than the pipe so the tile is not gripping it; you want a small gap that gets grouted or sealed, not a tight ring that cracks the tile. Mark the pipe centre by measuring from two reference edges, drill slowly with water to keep the bit cool, and let the bit do the work.
Where a cut needs to wrap around the base of the toilet pan, the usual approach is to cut the tile in two pieces so the join sits at the centre line of the pipe or pan, drill or cut the curve into each half, and lay them so the seam is barely visible. An angle grinder with a diamond blade, or a wet saw, handles the curved freehand cuts; a manual tile cutter only does straight scores and snaps. Ideally the toilet is lifted off so you tile underneath it and refit on top, which looks far better and avoids a difficult cut around an awkward shape. Refitting a pan and reconnecting the soil pipe and water supply is plumbing, so factor that in.
Grouting, movement joints and sealing
Let the adhesive cure for the time on the bag, usually at least 24 hours, before grouting; walking on tiles too soon disturbs the bed. Use a flexible grout suited to floors and to the joint width, and work it fully into the joints with a rubber float held at an angle, then clean off the haze before it hardens.
Do not grout right up to the walls. Around the edge of the room, and against the bath, shower tray and any fixed units, leave a gap and fill it with a flexible silicone sealant rather than rigid grout. These perimeter and junction lines are movement joints: tiles, walls and timber all expand and move at different rates, and silicone flexes where grout would simply crack. On a larger floor, intermediate movement joints may also be needed in line with the British Standard, which is one of the technical points where a professional spec pays off.
If you have used a porcelain tile, the body usually needs no sealing, but check the manufacturer’s advice; natural stone and some textured porcelains do want an impregnating sealer to keep them clean. Cement-based grout benefits from a grout sealer to resist staining and mould in a humid room.
When a tiler is worth the money
Plenty of bathroom floors are well within reach of a careful DIYer working slowly. There are three situations where bringing in a professional usually saves money in the long run. The first is creating falls towards a drain in a wet room, where the slope has to be accurate or water sits in the wrong place. The second is large-format tiles, which are heavy, unforgiving on any unevenness and need solid coverage that is hard to achieve by hand. The third is heavy custom cutting, the curved cuts around a pan, a pedestal or fitted furniture, where one cracked porcelain tile can cost more than an hour of a tiler’s time.
If you are in Bromley or the wider south-east London area and the job involves any of those, or a timber floor you are not sure about, it is worth getting a local tiler to at least look at the substrate before you commit to materials. You can see the kind of bathroom floor work we cover on our homepage at Bromley Tilers.
Frequently asked questions
Can I tile a bathroom floor over chipboard?
Not directly. Standard chipboard moves too much and the tiles will eventually crack or lift. Screw the boards down firmly, then overlay with a tile backer board or, if the floor is genuinely rigid, an uncoupling membrane. Prime first and use a flexible cement-based adhesive.
What R rating should bathroom floor tiles be?
R10 is a reasonable minimum for a domestic bathroom floor, and R11 is worth considering right next to the bath or shower where water collects. Avoid polished tiles on the floor, as they become slippery when wet. The R rating is guidance for a home rather than a legal requirement.
Do I need to prime the floor before tiling?
Yes, on timber boards, backer board or a screed. Use an SBR-based primer, usually in two thin coats, to seal the surface and stop it pulling water out of the adhesive. Never use PVA, because it breaks down when it gets wet and the bond fails.
Can I use ready-mixed adhesive on a bathroom floor?
No. Ready-mixed tub adhesives cure by losing water to the air and cannot set reliably under a floor tile. Use a powder, cement-based adhesive that you mix yourself, classified C2 under BS EN 12004, ideally with an S1 flexible rating.
How do I cut a tile around the toilet soil pipe?
Use a diamond hole cutter in a drill, sized slightly larger than the pipe, and drill slowly with water to keep it cool. For the base of the pan, cut the tile into two pieces meeting at the pipe centre and shape the curve into each half. Lifting the toilet off and tiling underneath gives a much cleaner result.
Why do you fill the edges with silicone instead of grout?
The perimeter of the room and the joints against the bath, tray and units are movement joints. Everything expands and contracts at slightly different rates, and flexible silicone moves with it. Rigid grout in those positions simply cracks and lets water in.
Related guides
- How to Tile a Bathroom Wall: A UK Step-by-Step Guide
- How Much Does Tiling Cost in the UK? A Realistic Price Guide
- How to Remove Old Wall Tiles Without Damaging the Wall
- Porcelain vs Ceramic Tiles: Which Is Right for Your Bathroom or Kitchen?
- How to Tank and Waterproof a Wet Room Before Tiling: A Bromley Homeowner’s Guide
- Do You Need to Seal Natural Stone Tiles Before Grouting? A Tiler Explains
- How to Tile a Shower: Walls, Niche and Waterproofing
- Construction Trade News: June 2026
- Bathroom Tiling Guide: How to Plan, Prep and Finish a Lasting Job
- Tile Backer Board vs Plasterboard for Bathrooms
- Best Tiles for Small Bathrooms (and How to Make a Space Look Bigger)
- Wall and Floor Tiles for a Wet Room: What Actually Works
- Tiling vs Wall Panels for a Bathroom: Which Is Better?
- Do You Tile the Floor or Walls First in a Bathroom?
- Tiling and Bathroom Trade News: Mid-June 2026
- Kitchen Tiling: Splashbacks, Walls and Floors Explained