


Most articles about converting a bathroom into a wet room jump straight to the total bill and a photo of a frameless screen. Almost none explain the one step that decides whether your wet room lasts twenty years or leaks into the ceiling below within two: tanking. This is the waterproofing layer that goes on after the walls and floor are prepped and before a single tile is fixed. Get it right and the room is sealed; get it wrong and no amount of expensive tile will save you.
We tile wet rooms across Bromley, Beckenham, Orpington and the wider south east London suburbs, and we get called to fix other people’s leaks more often than we would like. This guide covers what tanking is, the two main systems, how it is done properly, what it costs, and the mistakes that turn a DIY job into a repair bill.
What “tanking” a wet room actually means
Tanking is a continuous waterproof barrier across every surface that will get wet: the floor, the lower walls of the shower zone, and often the full height of the walls in an open wet room. The tiles, adhesive and grout sit on top of this barrier; they are not the waterproofing. Tile and grout are only water resistant, so water passes through grout joints in use, soaks the substrate behind, and that is where rot, blown plaster and structural damp begin.
This is not just trade folklore. The British Standard for tiling, BS 5385-1, was revised in July 2018 to recommend a proprietary tanking membrane system across substrates in domestic wet areas before tiling, not only in commercial work; you can read a manufacturer’s summary on the BAL adhesives technical pages. For new build homes registered with the NHBC, the Standards now call for an impermeable, EAD-certified tanking system behind tiled finishes in wet rooms and higher-flow showers, applying to homes whose foundations were begun on or after 1 January 2025 (see the NHBC technical guidance pages). Either way, tanking is now the expected standard, and a tiler who skips it is exposing both you and themselves.
The two tanking systems: paint-on membrane vs sheet membrane
There are two routes, and it helps to know the difference on a quote.
Paint-on (liquid applied) membrane
The most common system for domestic wet rooms. A ready-mixed or two-part liquid is brushed, rolled or trowelled on in coats, building a flexible rubbery skin. Products such as BAL Waterproof, Mapei Mapegum WPS or Mapelastic AquaDefence, and Sika Aquaseal all work this way. It moulds around awkward shapes, pipe penetrations and the drain with no joins. The catch is the drying time between coats, which is where rushed jobs go wrong.
Sheet (self-adhesive or bonded) membrane
A thin polyethylene or butyl sheet bonded to the floor and walls, either with a self-adhesive backing or set into adhesive. Schluter KERDI is a well known example. It is touch-dry the moment it is on, so you can tile sooner, and it gives a consistent thickness. The trade-off is the seams: every overlap and corner is a potential leak path and has to be lapped and sealed with matching banding and preformed corners. Sheet systems suit timber floors and tight programmes.
Neither is “better” in the abstract; a good tiler chooses on the substrate, layout and drying time available. What matters most is that every component comes from the same system: primer, membrane, tape and sealant from one manufacturer. Mixing a cheap primer from one brand with a membrane from another is a common reason a tank fails.
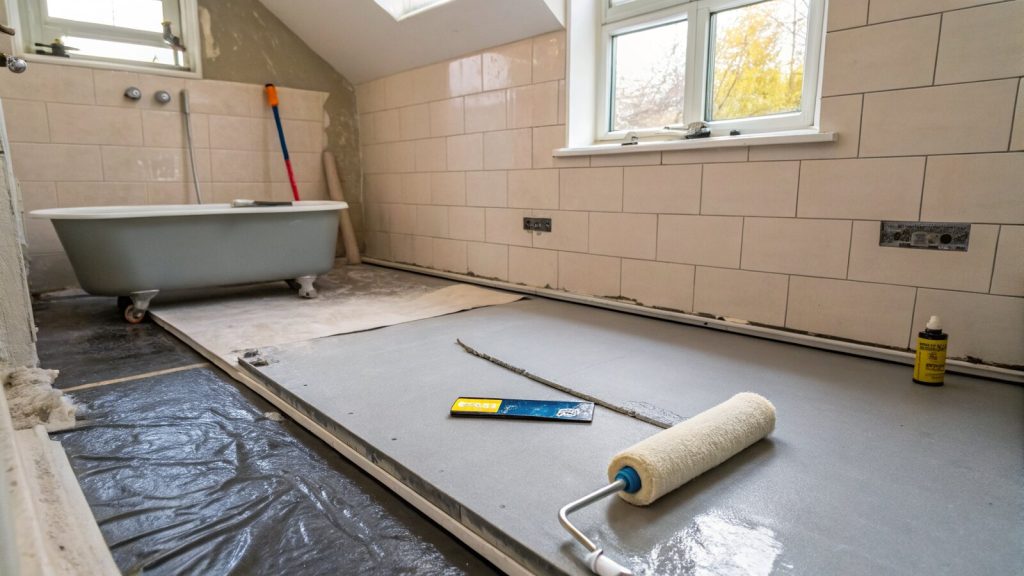
How a wet room is tanked properly, step by step
Roughly what you should see before any tile boxes are opened:
- Substrate preparation. The surface must be flat, clean, dry and sound. On a timber floor that means lifting boards, checking joists for rot, and laying a cement-based or foam tile backer board screwed down at close centres so there is no flex. Plywood moves with moisture and is not a reliable tiling surface in a wet zone, so backer board is the safer base; any movement cracks a membrane.
- Set the falls and the drain. The floor needs a gradient so water runs to the drain rather than pooling, commonly around a 1:40 to 1:80 slope depending on whether you run to a point gully or a linear channel. The drain flange is bedded flush with the finished floor.
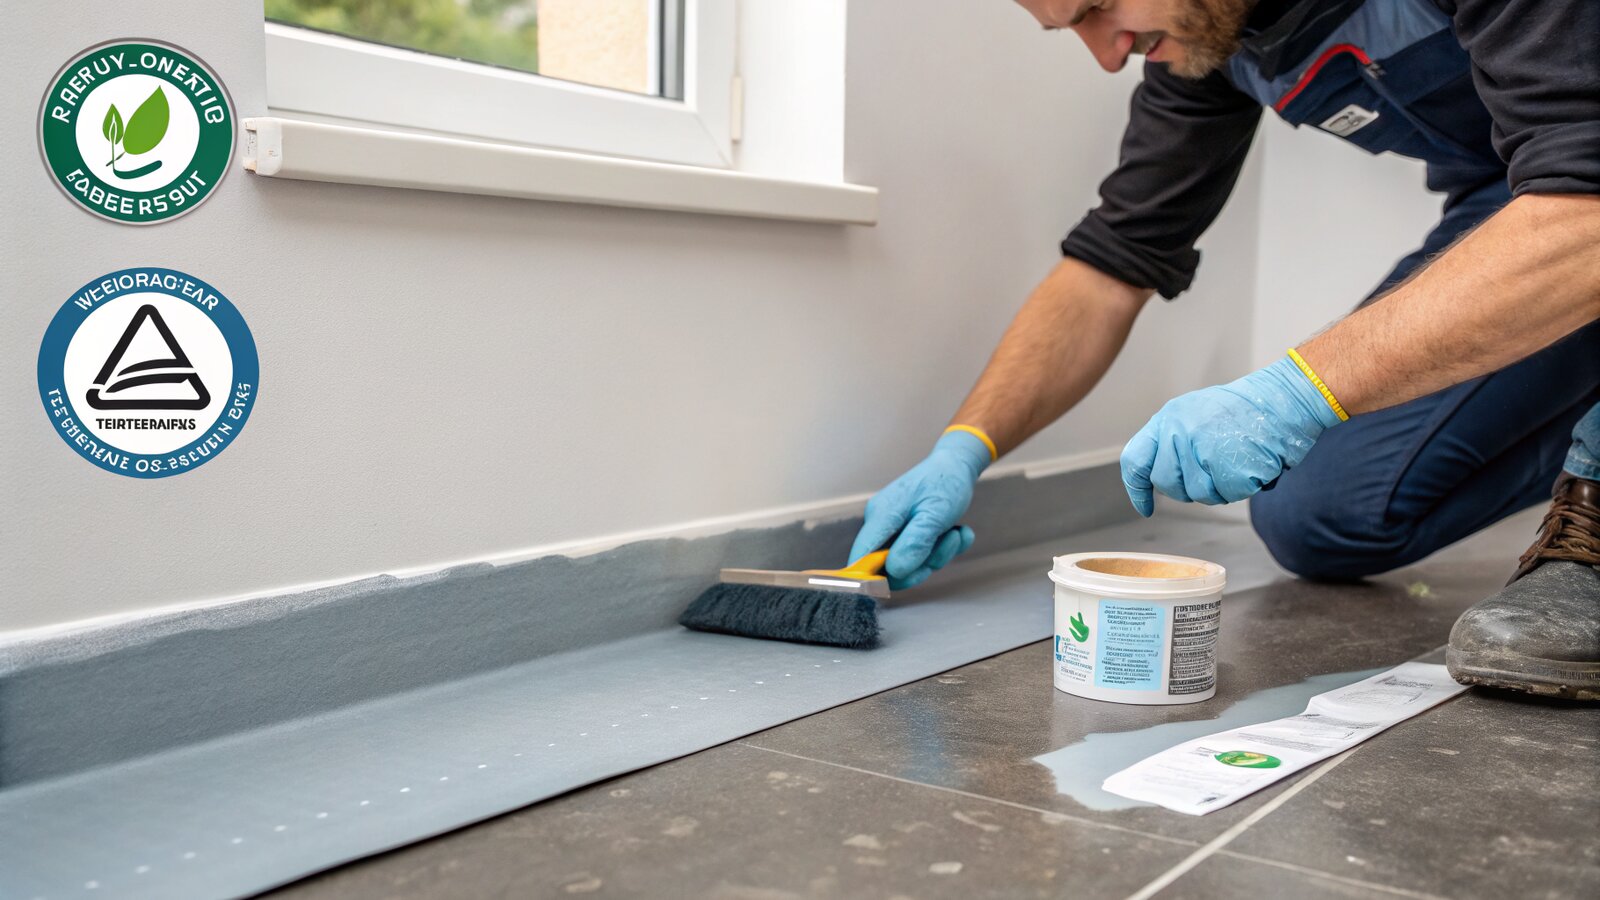
- Prime. Porous backgrounds, plasterboard and plaster especially, need a primer first so the membrane bonds, and it must be dry before taping.
- Tape the corners and joints. The step amateurs skip and professionals never do. Every internal corner, wall-to-floor junction, board joint and pipe penetration is reinforced with the system’s tape, bedded into a first pass of wet membrane, because these are the spots that move and crack. Pipe collars and a drain cuff seal the rest.
- Apply the membrane in coats. At least two coats, brushed or rolled in alternating directions so there are no pinholes or thin patches. You should not see the substrate colour through the finished film. One thick coat skins over and can crack as it cures, so two thin coats are safer.
- Let it cure, then test. Each coat needs its drying time, and the whole tank must cure before tiling; an overnight wait is common for floor membranes. Then flood test: plug the drain, run a shallow film of water across the floor, leave it and confirm the level has not dropped.
Only once the tank is proven watertight do the tiles go on, fixed with a suitable adhesive and finished with grout and, at the changes of plane, a flexible silicone. The tank waterproofs; the tile is the wearing surface.
The cure: why you cannot rush it
The most common corner cut on a DIY or cowboy wet room is tiling before the membrane has cured. It can feel dry on the surface and still be soft underneath. Lay heavy porcelain and a bed of adhesive on top of an under-cured tank and you trap moisture and risk the layer shearing later. In a cold, unheated Bromley bathroom in winter, curing takes longer than the tin suggests, not less. Patience is free; lifting a tiled floor to redo a failed tank is not.
What tanking costs as part of a Bromley wet room
Tanking is rarely a standalone line; it is folded into the waterproofing and prep stage, one of the more labour-heavy parts of the job. Prices vary widely by room size, substrate and access, so treat any figure as a ballpark. As a broad guide, professional tanking tends to land somewhere around £30 to £50 per square metre for materials and labour, and the waterproofing stage often adds a few hundred to roughly a thousand pounds to a project. A full wet room conversion in the south east commonly runs from several thousand pounds upward. The only number that means anything is a written quote against your room.
DIY tanking kits are cheap by comparison, often around a hundred pounds for a shower zone. That low cost is why people try it and why we get the call-backs. The skill is not in the product; it is in the detailing at corners, drains and pipe penetrations.
The leaks a botched DIY tank causes
When a wet room leaks, it is almost never the flat middle of the floor. It is the details:

- Untaped corners and joints. No reinforcing tape, so the corner flexes, the film cracks, and water tracks down behind the tile.
- One thin coat instead of two. Stretching the product leaves pinholes you cannot see, and water finds every one.
- Tiling before cure. The most expensive to put right because the tile has to come up.
- Mixed-brand components. A primer from one maker, membrane from another, tape from a third. They may not bond, so the system delaminates.
- Poor drain and pipe detailing. Gaps where the membrane meets the drain flange or a pipe collar. Water always finds the gap.
- No fall, or a fall toward a wall. Standing water sits on a grout joint instead of draining, and given time it gets in.
None of these show up on day one. The room looks perfect, and six months later a stain appears on the ceiling below. By then the fix means stripping tile, drying the structure, re-tanking and re-tiling: a far bigger bill than doing it once.
Should you DIY it or get a tiler in?
Over a simple solid concrete floor with a single shower zone, a competent DIYer with a quality matched tanking kit and careful corner taping can get a sound result. The risk rises fast with timber floors, multiple penetrations, an open-plan layout and the drain detailing, and because the failure is hidden until it is serious, getting it wrong dwarfs the saving from doing it yourself. If you do hire, ask which system the tiler uses, whether they tape the corners and joints, and whether they flood test; a good one will be glad you asked. You can see how we approach wet room and bathroom tiling on our Bromley Tilers homepage.
Frequently asked questions
Is tanking a wet room a legal requirement in the UK?
It is the expected standard rather than a single criminal-law offence. BS 5385-1 has recommended a proprietary tanking membrane before tiling in domestic wet areas since the July 2018 revision, and for NHBC-registered new builds the Standards require a certified tanking system in wet rooms and higher-flow showers. Skip it and you and the installer are liable for any water damage, and most reputable tilers will not do the job without it.
Can I just use waterproof tile adhesive and grout instead of tanking?
No. Standard adhesive and grout are water resistant, not waterproof, and water passes through grout joints into the substrate over time. For a wet room or a normal shower the British Standard treats adhesive and grout as no substitute for a proper tank.
How long does the tanking membrane need to dry before tiling?
It depends on the product. Some liquid membranes allow tiling within a few hours, others want six to twelve hours between coats and a full cure before any load goes on, so an overnight wait is common and sensible. Follow the manufacturer’s times, and allow longer in a cold room because curing slows in low temperatures.
Do the walls need tanking or just the floor?
The floor and the lower walls of the shower zone always need it. In an open wet room with no screen the splash zone is much larger, so the walls are usually tanked to full height or well beyond the shower area. The aim is a continuous waterproof envelope with no untreated gaps where water can land.
Related guides
- How to Tile a Bathroom Wall: A UK Step-by-Step Guide
- How Much Does Tiling Cost in the UK? A Realistic Price Guide
- How to Remove Old Wall Tiles Without Damaging the Wall
- Porcelain vs Ceramic Tiles: Which Is Right for Your Bathroom or Kitchen?
- Do You Need to Seal Natural Stone Tiles Before Grouting? A Tiler Explains
- How to Tile a Bathroom Floor (Including Around the Toilet)
- How to Tile a Shower: Walls, Niche and Waterproofing
- Construction Trade News: June 2026
- Bathroom Tiling Guide: How to Plan, Prep and Finish a Lasting Job
- Tile Backer Board vs Plasterboard for Bathrooms
- Best Tiles for Small Bathrooms (and How to Make a Space Look Bigger)
- Wall and Floor Tiles for a Wet Room: What Actually Works
- Tiling vs Wall Panels for a Bathroom: Which Is Better?
- Do You Tile the Floor or Walls First in a Bathroom?
- Tiling and Bathroom Trade News: Mid-June 2026
- Kitchen Tiling: Splashbacks, Walls and Floors Explained
- How to Tile a Kitchen Splashback: Step-by-Step Bromley Guide
- How to Tile Around Kitchen Sockets, Switches and Worktops
- Kitchen Splashback Tile Ideas: 12 Looks That Work
- Tiling and Bathroom Trade News: Late June 2026
- How to Lay Metro Tiles in a Herringbone Pattern
- Tiled vs Glass Splashback (and Acrylic): Which Is Best?
- How High Should a Kitchen Splashback Be Tiled? UK Heights Guide
- Tiling and Bathroom Trade News: Early July 2026
- Types of Tiles: The Complete UK Buyer’s Guide
- Porcelain vs Natural Stone Tiles: Which Should You Choose?
- Natural Stone Tiles Explained: Marble, Travertine, Slate and Limestone
- Tiling and Bathroom Trade News: Mid-July 2026
- Mosaic Tiles: Where to Use Them and How They’re Fixed
- Tile Slip Ratings Explained: R Ratings and PTV for UK Floors