


Learning how to cut tiles cleanly is the difference between a wall that looks professionally finished and one with chipped, ragged edges around every socket and pipe. Most tiling jobs are roughly 80 per cent full tiles and 20 per cent cuts, and it is those cuts, at the corners, along the floor and around obstacles, that decide how tidy the finished room looks. You do not need a workshop full of kit to get them right. With the correct cutter for the material and a little practice on offcuts, straight cuts, curves and holes are all within reach of a confident DIYer.
This guide covers the three tools that handle almost every cut you will meet: the manual snap cutter, the electric wet saw and tile nippers. It explains how to use each one, how to adapt your method for porcelain, ceramic and natural stone, and the safety points that matter, because cutting tiles releases fine dust you should not be breathing.
The main tools for cutting tiles
Three tools cover the vast majority of cuts, with a couple of extras for the fiddly jobs:
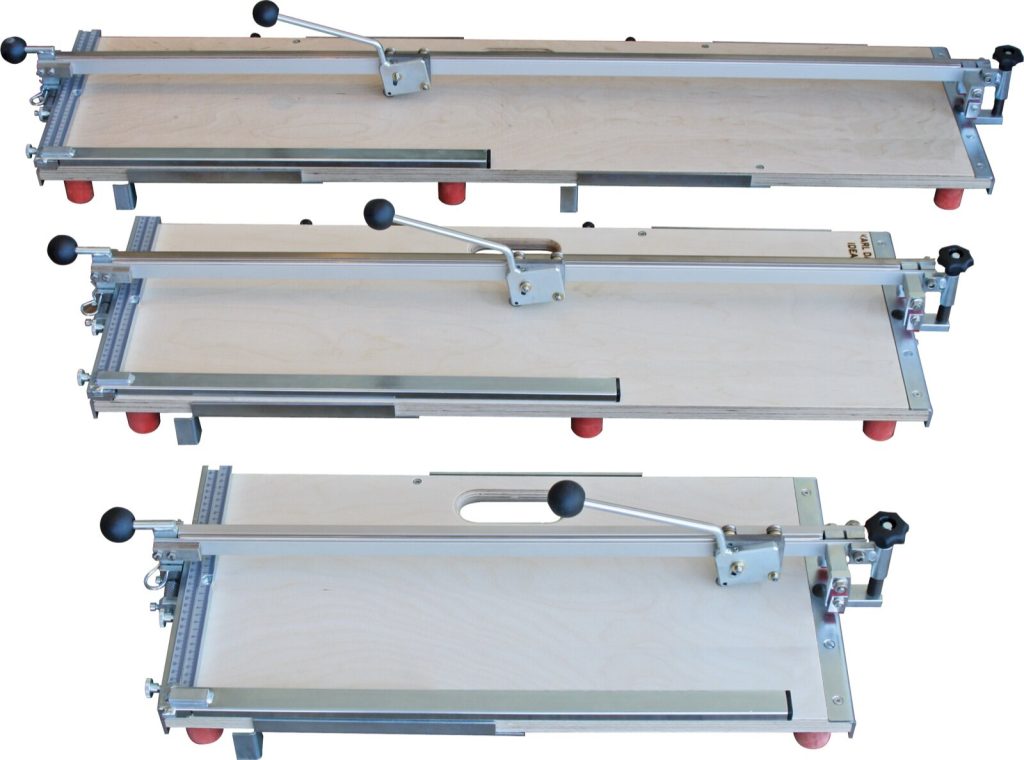
- Manual tile cutter (snap cutter): a bench tool that scores the glaze with a tungsten wheel, then snaps the tile along the line. Fast, quiet, dust-free and ideal for straight cuts in ceramic and most porcelain.
- Electric wet saw: a diamond blade cooled by water. It handles thick porcelain, natural stone and awkward L-shaped cuts that a snap cutter cannot manage, and the water keeps dust down.
- Tile nippers: hand pliers that nibble away small pieces for curves and rough shapes around pipes.
- Angle grinder with a diamond blade: for L-shaped notches, plunge cuts and cutting tiles already fixed to a wall.
- Diamond hole saws and tile drill bits: for neat round holes where pipes and taps pass through.
Whichever tool you use, measure twice, mark with a chinagraph pencil or fine marker, and always test your method on a spare tile first.
How to cut tiles with a manual cutter
The manual snap cutter is the workhorse for wall tiles and thinner floor tiles. The technique is simple but rewards a steady hand.
- Measure the gap, remembering to allow for the grout joint and any spacers, then mark the cut line on the tile.
- Place the tile flat against the front fence so the mark lines up with the scoring wheel.
- Lift the handle, sit the wheel at the near edge, then push (or pull, depending on the model) in one firm, continuous pass to score the glaze. Score once only; going over the line twice gives a rough break.
- Bring the snapping feet down over the scored line and press down firmly to snap the tile cleanly in two.
Smooth any sharp edge with a rubbing stone or fine sanding pad. Very thin slivers, under about 30mm, tend to crumble, so plan your layout to avoid them where you can.
How to cut tiles with an electric wet saw
When you hit thick porcelain, dense stone or a cut a snap cutter cannot make, the electric wet saw takes over. Fill the reservoir so the blade runs through water, which cools the diamond edge and suppresses dust.
- Set the fence to the width you need and check it is square to the blade.
- Feed the tile slowly and steadily into the blade, letting the saw do the work rather than forcing it. Pushing too hard chips the glaze and overheats the blade.
- Ease off near the end of the cut to stop the corner breaking away.
- For an L-shaped cut, saw in from each edge to the internal corner, then finish the corner with nippers or a grinder, since a straight blade cannot turn.
Keep the water topped up and clean; a dry blade wears out fast and throws dust. Wet saws are widely available to hire by the day if you only need one for a single room.
Cutting curves, holes and notches
Obstacles are where cuts go wrong. For a curved cut around a pipe or a moulding, mark the shape, score the outline with the scoring wheel where you can, then remove the waste in small bites with tile nippers, working towards the line rather than snapping at it. For a hole in the middle of a tile, use a diamond hole saw in a drill: start at a slight angle to bite the glaze, bring the drill upright, and keep the bit cool with water or a low speed to avoid cracking. For a socket cut-out, drill the corners and join them with an angle grinder fitted with a diamond blade.
Porcelain, ceramic and natural stone: what changes
The material dictates the tool. Ceramic is soft and forgiving, so a manual cutter handles almost every cut. Porcelain is denser and more brittle: thin wall porcelain snaps fine on a good manual cutter, but thick or large-format porcelain, and any polished porcelain, cuts far more reliably on a wet saw with a porcelain-rated blade. Natural stone such as marble, travertine and slate should always be cut wet, because a dry cut scorches the surface and stone chips unpredictably. Match the blade to the job, and let a fresh blade do the work.
Staying safe: dust and blades
Cutting tiles, especially porcelain and stone, produces respirable crystalline silica, a fine dust linked to serious lung disease over time. The Health and Safety Executive advises controlling it at source rather than relying on a mask alone: cut wet wherever possible, or use on-tool dust extraction, and work in a ventilated space. When any dust is present, wear a properly fitted FFP3 mask, along with safety glasses and gloves, since freshly cut edges are sharp. You can read the HSE guidance on silica dust in construction for the full picture. Electric cutters and grinders should always be run through an RCD.
When to leave it to a tiler
Straight cuts and the odd pipe hole are well within DIY reach. Large-format porcelain, full bathrooms with dozens of intricate cuts, natural stone and mitred external corners are where a professional finish and the right cutting kit pay for themselves. If a job involves a lot of expensive tiles or tricky angles, a day with an experienced tiler often costs less than a box of cracked porcelain. If you are in south east London and would rather hand it over, Bromley Tilers can take on the whole job.
Frequently asked questions
Can you cut tiles without a tile cutter?
For a one-off cut you can score the glaze with a handheld tile scriber and a straight edge, then snap the tile over a dowel or matchstick placed under the line. It works for straight cuts in thin ceramic, but it is far less reliable than a proper snap cutter and no use for porcelain or stone.
How do you cut porcelain tiles without chipping them?
Use a wet saw with a sharp, porcelain-rated diamond blade, feed the tile slowly, and slow right down as the blade exits the far edge. Scoring the glaze line first and cutting face up also helps keep the visible edge clean.
What is the best tool for cutting tiles for beginners?
A good-quality manual snap cutter. It is affordable, needs no power, makes no dust and handles most wall tiles and thinner floor tiles. Add a wet saw only when you are working with thick porcelain or stone.
Do you cut tiles face up or face down?
Manual snap cutters and wet saws both cut face up, scoring or sawing through the glazed surface so the clean break is on the visible side. Only some specialist scoring tools work face down.
How do you smooth a cut tile edge?
Run a rubbing stone, a diamond hand pad or fine wet-and-dry paper along the cut edge. Most cut edges sit against a wall or behind a trim anyway, so only exposed edges need much attention.
Related guides
- How to Tile a Bathroom Wall: A UK Step-by-Step Guide
- How Much Does Tiling Cost in the UK? A Realistic Price Guide
- How to Remove Old Wall Tiles Without Damaging the Wall
- Porcelain vs Ceramic Tiles: Which Is Right for Your Bathroom or Kitchen?
- How to Tank and Waterproof a Wet Room Before Tiling: A Bromley Homeowner’s Guide
- Do You Need to Seal Natural Stone Tiles Before Grouting? A Tiler Explains
- How to Tile a Bathroom Floor (Including Around the Toilet)
- How to Tile a Shower: Walls, Niche and Waterproofing
- Bathroom Tiling Guide: How to Plan, Prep and Finish a Lasting Job
- Tile Backer Board vs Plasterboard for Bathrooms
- Best Tiles for Small Bathrooms (and How to Make a Space Look Bigger)
- Wall and Floor Tiles for a Wet Room: What Actually Works
- Tiling vs Wall Panels for a Bathroom: Which Is Better?
- Do You Tile the Floor or Walls First in a Bathroom?
- Kitchen Tiling: Splashbacks, Walls and Floors Explained
- How to Tile a Kitchen Splashback: Step-by-Step Bromley Guide
- How to Tile Around Kitchen Sockets, Switches and Worktops
- Kitchen Splashback Tile Ideas: 12 Looks That Work
- How to Lay Metro Tiles in a Herringbone Pattern
- Tiled vs Glass Splashback (and Acrylic): Which Is Best?
- How High Should a Kitchen Splashback Be Tiled? UK Heights Guide
- Types of Tiles: The Complete UK Buyer’s Guide
- Porcelain vs Natural Stone Tiles: Which Should You Choose?
- Natural Stone Tiles Explained: Marble, Travertine, Slate and Limestone
- Mosaic Tiles: Where to Use Them and How They’re Fixed
- Tile Slip Ratings Explained: R Ratings and PTV for UK Floors
- Matt vs Gloss Tiles: Which Finish Is Right for Your Room?
- Cost to Tile a Bathroom in the UK: 2026 Price Breakdown
- Polystyrene Ceiling Tiles: Are They Any Good?
- Cost to Tile a Kitchen in 2026: Floor and Splashback Prices
- Tiling Cost Per Square Metre 2026: Labour and All-In Prices
- Tiler Day Rate UK: What Tilers Charge Per Day in 2026
- Cost to Regrout a Bathroom in 2026: UK Prices Explained
- Floor Tile Prices UK 2026: What You Will Pay Per Square Metre
- Is It Cheaper to Tile or Use Wall Panels? A UK Cost Comparison
- How to Tile: A Complete Beginner’s Guide (UK)
- How to Cut Holes in Tiles for Pipes and Taps
- How to Grout Tiles (and Get Clean, Even Lines)
- Cork Flooring: Pros, Cons and Where It Works in UK Homes
- How to Mix and Apply Tile Adhesive Correctly
- How to Set Out Tiles for a Perfect Layout
- How to Seal Grout and Tiles in a Bathroom (UK Guide)
- Can You Tile Over Tiles? When It Works and When It Doesn’t
- Tiling Tools List: What You Need for a Professional Finish
- How Much Tile Adhesive Do I Need? Coverage Per Square Metre
- Tile Problems: 9 Common Faults and How to Fix Each
- How to Fix Loose Tiles Without Removing Them
- Cracked Grout Repair: Why It Happens and How to Fix It
- How to Replace a Broken Tile Without Redoing the Wall
- Water Leaking Through Shower Tiles: 6 Causes and Fixes
- Remove Mouldy Silicone Sealant: A 24-Hour Reseal Job
- How to Clean Grout: What Works, and What Etches Stone
- Why Are My Floor Tiles Lifting? The 40m² Bay Rule
- How to Lay Porcelain Paving: 1:80 Fall, 150mm Below DPC
- Tile Patterns: Why Big Tiles Need a One-Third Offset
- Grout Colour Ideas: How to Get the Shade You Chose
- Can You Paint Tiles? Yes on Walls, No in the Shower
- Decoupling Membrane for Tiles: When You Actually Need One
- Can You Tile Over a Wooden Floor? What Changed in 2024
- Tiling Cost 2026: £25 to £95 per m² Labour, UK Rates
- Tile Ideas: 7 Looks and the One Rule Each Needs
- Metro Tiles: Sizes, Bevels and the 1/3 Offset Rule
- Tile Feature Wall: The Weight Limit That Decides Yours
- Tiling Over Underfloor Heating: 14 Days Before Heat On
- How to Tile a Hallway Floor: Set Out From the Door
- Wood Effect Tiles and Marble Effect: 5 Specs to Check
- Tile Levelling Systems: The 3mm Rule That Decides It
- Floor Levelling Compound: How Deep and How Long to Dry
- How to Find a Good Tiler: 9 Checks Before You Book
- Tiling Quote: The 10 Lines a Proper One Must Show
- Tile Trim: Sizes, Profiles and the One-Size-Up Rule
- Tile Spacers: 2mm or 3mm, and When to Pull Them Out
- Tiling the Fireplace: 125mm Hearths, Adhesive and Tiles
- Porcelain vs Stone Paving: Grip, Sealing and Upkeep
- Tiling a Large Floor: Movement Joints Every 10 Metres
- DIY Tiling vs Professional: 6 Jobs to Never Do Yourself
- Terracotta Tiles: Seal Before Grouting, Wait 7 Days
- Tile Drill Bits: Which Bit Won’t Crack Porcelain
- Tiling Corners With Trim: Which Profile, and When to Mitre
- Travertine Tiles: Filled or Unfilled, and How to Seal Them
- Slate Tiles: Calibrated or Riven, and How to Lay Them
- Zellige Tiles: Order 15% Extra and Fix Them Edge to Edge
- Terrazzo Tiles: Real 20mm vs Porcelain, Seal Before Grouting
- Split Face Tiles: Will Your Wall Take 27kg per m²?