


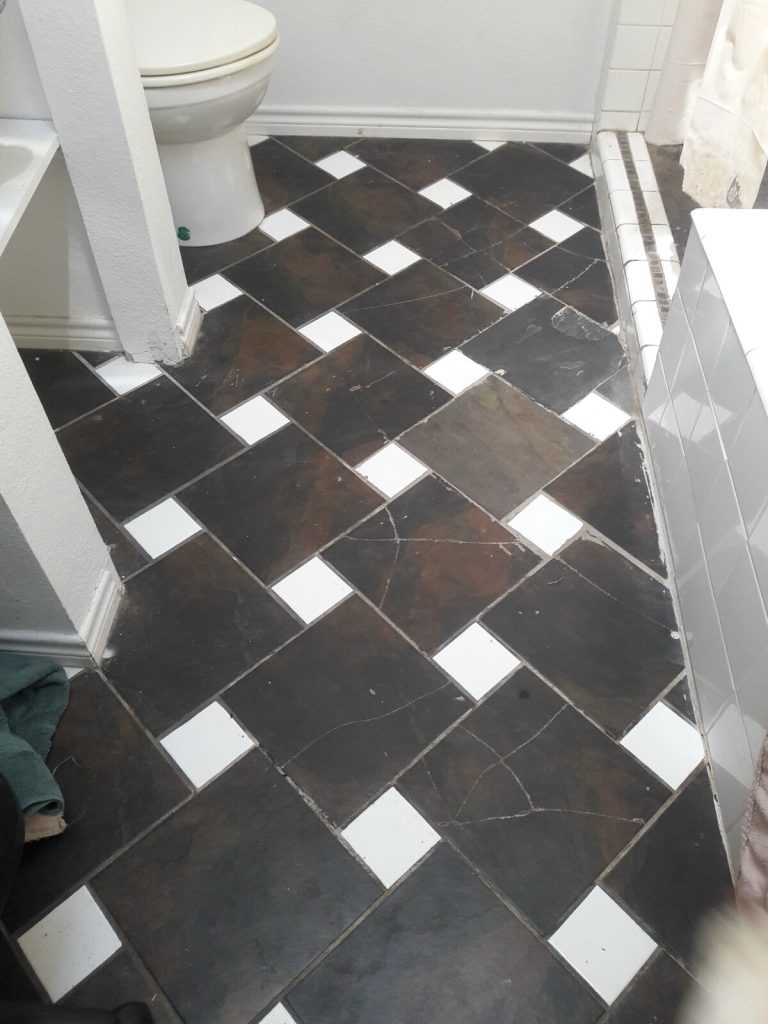
Knowing how to replace a broken tile is the difference between a two hour job on a Saturday and a quote for a whole new bathroom. One cracked tile does not condemn the wall around it. As long as the tiles either side are firmly stuck down and the surface underneath is sound, the damaged tile comes out on its own and a new one goes straight back in.
The part that goes wrong is almost never the sticking down. It is the getting out. Rushing the removal is what turns one broken tile into three, and it is the single reason people end up retiling a wall they never intended to touch. Below is the method a working tiler uses, in the order they use it.
First, work out whether you can match the tile
Do this before you pick up a chisel. There is no point opening a hole in the wall if nothing on sale will fill it. Start with the loft, the garage and under the stairs: plenty of bathrooms were tiled with a spare box that never got thrown out.
If there are none, look at the back of a tile. Manufacturers usually print or mould the brand, range and size onto the reverse, and a merchant can work backwards from that. Record the actual dimensions rather than the nominal ones: a tile sold as 300 x 600 mm is often 298 x 598 mm, and the two will not sit in the same joint pattern.
Be realistic about colour. Tiles are fired in batches and shade varies between them, so a tile bought today from a long-running range will often be a shade off the ones on your wall. Under a single ceiling light you may never notice. On a large pale wall in daylight you will.
If you cannot match it, lift a tile from somewhere nobody looks: behind the cistern, in the airing cupboard, under a bath panel. Put that one into the visible hole and the nearest-match new tile into the hidden spot. The mismatch still exists, it just lives where it does not matter.
What you need before you start
- Grout rake, or an oscillating multi-tool with a grout removal blade
- A sharp bolster or cold chisel and a club hammer
- Safety glasses and gloves, and an FFP3 mask
- Masking tape, a dust sheet and a vacuum you do not mind filling with fine dust
- Adhesive suited to the location, plus a small notched trowel or filling knife
- Tile spacers matched to the existing joint width
- Grout, a grout float and a sponge
- Silicone sealant if the tile sits against a bath, tray or worktop
An oscillating tool is the one item worth borrowing or hiring. Raking grout by hand on a hard modern joint is slow, and slow work is where people get impatient and start levering.
How to replace a broken tile, step by step
1. Mask the neighbours
Run masking tape along the edge of every tile touching the broken one. It will not stop a hammer, but it stops the glaze getting scuffed by a slipping chisel.
2. Rake the grout out to full depth
All four sides, right down to the adhesive bed. This is the step people cut short and the one that decides whether the job goes well. Grout is not soft filler: it locks the tile to its neighbours, so leaving any in the joint means chiselling four tiles at once. Keep going until the blade drops into empty space rather than biting.
3. Break the tile from the middle outwards
If the tile is still largely whole, drill a handful of holes across its centre with a tile bit first, or score a deep X with a tile scribe. That gives the chisel somewhere to start. Work outwards from the middle as the pieces come free. Never put the chisel under the edge and lever against the tile next to it: that is how a one tile job becomes a three tile job.
4. Clean the bed back flat
Every ridge of old adhesive has to come off. A lump left in the corner holds the new tile proud, and a tile bedded on a high spot cracks again within a year. Scrape back to the substrate, vacuum, then dry-fit the tile and run a straight edge across it and its neighbours. It should sit flush without pressure.
5. Look at what is underneath
This is a free inspection, so use it. If the board behind a shower tile is dark, soft or crumbling, deal with that first: tiling over failing board buys you a few months. Same on a floor. If the screed is cracked in line with the tile you removed, the crack is the cause and the tile was the symptom.
6. Bed the new tile
Comb adhesive onto the bed with a small notched trowel, then skim a thin layer onto the back of the tile itself. That second step is back buttering, and on a single replacement it is the only reliable way to fill the void. BS 5385, the British Standard for wall and floor tiling, expects full adhesive contact behind tiles in wet areas, and you cannot get that in a one tile hole by trowelling alone.
Push the tile in with a slight twist to collapse the ridges, then set spacers on all four sides so it cannot drift. Wipe adhesive out of the joints straight away, because cured adhesive in a grout joint is another small demolition job.
7. Leave it completely alone
Give it a full 24 hours, or whatever the bag states, before you grout. Do not use the shower. Adhesive that is still green will let the tile move under water pressure and the new grout will crack within days.
8. Grout, then seal the corners
Mix a small amount and test the colour on card first: wet grout is darker than cured grout, so the shade you see while working is not the shade you keep. Work it in with a float at an angle, fill the joint completely, then sponge off before it sets. Where the tile meets a bath, tray, worktop or internal corner use silicone, not grout, because those junctions move. The full method is in our guide to grouting tiles.
Dust is the part most guides skip
Chiselling and cutting ceramic, porcelain and stone releases respirable crystalline silica. It is invisible, it stays airborne long after the noise stops, and inhaling it over time causes silicosis, which is incurable. The UK workplace exposure limit is 0.1 mg per cubic metre averaged over eight hours, and dry cutting porcelain in a small bathroom clears that easily.
For a one tile job: wear a properly fitted FFP3 mask rather than a paper nuisance mask; cut wet or with on-tool extraction; shut the door and open the window; and vacuum rather than sweep, because sweeping puts the lot back in the air. The HSE guidance on construction dust sets out the controls in full.
Which adhesive and grout to buy
Adhesives are classified under BS EN 12004: C1 is standard, C2 the improved grade, with S1 or S2 added where the adhesive deforms enough to absorb substrate movement. Grouts sit under BS EN 13888, where CG2 is the improved grade. The Tile Association publishes the technical guidance the trade works to.
- Small ceramic tile on a dry plastered wall: a ready mixed tub adhesive is acceptable and much easier to handle for one tile.
- Anything in a shower, wet room or splash zone: cement based powder adhesive, C2 grade, with a CG2 grout. Ready mixed is not designed to stay put under constant wetting.
- Floor tiles, porcelain and natural stone: cement based powder only, whatever the room, and a rapid set white adhesive under pale stone, because grey adhesive and slow moisture release both stain it.
When a cracked tile is a symptom rather than an accident
A single tile with a crack radiating from one point, usually with a chip at the centre, is an impact. Something got dropped. Replace it and forget about it. Treat these differently:
- A crack running in a straight line through several tiles. That is the substrate moving, not the tiles failing. Usually a timber floor that flexes underfoot, a missing movement joint, or a new crack in a screed.
- A tile that cracks again in the same place after replacement. Same answer. Replacing it a third time is money spent on the wrong thing.
- Cracked floor tiles over underfloor heating. Stop. There are pipes or heating cable in the screed, and a chisel finds them easily.
- Loose or hollow-sounding tiles nearby. Tap around the area with a knuckle. A hollow note means the adhesive has let go, which is a different repair: see how to fix loose tiles.
When to hand it to a tiler
Replacing one ceramic tile on a dry wall is a reasonable DIY job. Worth paying for: large format porcelain, natural stone, anything over underfloor heating, and anything in a wet room, where the tanking membrane sits directly under the adhesive and a chisel through it means a leak you will not see until the ceiling below stains.
For advice on tiling, repairs and wet areas across Bromley and south east London, see the rest of Bromley Tilers.
Frequently asked questions
Can you replace one tile without removing the others?
Yes, and it is the normal way to do it. The technique rests on removing the grout to full depth first, so the damaged tile is no longer bonded to its neighbours, then breaking it out from the centre rather than levering from an edge.
How long does it take to replace a broken tile?
One to two hours of actual work for a single wall tile, split across two visits. Removal, cleaning the bed and setting the new tile takes the first session, then you wait a full 24 hours for the adhesive to cure before grouting, which is another twenty minutes.
Can you fill a cracked tile instead of replacing it?
Epoxy repair fillers and touch-up kits can make a hairline crack much less obvious on a floor tile that is otherwise firmly bedded. They are a cosmetic fix, not a waterproof one. In a shower, or on any tile that has broken through, water will find the crack and get behind the tile, so replacement is the honest answer.
Why do my tiles keep cracking in the same place?
Because something underneath is moving: usually a flexing timber floor, a crack in the screed, or a missing movement joint. Replacing the tile treats the damage and leaves the cause intact, which is why the same tile fails again. The floor build-up needs stiffening or decoupling first. Cracked grout in the same run is usually the first warning.
Do I need to seal a new tile before grouting?
Only if it is natural stone or unglazed. Porous stone such as marble, travertine and limestone absorbs pigment from the grout and stains permanently, so it gets an impregnating sealer before grouting and usually a second coat after. Glazed ceramic and porcelain need no sealing.
Related guides
- How to Tile a Bathroom Wall: A UK Step-by-Step Guide
- How Much Does Tiling Cost in the UK? A Realistic Price Guide
- How to Remove Old Wall Tiles Without Damaging the Wall
- Porcelain vs Ceramic Tiles: Which Is Right for Your Bathroom or Kitchen?
- How to Tank and Waterproof a Wet Room Before Tiling: A Bromley Homeowner’s Guide
- Do You Need to Seal Natural Stone Tiles Before Grouting? A Tiler Explains
- How to Tile a Bathroom Floor (Including Around the Toilet)
- How to Tile a Shower: Walls, Niche and Waterproofing
- Bathroom Tiling Guide: How to Plan, Prep and Finish a Lasting Job
- Tile Backer Board vs Plasterboard for Bathrooms
- Best Tiles for Small Bathrooms (and How to Make a Space Look Bigger)
- Wall and Floor Tiles for a Wet Room: What Actually Works
- Tiling vs Wall Panels for a Bathroom: Which Is Better?
- Do You Tile the Floor or Walls First in a Bathroom?
- Kitchen Tiling: Splashbacks, Walls and Floors Explained
- How to Tile a Kitchen Splashback: Step-by-Step Bromley Guide
- How to Tile Around Kitchen Sockets, Switches and Worktops
- Kitchen Splashback Tile Ideas: 12 Looks That Work
- How to Lay Metro Tiles in a Herringbone Pattern
- Tiled vs Glass Splashback (and Acrylic): Which Is Best?
- How High Should a Kitchen Splashback Be Tiled? UK Heights Guide
- Types of Tiles: The Complete UK Buyer’s Guide
- Porcelain vs Natural Stone Tiles: Which Should You Choose?
- Natural Stone Tiles Explained: Marble, Travertine, Slate and Limestone
- Mosaic Tiles: Where to Use Them and How They’re Fixed
- Tile Slip Ratings Explained: R Ratings and PTV for UK Floors
- Matt vs Gloss Tiles: Which Finish Is Right for Your Room?
- Cost to Tile a Bathroom in the UK: 2026 Price Breakdown
- Polystyrene Ceiling Tiles: Are They Any Good?
- Cost to Tile a Kitchen in 2026: Floor and Splashback Prices
- Tiling Cost Per Square Metre 2026: Labour and All-In Prices
- Tiler Day Rate UK: What Tilers Charge Per Day in 2026
- Cost to Regrout a Bathroom in 2026: UK Prices Explained
- Floor Tile Prices UK 2026: What You Will Pay Per Square Metre
- Is It Cheaper to Tile or Use Wall Panels? A UK Cost Comparison
- How to Tile: A Complete Beginner’s Guide (UK)
- How to Cut Tiles: Manual Cutter, Wet Saw and Nippers
- How to Cut Holes in Tiles for Pipes and Taps
- How to Grout Tiles (and Get Clean, Even Lines)
- Cork Flooring: Pros, Cons and Where It Works in UK Homes
- How to Mix and Apply Tile Adhesive Correctly
- How to Set Out Tiles for a Perfect Layout
- How to Seal Grout and Tiles in a Bathroom (UK Guide)
- Can You Tile Over Tiles? When It Works and When It Doesn’t
- Tiling Tools List: What You Need for a Professional Finish
- How Much Tile Adhesive Do I Need? Coverage Per Square Metre
- Tile Problems: 9 Common Faults and How to Fix Each
- How to Fix Loose Tiles Without Removing Them
- Cracked Grout Repair: Why It Happens and How to Fix It
- Water Leaking Through Shower Tiles: 6 Causes and Fixes
- Remove Mouldy Silicone Sealant: A 24-Hour Reseal Job
- How to Clean Grout: What Works, and What Etches Stone
- Why Are My Floor Tiles Lifting? The 40m² Bay Rule
- How to Lay Porcelain Paving: 1:80 Fall, 150mm Below DPC
- Tile Patterns: Why Big Tiles Need a One-Third Offset
- Grout Colour Ideas: How to Get the Shade You Chose
- Can You Paint Tiles? Yes on Walls, No in the Shower
- Decoupling Membrane for Tiles: When You Actually Need One
- Can You Tile Over a Wooden Floor? What Changed in 2024
- Tiling Cost 2026: £25 to £95 per m² Labour, UK Rates
- Tile Ideas: 7 Looks and the One Rule Each Needs
- Metro Tiles: Sizes, Bevels and the 1/3 Offset Rule
- Tile Feature Wall: The Weight Limit That Decides Yours
- Tiling Over Underfloor Heating: 14 Days Before Heat On
- How to Tile a Hallway Floor: Set Out From the Door
- Wood Effect Tiles and Marble Effect: 5 Specs to Check
- Tile Levelling Systems: The 3mm Rule That Decides It
- Floor Levelling Compound: How Deep and How Long to Dry
- How to Find a Good Tiler: 9 Checks Before You Book
- Tiling Quote: The 10 Lines a Proper One Must Show
- Tile Trim: Sizes, Profiles and the One-Size-Up Rule
- Tile Spacers: 2mm or 3mm, and When to Pull Them Out
- Tiling the Fireplace: 125mm Hearths, Adhesive and Tiles
- Porcelain vs Stone Paving: Grip, Sealing and Upkeep
- Tiling a Large Floor: Movement Joints Every 10 Metres
- DIY Tiling vs Professional: 6 Jobs to Never Do Yourself
- Terracotta Tiles: Seal Before Grouting, Wait 7 Days
- Tile Drill Bits: Which Bit Won’t Crack Porcelain
- Tiling Corners With Trim: Which Profile, and When to Mitre
- Travertine Tiles: Filled or Unfilled, and How to Seal Them
- Slate Tiles: Calibrated or Riven, and How to Lay Them
- Zellige Tiles: Order 15% Extra and Fix Them Edge to Edge
- Terrazzo Tiles: Real 20mm vs Porcelain, Seal Before Grouting
- Split Face Tiles: Will Your Wall Take 27kg per m²?
- Tile Sealer: Which Tiles Need It and Which Type to Buy
- How to Remove Grout Haze: Which Cleaner for Which Grout
- Efflorescence on Tiles: Why It Comes Back and How to Stop It
- Tile Primer: Which Surfaces Need It and How Much to Dilute
- Epoxy Grout: Where It’s Worth It and How to Apply It
- How to Tile Stairs: Keep Every Riser the Same Height
- Shower Niche: Sizes, Height and Which Wall Can Take One
- How Many Tiles Do I Need? Add 10% to 20% by Layout
- How to Tile a Window Sill: Sill Last, Silicone at the Frame
- How to Tile Around a Toilet: Lift the Pan or Cut Round It