


A tile to carpet transition has one job: to join two floors of different heights without a trip edge, a frayed carpet edge or a chipped tile. Get it right and nobody notices it. Get it wrong and you have a brass bar that rocks, a carpet that pulls away from the gripper, or a tile edge that cracks the first time a suitcase wheel hits it. This page explains how to measure the height gap, which kind of strip suits which gap, where exactly the strip should sit in the doorway, and the order of work that saves you from retro-fitting a bodge after the carpet fitter has gone.
The same rules apply when tiles meet laminate, engineered wood or vinyl, so those are covered too.
Why tile and carpet rarely finish at the same height
A tiled floor is built up in layers: the tile itself, the adhesive bed under it, and sometimes a backer board, an uncoupling mat or a levelling compound under that. A carpeted floor is the carpet pile plus its underlay, held down at the edges by gripper. The two build-ups almost never match, and the difference changes from house to house because tiles, underlays and carpets all come in different thicknesses.
That is why you cannot buy the right strip from a photograph. You need two numbers measured on site:
- The finished tile height: from the subfloor to the top of the tile, including adhesive and anything under it. If the tiles are not down yet, ask your tiler what build-up they are planning. On a timber floor with a backer board this can be noticeably thicker than tile on screed.
- The finished carpet height: compress a sample of the actual carpet on its actual underlay with your thumb, and measure what is left. A thick underlay that looks generous in the shop can leave the carpet standing proud of the tile.
The gap between those two numbers, and which side is higher, decides the strip. Most of the time the tile is higher, because the carpet compresses and the tile does not.
Which tile to carpet transition strip for which gap
There are four broad families of strip. Brand names vary, but the shapes are the same across suppliers.
Ramp profiles fixed under the tile
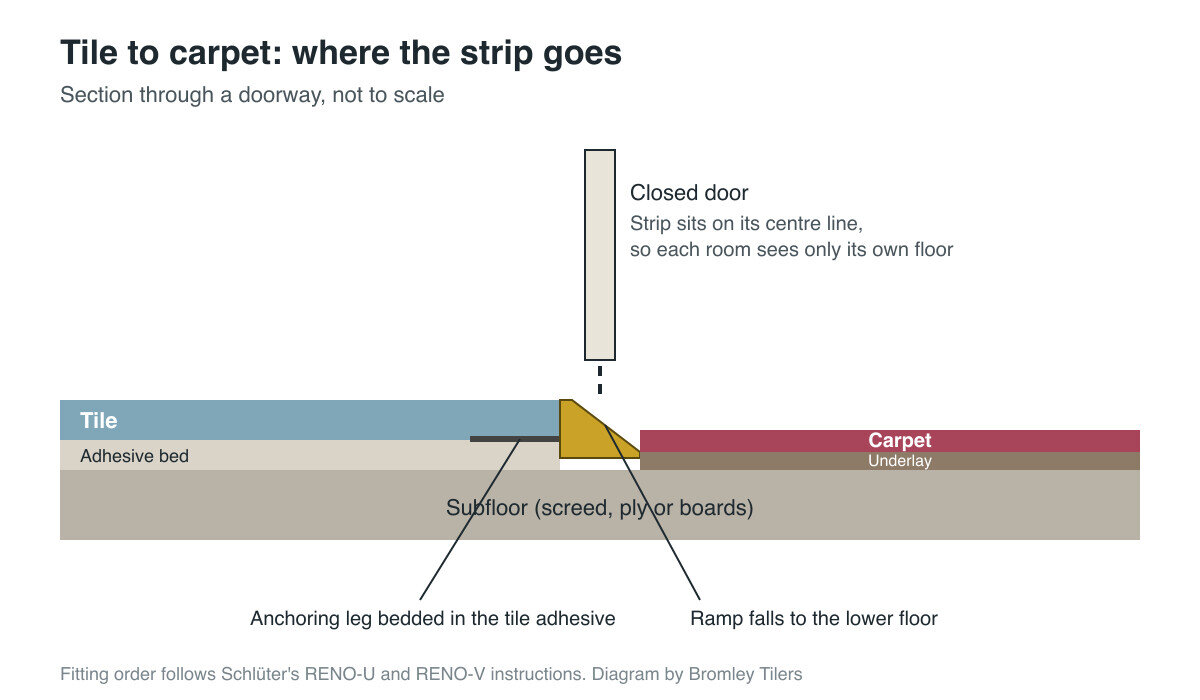
These have a perforated anchoring leg that is bedded in the tile adhesive, with a sloping face that falls from the tile down to the lower floor. Schlüter’s RENO-U is a well-known example: the manufacturer describes it as a stepless transition from tile to lower coverings such as carpet, linoleum or PVC, with a visible face angled at roughly 17 to 25 degrees that ends in a 4 mm stop edge. You choose the profile height to match the tile thickness, not the carpet.
This is the neatest finish when the tile is clearly higher than the carpet and you know it before tiling. It cannot be added afterwards without lifting the last row of tiles.
Adjustable-arm profiles
Where the carpet height is not known yet, or varies across a wide opening, an adjustable profile helps. Schlüter’s RENO-V has an arm on a ball-and-socket joint that rests on the adjoining covering and follows its height. Like the ramp type, its anchoring leg goes into the tile adhesive, and the maker says the profile should sit no higher than the tiled surface. The arm can be secured with silicone, and in heavy-duty areas it is back-filled with mortar.
Carpet edge strips (Z bars and gripper bars)
A Z bar is a metal strip that grips the carpet edge and screws to the subfloor, butting up to the tile. It is what carpet fitters carry in the van. It works well where the tile edge is already finished and the heights are close. Where the tile sits well above the carpet, a Z bar leaves the tile edge exposed as a step, which is exactly the trip and chip point you were trying to avoid.
Screw-down or stick-down cover strips
Flat or ramped bars that screw or glue over the joint after both floors are down. They are the retrofit option. They cover a poor joint, but they sit on top of the floor, so they add their own height, and on tiles the screw fixings need holes drilled through the tile or a fixing channel in the gap.
Where the strip should sit in the doorway
The convention, and the one that looks right, is to put the joint directly under the closed door, on the centre line of the door leaf. Stand in either room with the door shut and you see only that room’s floor. Put the joint anywhere else and you get a sliver of tile showing in the bedroom, or a strip of carpet in the hallway.
Two practical points follow from that:
- Check the door clearance. If the strip or the tile is higher than the old floor, the door may now catch. Trim the door before the floor goes down, not after, when you will be sawing it with the new floor underneath.
- Mark the line before tiling. Close the door, mark its centre on the subfloor, and give that line to your tiler. The cut row of tiles should finish there, with the profile’s anchoring leg set just behind it.
The diagram at the top of this section shows the arrangement for a ramp profile.
Fitting order: tile first, carpet last
The order matters more than the product. A good sequence for a doorway where tile meets carpet:
- Measure both build-ups and decide the profile before any tile is cut.
- Tile up to the door line, bedding the profile’s anchoring leg in adhesive as you lay the last row. Schlüter’s instructions for RENO-U say to fill the hollow underside of the profile with adhesive, press the perforated leg into a trowelled bed, trowel more adhesive over it, then press the tiles in so the profile sits flush with or about 1 mm below the tile surface. The lateral spacer leaves a joint of about 1.5 mm to grout.
- Grout the joint between tile and profile completely so there is no hollow edge to crack.
- Let the tiles cure before anyone kneels on the edge.
- The carpet fitter fits gripper on the carpet side, a few millimetres back from the profile, stretches the carpet and tucks it against the strip.
If the carpet is going down first and the tile later, tell the carpet fitter where the tile will finish. A carpet cut long and folded under at the doorway is easier to trim later than one that falls short.
Tile to laminate, wood and vinyl
The same height logic applies, with one extra rule: floating floors move. Laminate and engineered boards laid on underlay expand and contract with humidity and need an expansion gap at every edge, including where they meet tile. That means the transition must cover a gap without being fixed to the floating floor itself.
- Tile and laminate at the same height: a T-section profile sits in the gap and covers both edges. Schlüter makes T-shaped profiles in its RENO range for same-height hard floors, used mainly in renovation work.
- Tile higher than laminate: a ramp profile anchored under the tile, with the laminate stopping short of it to leave its gap.
- Vinyl and LVT: these are thin, so the step from a tile build-up is often larger than with carpet. A ramp with a low stop edge suits, and RENO-U’s 4 mm stop edge is designed for coverings like linoleum and PVC.
Never fix a floating floor down with the transition strip’s screws. If the boards cannot move, they will lift or gap somewhere else in the room.
Choosing a finish
Most transition profiles come in aluminium, anodised aluminium, stainless steel and brass. Schlüter’s RENO-U, for example, is listed in stainless steel, brushed stainless, aluminium, anodised aluminium and brass. Some practical guidance:
- Stainless steel is the hardest-wearing choice for front doors and busy hallways.
- Brass suits period hallways with encaustic or geometric tiles, but it tarnishes; Schlüter notes brass and aluminium can oxidise and gives care guidance for each.
- Plain aluminium reacts with alkaline cement residue, so wipe adhesive and grout off it straight away.
- Anodised finishes can scratch, so protect them while the room is still a building site.
Match the strip to other metalwork in the room, such as door furniture or the tile trim on wall edges, rather than picking it in isolation.
If you are tiling a hallway that runs into several carpeted rooms, the set-out matters as much as the strips. Our guide to tiling a hallway floor covers where to start so the cut tiles land at the doorways rather than in the middle of the floor. For help with a job in Bromley or south-east London, Bromley Tilers can plan the transitions as part of the tiling quote.
Frequently asked questions
What is the best tile to carpet transition strip?
Where the tile is higher than the carpet, a ramp profile with its anchoring leg bedded under the last row of tiles gives the cleanest, strongest edge. Choose the profile height to match the tile thickness. If the carpet height is uncertain, use an adjustable-arm profile instead.
Should a transition strip go under the door?
Yes. Set the joint on the centre line of the closed door so each room shows only its own floor. Mark the line on the subfloor before tiling so the last row finishes in the right place.
Can I fit a tile to carpet strip after the tiles are laid?
You can, but only a surface-fixed type such as a Z bar or a screw-down cover strip. Profiles that anchor in the adhesive have to go in while the last row of tiles is being laid.
Who fits the transition strip, the tiler or the carpet fitter?
If it anchors under the tile, the tiler fits it. The carpet fitter then fits gripper behind it and tucks the carpet against the strip. A Z bar is usually the carpet fitter’s job. Agree who supplies what before either trade starts.
What if the carpet ends up higher than the tile?
That usually means a thick underlay. A thinner underlay is the simplest fix. Otherwise use a profile designed for the higher side, or an adjustable type that can follow the carpet height, rather than leaving the carpet edge standing proud.
Do I need a transition between tile and laminate?
Yes. Laminate needs an expansion gap at its edges, and a T-section or ramp profile covers that gap without fixing the boards down. Never screw through a floating floor.
Related guides
- How to Tile a Bathroom Wall: A UK Step-by-Step Guide
- How Much Does Tiling Cost in the UK? A Realistic Price Guide
- How to Remove Old Wall Tiles Without Damaging the Wall
- Porcelain vs Ceramic Tiles: Which Is Right for Your Bathroom or Kitchen?
- How to Tank and Waterproof a Wet Room Before Tiling: A Bromley Homeowner’s Guide
- Do You Need to Seal Natural Stone Tiles Before Grouting? A Tiler Explains
- How to Tile a Bathroom Floor (Including Around the Toilet)
- How to Tile a Shower: Walls, Niche and Waterproofing
- Construction Trade News: June 2026
- Bathroom Tiling Guide: How to Plan, Prep and Finish a Lasting Job
- Tile Backer Board vs Plasterboard for Bathrooms
- Best Tiles for Small Bathrooms (and How to Make a Space Look Bigger)
- Wall and Floor Tiles for a Wet Room: What Actually Works
- Tiling vs Wall Panels for a Bathroom: Which Is Better?
- Do You Tile the Floor or Walls First in a Bathroom?
- Tiling and Bathroom Trade News: Mid-June 2026
- Kitchen Tiling: Splashbacks, Walls and Floors Explained
- How to Tile a Kitchen Splashback: Step-by-Step Bromley Guide
- How to Tile Around Kitchen Sockets, Switches and Worktops
- Kitchen Splashback Tile Ideas: 12 Looks That Work
- Tiling and Bathroom Trade News: Late June 2026
- How to Lay Metro Tiles in a Herringbone Pattern
- Tiled vs Glass Splashback (and Acrylic): Which Is Best?
- How High Should a Kitchen Splashback Be Tiled? UK Heights Guide
- Tiling and Bathroom Trade News: Early July 2026
- Types of Tiles: The Complete UK Buyer’s Guide
- Porcelain vs Natural Stone Tiles: Which Should You Choose?
- Natural Stone Tiles Explained: Marble, Travertine, Slate and Limestone
- Tiling and Bathroom Trade News: Mid-July 2026
- Mosaic Tiles: Where to Use Them and How They’re Fixed
- Tile Slip Ratings Explained: R Ratings and PTV for UK Floors
- Matt vs Gloss Tiles: Which Finish Is Right for Your Room?
- Cost to Tile a Bathroom in the UK: 2026 Price Breakdown
- Polystyrene Ceiling Tiles: Are They Any Good?
- Cost to Tile a Kitchen in 2026: Floor and Splashback Prices
- Tiling and Bathroom Trade News: Mid-July 2026
- Tiling Cost Per Square Metre 2026: Labour and All-In Prices
- Tiler Day Rate UK: What Tilers Charge Per Day in 2026
- Cost to Regrout a Bathroom in 2026: UK Prices Explained
- Floor Tile Prices UK 2026: What You Will Pay Per Square Metre
- Is It Cheaper to Tile or Use Wall Panels? A UK Cost Comparison
- How to Tile: A Complete Beginner’s Guide (UK)
- How to Cut Tiles: Manual Cutter, Wet Saw and Nippers
- How to Cut Holes in Tiles for Pipes and Taps
- How to Grout Tiles (and Get Clean, Even Lines)
- Cork Flooring: Pros, Cons and Where It Works in UK Homes
- Tiling and Bathroom Trade News: Late July 2026
- How to Mix and Apply Tile Adhesive Correctly
- How to Set Out Tiles for a Perfect Layout
- How to Seal Grout and Tiles in a Bathroom (UK Guide)
- Can You Tile Over Tiles? When It Works and When It Doesn’t
- Tiling Tools List: What You Need for a Professional Finish
- How Much Tile Adhesive Do I Need? Coverage Per Square Metre
- Tiling Trade News: Topps App, Costs Up 6% (Aug 2026)
- Tile Problems: 9 Common Faults and How to Fix Each
- How to Fix Loose Tiles Without Removing Them
- Cracked Grout Repair: Why It Happens and How to Fix It
- Tiling Trade News: TTA Silica Warning, 2% Retentions
- How to Replace a Broken Tile Without Redoing the Wall
- Water Leaking Through Shower Tiles: 6 Causes and Fixes
- Remove Mouldy Silicone Sealant: A 24-Hour Reseal Job
- How to Clean Grout: What Works, and What Etches Stone
- Why Are My Floor Tiles Lifting? The 40m² Bay Rule
- Tiling Trade News: 3,841 Construction Firms Failed
- How to Lay Porcelain Paving: 1:80 Fall, 150mm Below DPC
- Tile Patterns: Why Big Tiles Need a One-Third Offset
- Grout Colour Ideas: How to Get the Shade You Chose
- Can You Paint Tiles? Yes on Walls, No in the Shower
- Decoupling Membrane for Tiles: When You Actually Need One
- Can You Tile Over a Wooden Floor? What Changed in 2024
- Tiling Cost 2026: £25 to £95 per m² Labour, UK Rates
- Tile Ideas: 7 Looks and the One Rule Each Needs
- Metro Tiles: Sizes, Bevels and the 1/3 Offset Rule
- Tile Feature Wall: The Weight Limit That Decides Yours
- Tiling Over Underfloor Heating: 14 Days Before Heat On
- How to Tile a Hallway Floor: Set Out From the Door
- Wood Effect Tiles and Marble Effect: 5 Specs to Check
- Tile Levelling Systems: The 3mm Rule That Decides It
- Tiling Trade News: Repair Work Up 1.7%, Headlam Fails
- Floor Levelling Compound: How Deep and How Long to Dry
- How to Find a Good Tiler: 9 Checks Before You Book
- Tiling Quote: The 10 Lines a Proper One Must Show
- Tile Trim: Sizes, Profiles and the One-Size-Up Rule
- Tile Spacers: 2mm or 3mm, and When to Pull Them Out
- Tiling the Fireplace: 125mm Hearths, Adhesive and Tiles
- Tiling Trade News: Shaws Sinks Reprice on 1 November
- Porcelain vs Stone Paving: Grip, Sealing and Upkeep
- Tiling a Large Floor: Movement Joints Every 10 Metres
- DIY Tiling vs Professional: 6 Jobs to Never Do Yourself
- Terracotta Tiles: Seal Before Grouting, Wait 7 Days
- Tile Drill Bits: Which Bit Won’t Crack Porcelain
- Tiling Corners With Trim: Which Profile, and When to Mitre
- Travertine Tiles: Filled or Unfilled, and How to Seal Them
- Slate Tiles: Calibrated or Riven, and How to Lay Them
- Zellige Tiles: Order 15% Extra and Fix Them Edge to Edge
- Terrazzo Tiles: Real 20mm vs Porcelain, Seal Before Grouting
- Tiling Trade News: 36% Now Add a Bathroom Accent Wall
- Split Face Tiles: Will Your Wall Take 27kg per m²?
- Tile Sealer: Which Tiles Need It and Which Type to Buy
- How to Remove Grout Haze: Which Cleaner for Which Grout
- Efflorescence on Tiles: Why It Comes Back and How to Stop It
- Tile Primer: Which Surfaces Need It and How Much to Dilute
- Epoxy Grout: Where It’s Worth It and How to Apply It
- How to Tile Stairs: Keep Every Riser the Same Height
- Shower Niche: Sizes, Height and Which Wall Can Take One
- How Many Tiles Do I Need? Add 10% to 20% by Layout
- How to Tile a Window Sill: Sill Last, Silicone at the Frame
- Tiling Trade News: Victorian Plumbing Tile Sales Up 76%
- How to Tile Around a Toilet: Lift the Pan or Cut Round It
- Tile Skirting: Leave a 6mm Gap and Seal, Never Grout