


Shower tray before or after tiling? Fit the tray first, then tile the walls down onto it. That is the order the tray makers write into their own fitting instructions, and it is the order that keeps water out of the wall. Wickes’ instructions for its flat-top trays say all flat-top trays should go in before tiling so the top edge of the tray sits behind, or at least below, the tile face. Kohler Mira’s guide for its Flight trays puts it more simply: “Tile the walls down on top of shower tray.”
This page explains why the order matters, what to do at the tray edge, how long to wait between each stage, and the two situations where the answer changes. If you are planning the whole job, our shower tiling walkthrough covers the walls themselves.
Why the tray goes in before the tiles
Water runs down a shower wall, over the face of the tiles and into the tray. If the bottom row of tiles finishes on the tray, the water runs off the tile and lands inside the tray. If the tray is pushed in after tiling, the tray edge sits against the face of the tiles, and every drop that runs down the wall arrives at a joint that relies entirely on a bead of silicone.
With the tray in first, the tiles overlap the tray edge like roof slates overlap the row below. The silicone is still there, but it is a second line of defence rather than the only one. That overlap is the reason Wickes says the tray’s top radius should finish behind or below the tile face.
There is also a practical reason. A tray must be bedded level on a full bed, and that is far easier to adjust with bare walls around it. Tiles already on the wall leave you no room to shift the tray by the few millimetres that level often needs.
The order of work, step by step
- Prepare the floor. It must be solid, flat and free of movement. On a timber floor, Wickes says the boards must be securely fixed, and where the waste cannot drop through them it suggests 18 to 20mm green-grade (moisture-resistant) chipboard cut to the tray size.
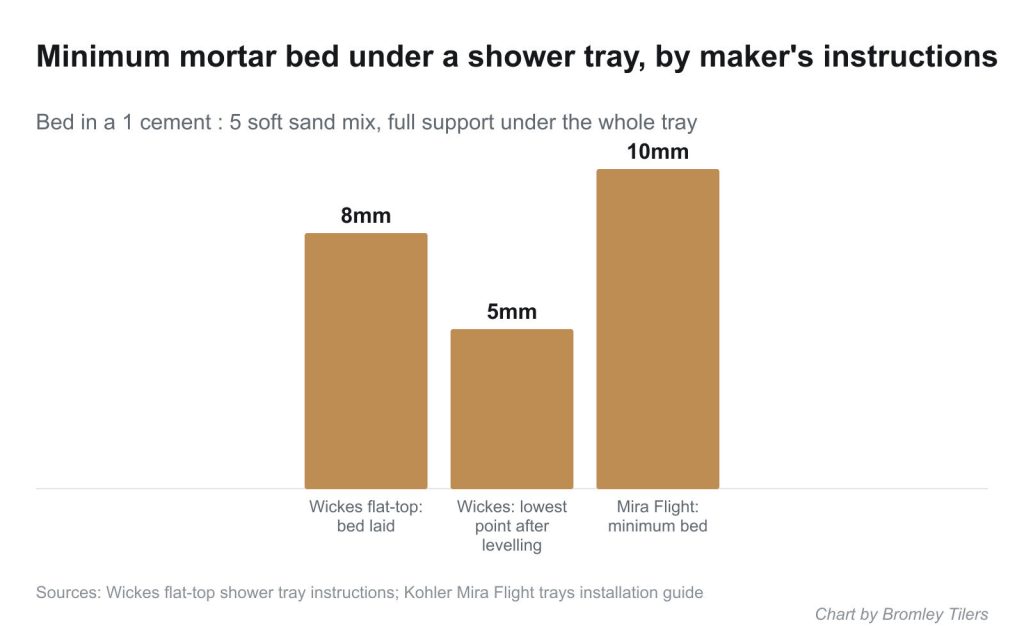
- Bed the tray. Wickes specifies a full bed of weak cement mortar, 1 part cement to 5 parts soft sand, laid at least 8mm thick, with at least 5mm left at the lowest point once the tray is level. Mira asks for the same 5:1 mix at a minimum of 10mm, or a construction adhesive at every contact point where mortar is not practical. Use whichever your tray’s instructions give.
- Connect and test the waste. Once the bed has set, connect the waste and run water through it. Both makers tell you to check for leaks and proper drainage before you go any further. Wickes puts it bluntly: do not proceed if not satisfied.
- Board and tank the walls. If you are using backer board or a tanking system, it goes on now, down to the tray. More on the tray edge below.
- Tile down onto the tray. The bottom row sits on or just above the tray edge, overlapping it.
- Grout, then silicone the tray joint. The joint between the bottom tiles and the tray is sealed with silicone, never grout.
- Fit the enclosure or screen last. Its wall channels fix through the tiles.
Sealing the tray edge: the two beads of silicone
Most instructions call for silicone twice. Wickes says that for a flat-top tray, every tray-to-wall joint should get a bead of silicone before the walls are tiled, and then an extra bead between the tray and the tiles before the enclosure’s wall channels go on. Mira’s upstand trays work the same way: sealant where the tray meets the wall or plasterboard before it goes in, then sealant between the tray and the tiled wall afterwards.
Why two? The first bead closes the gap behind the tiles, so any water that gets past the visible joint still meets a seal. The second is the one you see and replace every few years. When it goes black or starts to peel, you strip and redo it; our page on replacing mouldy silicone sealant shows how.
Leave the bottom row of tiles a small gap above the tray rather than pressing it hard down onto the tray. A tray moves a little under load, and a tile jammed tight against it will crack the silicone or chip the tray’s surface. The gap is filled with silicone, which can flex. Never fill it with grout: grout is rigid, it cracks along that line within months, and the crack lets water straight behind the tiles. Our guide to tile movement joints explains why a change of plane like this always takes a flexible sealant.
Tanking at the tray edge
Tanking is a waterproof layer on the wall behind the tiles. In a shower over a tray it is good practice; in a wet room it is essential. The weak point is the line where the wall meets the tray, because the tanking has to stop there and the tray has to take over.
Most tanking kits handle this with a reinforcing tape along the tray edge, bonded to the wall and lapped onto the tray’s upstand or top edge so the tiles and adhesive cover it. Kits differ in how they want the tape bonded to the tray, what primer they need and how long the system cures before tiling, so follow the kit’s own sheet rather than a forum thread. The one rule that does not change: tanking goes on after the tray is in, so it can lap onto it. You cannot tank down to a tray that is not there yet.
For the full process on a wet-room floor, see tanking before tiling.
Trays with upstands
Some trays have an upstand: a raised lip along the wall edges. Others take a separate seal strip. In both cases the upstand is meant to finish behind the tiles, not in front of them. Tray instructions that cover upstands and seal strips commonly warn that the tray may need recessing into the wall so the tiles can still come down onto the tray surface.
In practice that means the board or plaster above the tray is packed out, or the tray is let into a stud wall, so the upstand sits in the same plane as the board. The tile then covers the upstand and lands on the tray. If you board straight over an upstand, the bottom row of tiles kicks out at an angle; if you board above it and stop, there is a step that the tiles cannot cover. Check this before you buy a tray, especially in a room with solid walls.
When you can fit the tray after tiling
There are two honest exceptions.
A replacement tray against existing tiles. If the old tray has cracked and the wall tiles are sound, you can fit a new tray of exactly the same size and seal it to the existing tiles. It will never be quite as good as tiles lapping over the tray, because the joint relies on silicone alone, so check it often. If the new tray is a different height, the bottom row of tiles usually has to come off anyway.
A tray on legs with removable panels. Some trays sit on an adjustable leg set with a front panel, which lets the waste run above a solid floor. The tray still goes in before the wall tiles. What changes is that the floor tiles can run under the panel rather than up to the tray.
The floor is a separate question. Floor tiles can go down before or after the tray, and many fitters lay the floor up to the tray once it is set so the tray sits on the subfloor at its true height. Our page on whether to tile the shower floor or walls first covers that order.
Common mistakes that cause leaks
- Bedding the tray on dabs. A tray on blobs of mortar flexes, the silicone joint opens, and water gets behind the tiles. Both Wickes and Mira ask for full support under the tray.
- Skipping the water test. A waste that weeps under the tray is a disaster once the walls are tiled. Test before tiling, while you can still get at it.
- Grouting the tray joint. It is one of the most common causes of a leaking shower. Rake it out and silicone it.
- Siliconing too soon. Leave the grout to cure before you seal the tray joint, and leave the silicone to cure before the first shower. Our page on how long bathroom silicone takes to dry gives the times.
- Using the shower before it is ready. If water is already coming through, start with water leaking through shower tiles.
Frequently asked questions
Do you fit a shower tray before or after tiling?
Before. Fit, level and test the tray first, then tile the walls down onto it so the tiles overlap the tray edge. Wickes and Kohler Mira both give this order in their tray fitting instructions.
Should tiles sit on the shower tray?
The bottom row should finish over the tray edge, with a small gap between tile and tray that is filled with silicone. Do not press tiles hard onto the tray, and never grout that joint.
Do you silicone a shower tray before or after tiling?
Both. One bead goes along the tray-to-wall joint before tiling, and a second goes between the tray and the bottom row of tiles after grouting.
Can I tile down to a shower tray I have already fitted?
Yes, that is the normal method. Make sure the tray is fully bedded, the waste has been tested and any tanking laps onto the tray edge before the first tile goes on.
Can you fit a new shower tray without removing tiles?
Only if the new tray is the same size and height as the old one. It will rely on silicone alone at the wall joint, so it needs checking and resealing more often.
What do you do with a shower tray upstand?
Set the tray so the upstand finishes behind the tile line, recessing it into the wall or packing out the board above it. The tiles then cover the upstand and land on the tray.
Need a shower tiled over a tray that is fitted properly first? Bromley Tilers works across Bromley and south-east London.
Related guides
- How to Tile a Bathroom Wall: A UK Step-by-Step Guide
- How Much Does Tiling Cost in the UK? A Realistic Price Guide
- How to Remove Old Wall Tiles Without Damaging the Wall
- Porcelain vs Ceramic Tiles: Which Is Right for Your Bathroom or Kitchen?
- How to Tank and Waterproof a Wet Room Before Tiling: A Bromley Homeowner’s Guide
- Do You Need to Seal Natural Stone Tiles Before Grouting? A Tiler Explains
- How to Tile a Bathroom Floor (Including Around the Toilet)
- How to Tile a Shower: Walls, Niche and Waterproofing
- Construction Trade News: June 2026
- Bathroom Tiling Guide: How to Plan, Prep and Finish a Lasting Job
- Tile Backer Board vs Plasterboard for Bathrooms
- Best Tiles for Small Bathrooms (and How to Make a Space Look Bigger)
- Wall and Floor Tiles for a Wet Room: What Actually Works
- Tiling vs Wall Panels for a Bathroom: Which Is Better?
- Do You Tile the Floor or Walls First in a Bathroom?
- Tiling and Bathroom Trade News: Mid-June 2026
- Kitchen Tiling: Splashbacks, Walls and Floors Explained
- How to Tile a Kitchen Splashback: Step-by-Step Bromley Guide
- How to Tile Around Kitchen Sockets, Switches and Worktops
- Kitchen Splashback Tile Ideas: 12 Looks That Work
- Tiling and Bathroom Trade News: Late June 2026
- How to Lay Metro Tiles in a Herringbone Pattern
- Tiled vs Glass Splashback (and Acrylic): Which Is Best?
- How High Should a Kitchen Splashback Be Tiled? UK Heights Guide
- Tiling and Bathroom Trade News: Early July 2026
- Types of Tiles: The Complete UK Buyer’s Guide
- Porcelain vs Natural Stone Tiles: Which Should You Choose?
- Natural Stone Tiles Explained: Marble, Travertine, Slate and Limestone
- Tiling and Bathroom Trade News: Mid-July 2026
- Mosaic Tiles: Where to Use Them and How They’re Fixed
- Tile Slip Ratings Explained: R Ratings and PTV for UK Floors
- Matt vs Gloss Tiles: Which Finish Is Right for Your Room?
- Cost to Tile a Bathroom in the UK: 2026 Price Breakdown
- Polystyrene Ceiling Tiles: Are They Any Good?
- Cost to Tile a Kitchen in 2026: Floor and Splashback Prices
- Tiling and Bathroom Trade News: Mid-July 2026
- Tiling Cost Per Square Metre 2026: Labour and All-In Prices
- Tiler Day Rate UK: What Tilers Charge Per Day in 2026
- Cost to Regrout a Bathroom in 2026: UK Prices Explained
- Floor Tile Prices UK 2026: What You Will Pay Per Square Metre
- Is It Cheaper to Tile or Use Wall Panels? A UK Cost Comparison
- How to Tile: A Complete Beginner’s Guide (UK)
- How to Cut Tiles: Manual Cutter, Wet Saw and Nippers
- How to Cut Holes in Tiles for Pipes and Taps
- How to Grout Tiles (and Get Clean, Even Lines)
- Cork Flooring: Pros, Cons and Where It Works in UK Homes
- Tiling and Bathroom Trade News: Late July 2026
- How to Mix and Apply Tile Adhesive Correctly
- How to Set Out Tiles for a Perfect Layout
- How to Seal Grout and Tiles in a Bathroom (UK Guide)
- Can You Tile Over Tiles? When It Works and When It Doesn’t
- Tiling Tools List: What You Need for a Professional Finish
- How Much Tile Adhesive Do I Need? Coverage Per Square Metre
- Tiling Trade News: Topps App, Costs Up 6% (Aug 2026)
- Tile Problems: 9 Common Faults and How to Fix Each
- How to Fix Loose Tiles Without Removing Them
- Cracked Grout Repair: Why It Happens and How to Fix It
- Tiling Trade News: TTA Silica Warning, 2% Retentions
- How to Replace a Broken Tile Without Redoing the Wall
- Water Leaking Through Shower Tiles: 6 Causes and Fixes
- Remove Mouldy Silicone Sealant: A 24-Hour Reseal Job
- How to Clean Grout: What Works, and What Etches Stone
- Why Are My Floor Tiles Lifting? The 40m² Bay Rule
- Tiling Trade News: 3,841 Construction Firms Failed
- How to Lay Porcelain Paving: 1:80 Fall, 150mm Below DPC
- Tile Patterns: Why Big Tiles Need a One-Third Offset
- Grout Colour Ideas: How to Get the Shade You Chose
- Can You Paint Tiles? Yes on Walls, No in the Shower
- Decoupling Membrane for Tiles: When You Actually Need One
- Can You Tile Over a Wooden Floor? What Changed in 2024
- Tiling Cost 2026: £25 to £95 per m² Labour, UK Rates
- Tile Ideas: 7 Looks and the One Rule Each Needs
- Metro Tiles: Sizes, Bevels and the 1/3 Offset Rule
- Tile Feature Wall: The Weight Limit That Decides Yours
- Tiling Over Underfloor Heating: 14 Days Before Heat On
- How to Tile a Hallway Floor: Set Out From the Door
- Wood Effect Tiles and Marble Effect: 5 Specs to Check
- Tile Levelling Systems: The 3mm Rule That Decides It
- Tiling Trade News: Repair Work Up 1.7%, Headlam Fails
- Floor Levelling Compound: How Deep and How Long to Dry
- How to Find a Good Tiler: 9 Checks Before You Book
- Tiling Quote: The 10 Lines a Proper One Must Show
- Tile Trim: Sizes, Profiles and the One-Size-Up Rule
- Tile Spacers: 2mm or 3mm, and When to Pull Them Out
- Tiling the Fireplace: 125mm Hearths, Adhesive and Tiles
- Tiling Trade News: Shaws Sinks Reprice on 1 November
- Porcelain vs Stone Paving: Grip, Sealing and Upkeep
- Tiling a Large Floor: Movement Joints Every 10 Metres
- DIY Tiling vs Professional: 6 Jobs to Never Do Yourself
- Terracotta Tiles: Seal Before Grouting, Wait 7 Days
- Tile Drill Bits: Which Bit Won’t Crack Porcelain
- Tiling Corners With Trim: Which Profile, and When to Mitre
- Travertine Tiles: Filled or Unfilled, and How to Seal Them
- Slate Tiles: Calibrated or Riven, and How to Lay Them
- Zellige Tiles: Order 15% Extra and Fix Them Edge to Edge
- Terrazzo Tiles: Real 20mm vs Porcelain, Seal Before Grouting
- Tiling Trade News: 36% Now Add a Bathroom Accent Wall
- Split Face Tiles: Will Your Wall Take 27kg per m²?
- Tile Sealer: Which Tiles Need It and Which Type to Buy
- How to Remove Grout Haze: Which Cleaner for Which Grout
- Efflorescence on Tiles: Why It Comes Back and How to Stop It
- Tile Primer: Which Surfaces Need It and How Much to Dilute
- Epoxy Grout: Where It’s Worth It and How to Apply It
- How to Tile Stairs: Keep Every Riser the Same Height
- Shower Niche: Sizes, Height and Which Wall Can Take One
- How Many Tiles Do I Need? Add 10% to 20% by Layout
- How to Tile a Window Sill: Sill Last, Silicone at the Frame
- Tiling Trade News: Victorian Plumbing Tile Sales Up 76%
- How to Tile Around a Toilet: Lift the Pan or Cut Round It
- Tile to Carpet Transition: Pick the Strip by the Height Gap
- Tile Skirting: Leave a 6mm Gap and Seal, Never Grout
- Tile Backer Board: Cement or Foam, Which Thickness, Fixings
- Quarry Tiles: Seal Them or Not, and How to Clean Them
- Rapid Set Tile Adhesive vs Standard: 30 Mins or 24 Hours
- Can You Tile Onto Plaster? Yes, Up to 20kg per m²
- How to Tile a Balcony: 1.5-2% Fall, Drain Mat, 150mm Upstand
- Electric Tile Cutter: When You Need One and Which Disc
- Victorian Floor Tiles: Sizes, Repairs and When to Replace
- Marble Tiles: White Rapid-Set Adhesive, Seal Before Grouting
- Tiling on Anhydrite Screed: 0.5% Moisture, Sand, Then Prime
- Tiling Trade News: Domus Buyout After Headlam Collapse
- How High to Tile a Bathroom: 1.2m Line vs Floor to Ceiling
- Can You Tile Over Paint? Strip Emulsion, Key Gloss First
- Hollow Sounding Tiles: When to Leave Them, When to Lift
- Tile Movement Joints: Where They Go and the 10m Rule
- Tiling Trade News: Home Improvement Work to Fall 8%
- Outdoor Wall Tiles: 0.5% Absorption and a 100% Adhesive Bed
- Living Room Floor Tiles: Porcelain, Heating and the 3mm Rule
- Pink Tiles: Shades, Grout and Slip Ratings Before You Buy
- Cheap Tiles: 7 Checks Before You Buy From a Clearance Pile
- How Long Does Grout Take to Dry? 3 Hours, 24 Hours, 2 Weeks
- Uncoupling Membrane: When Tiles Need One and Which Type
- Tile Lippage: How Much Is Acceptable and How to Fix It
- Tile Trowel Size: The Right Notch for Wall and Floor Tiles
- Tiling in Cold Weather: The 5°C Rule and How to Beat It
- Limestone Tiles: Seal Before Grouting, Keep Acids Off