


The right tile trowel size is the notch that leaves enough adhesive under the tile to touch at least 85% of its back on a dry wall and 95% or more on a floor or in a shower. In practice that means a 4 to 6mm notch for most wall tiles, a 10mm notch for ordinary floor tiles and a 12mm notch, plus a skim on the back of the tile, for large format. The tile, the adhesive and how flat the wall or floor is can all move you up a size, so the numbers below are where to start, not where to stop.
This page covers how notch sizes are measured, how much adhesive each one actually leaves behind, a starting chart by tile size and the two-minute lift test we use on every job to prove the choice was right. If you would rather not do the checking yourself, Bromley Tilers fit wall and floor tiling across Bromley and south east London.
How tile trowel sizes are measured
The size printed on a notched trowel describes its teeth, not the blade. A 10mm square-notch trowel has teeth 10mm wide and 10mm deep, with 10mm gaps between them, so it combs out ridges of adhesive 10mm high with 10mm channels between them. Where two figures are given, such as 6 x 10mm, the first is the width of the notch and the second its depth.
There are two common shapes:
- Square notch. The standard for floors and most wall work. The square ridges collapse into a solid bed when the tile is pressed down.
- U notch (round notch). Leaves rounded ridges with less adhesive in them. Useful on walls with lighter tiles and with ready-mixed paste adhesives, but you need a bigger U notch to match the bed a square notch gives.
Small V-notch trowels also exist for mosaics and very thin tiles, where a deep bed would squeeze up through the joints.
How much adhesive each notch leaves under the tile
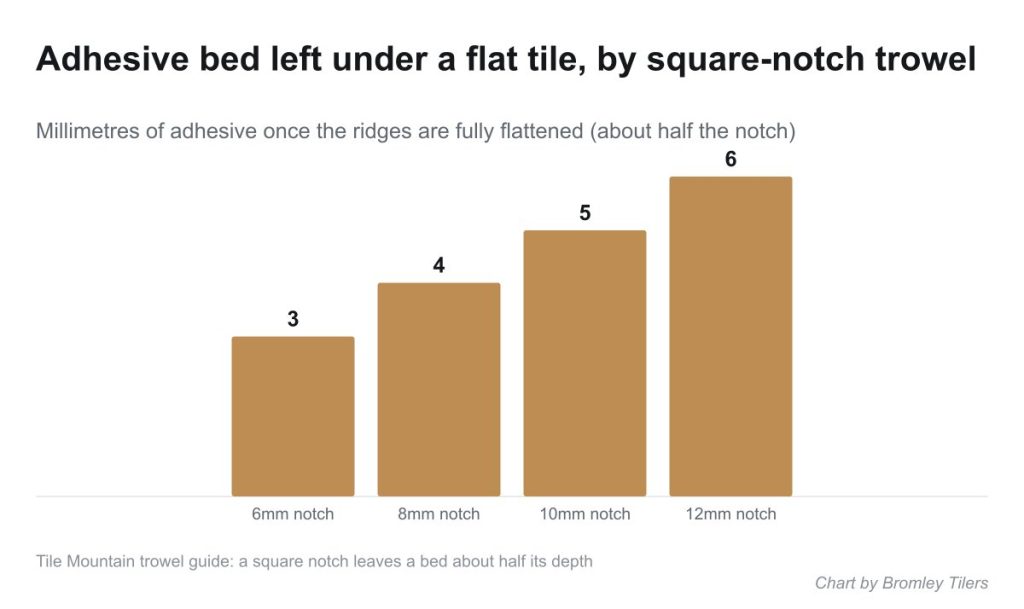
The useful number is not the notch size but the bed it leaves once the tile is bedded. With a square notch, the ridges and the gaps between them are the same size, so when you press the tile in and the ridges spread sideways to fill the gaps, the bed ends up roughly half the notch depth. Tile Mountain’s trowel guide sets this out: a 12mm square notch leaves about a 6mm bed and a 10mm square notch about 5mm, on a flat tile over a flat surface.
U notches give less. The same guide puts the bed at a little over a third of the notch, so a 10mm U notch leaves only about 3mm, the same as a 6mm square notch.
That matters because the bed has to do two jobs: stick the tile and take up any unevenness in the tile and the surface behind it. A cupped porcelain tile or a wall that is a couple of millimetres out needs more adhesive than the perfect flat case, which is why the starting chart below leans generous on floors.
Which tile trowel size to start with
These are the sizes we reach for first on a typical job with a cement-based flexible adhesive. They are starting points: the adhesive bag or data sheet has the final say, and the lift test decides whether you go up a size.
- Mosaics and small tiles up to about 100mm: 3 to 4mm notch (square or V). Any more and adhesive squeezes up through the joints.
- Wall tiles up to about 250mm (including most metro tiles): 6mm square notch, or a 4mm notch on a very flat wall with thin ceramic tiles.
- Wall tiles 300 x 600mm: 8 to 10mm square notch, with a thin skim on the back of each tile.
- Floor tiles up to about 450mm: 10mm square notch.
- Floor tiles 600 x 600mm and larger, and long plank tiles: 12mm square notch and a back-buttered skim on every tile. Some fixers go bigger on uneven floors, but a floor that needs more than that usually needs levelling first.
- Showers, wet rooms and outside: the size for the tile above, but always aiming for a solid bed with no voids, so back-butter as well.
The manufacturer’s coverage figures point the same way. BAL’s data for its Flex One flexible adhesive lists a 4mm notch for dry walls, a 6mm notch for dry walls and a 6mm notch solid bed for wet walls, and a 10mm notch solid bed for floors and outside. Its stated bed height range is 2 to 15mm, so a 12mm notch for large tiles sits comfortably inside what the product is designed to do.
What the trowel size does to your adhesive order
A bigger notch uses more adhesive, and the difference is large enough to change how many bags you buy. Using the same BAL Flex One figures:
- Dry wall, 4mm notch: about 0.6 square metres per kilogram.
- Dry wall, 6mm notch: about 0.5 square metres per kilogram.
- Wet wall, 6mm notch, solid bed: about 0.4 square metres per kilogram.
- Floors and outside, 10mm notch, solid bed: about 0.26 square metres per kilogram, or roughly 3.8kg for every square metre.
So the same 10 square metres needs around 17kg of adhesive on a dry wall with a 6mm notch but closer to 38kg on a floor with a 10mm notch. BAL notes the real figure varies with how flat the surface is and the trowel used, and back-buttering adds more again, so round up. Our adhesive and grout coverage page works through a full order.
The lift test: how to know the trowel size is right
No chart beats lifting a tile. Do this on the first two or three tiles of every room and again whenever the tile size or the surface changes.
- Spread adhesive and comb it in straight lines with the trowel held at a steady angle. Straight lines let air escape when the tile goes down; swirls trap it.
- Bed the tile with a slight sliding twist across the ridges, then press it home.
- Lift it straight off and look at the back.
On a dry wall you want adhesive over at least 85% of the back with the corners and edges covered. On a floor, in a shower or outside, aim for 95% or more, which is the figure Tile Mountain also quotes for wet areas. If the ridges are still visible and untouched, or the corners are bare, go up a notch size, back-butter, or both. If adhesive is pushing well up into the joints, go down a size.
Bare corners on a floor are the usual cause of tiles that crack or sound hollow a few months later. Our page on hollow sounding tiles covers what to do if that has already happened.
Large format tiles need more than a bigger notch
Tiles of 600mm and up are where trowel choice causes the most trouble, because a large porcelain tile is rarely perfectly flat and every millimetre of bow has to be filled with adhesive. Tile Mountain’s guide gives a simple check: hold two tiles face to face and press one corner together. The gap at the opposite corner, halved, is how far the tile is cupped, and that figure should be added to the bed you are aiming for.
Three habits matter as much as the notch:
- Back-butter every tile with a flat skim using the smooth edge of the trowel, so the tile’s back is wetted and the ridges have something to bond to.
- Comb all ridges in one direction, ideally along the short side of a rectangular tile, so air can be pushed out as you bed it.
- Use a levelling system to hold edges flush while the adhesive cures. Our tile lippage guide explains how much height difference between tiles is normal and when it is not.
More on handling big tiles is in our large format tiles guide.
Common trowel mistakes we see on repair jobs
- One trowel for everything. The 6mm notch that came in a starter kit is fine for small wall tiles and wrong for a 600 x 600mm floor.
- Worn teeth. Trowel teeth wear down on rough screed and backer board. A 10mm trowel that has lost a couple of millimetres leaves a thinner bed than you think. Replace it when the teeth no longer stand square.
- Dabs instead of a full bed. Five blobs of adhesive on the back of a tile leave large voids. It is not an accepted fixing method for floors or wet areas.
- Spreading too far ahead. Adhesive skins over in the open air. If your fingertip comes away clean when you touch the ridges, scrape it off and spread fresh. Our page on how to apply tile adhesive covers open time in more detail.
- Using the notch to fix a bad floor. Building up a thick bed to hide a dip is how tiles end up uneven. Level the floor first, then tile it. See how thick tile adhesive can be for the limits.
Frequently asked questions
What size trowel for 300 x 600 wall tiles?
Start with an 8 to 10mm square notch and back-butter each tile with a thin skim. Lift the first tile to check coverage; if the corners are bare, go up to the 10mm notch.
What size trowel for 600 x 600 floor tiles?
A 12mm square notch with every tile back-buttered is the usual starting point. If the lift test still shows voids, check the tile for cupping and the floor for flatness before reaching for a bigger notch.
Is a 6mm trowel big enough for floor tiles?
Rarely. A 6mm square notch leaves only about a 3mm bed, which suits small, flat wall tiles. BAL’s Flex One data sheet, for example, specifies a 10mm notch solid bed for floors.
Should I use a square notch or a U notch trowel?
Use a square notch for floors and most wall tiles. A U notch leaves rounded ridges with less adhesive, so you need a larger U notch to match the bed of a square notch. It suits lighter wall tiles and ready-mixed paste adhesives.
Which way should the trowel lines go?
In straight, parallel lines, not swirls, so air can escape as you bed the tile. On rectangular tiles comb along the short side, and on all tiles slide them slightly across the ridges as you press them in.
Does a bigger trowel make tiles stick better?
Only up to the point of full coverage. Too large a notch pushes adhesive into the joints, makes tiles harder to keep level and wastes adhesive. The right size is the smallest one that passes the lift test.
Related guides
- How to Tile a Bathroom Wall: A UK Step-by-Step Guide
- How Much Does Tiling Cost in the UK? A Realistic Price Guide
- How to Remove Old Wall Tiles Without Damaging the Wall
- Porcelain vs Ceramic Tiles: Which Is Right for Your Bathroom or Kitchen?
- How to Tank and Waterproof a Wet Room Before Tiling: A Bromley Homeowner’s Guide
- Do You Need to Seal Natural Stone Tiles Before Grouting? A Tiler Explains
- How to Tile a Bathroom Floor (Including Around the Toilet)
- How to Tile a Shower: Walls, Niche and Waterproofing
- Construction Trade News: June 2026
- Bathroom Tiling Guide: How to Plan, Prep and Finish a Lasting Job
- Tile Backer Board vs Plasterboard for Bathrooms
- Best Tiles for Small Bathrooms (and How to Make a Space Look Bigger)
- Wall and Floor Tiles for a Wet Room: What Actually Works
- Tiling vs Wall Panels for a Bathroom: Which Is Better?
- Do You Tile the Floor or Walls First in a Bathroom?
- Tiling and Bathroom Trade News: Mid-June 2026
- Kitchen Tiling: Splashbacks, Walls and Floors Explained
- How to Tile a Kitchen Splashback: Step-by-Step Bromley Guide
- How to Tile Around Kitchen Sockets, Switches and Worktops
- Kitchen Splashback Tile Ideas: 12 Looks That Work
- Tiling and Bathroom Trade News: Late June 2026
- How to Lay Metro Tiles in a Herringbone Pattern
- Tiled vs Glass Splashback (and Acrylic): Which Is Best?
- How High Should a Kitchen Splashback Be Tiled? UK Heights Guide
- Tiling and Bathroom Trade News: Early July 2026
- Types of Tiles: The Complete UK Buyer’s Guide
- Porcelain vs Natural Stone Tiles: Which Should You Choose?
- Natural Stone Tiles Explained: Marble, Travertine, Slate and Limestone
- Tiling and Bathroom Trade News: Mid-July 2026
- Mosaic Tiles: Where to Use Them and How They’re Fixed
- Tile Slip Ratings Explained: R Ratings and PTV for UK Floors
- Matt vs Gloss Tiles: Which Finish Is Right for Your Room?
- Cost to Tile a Bathroom in the UK: 2026 Price Breakdown
- Polystyrene Ceiling Tiles: Are They Any Good?
- Cost to Tile a Kitchen in 2026: Floor and Splashback Prices
- Tiling and Bathroom Trade News: Mid-July 2026
- Tiling Cost Per Square Metre 2026: Labour and All-In Prices
- Tiler Day Rate UK: What Tilers Charge Per Day in 2026
- Cost to Regrout a Bathroom in 2026: UK Prices Explained
- Floor Tile Prices UK 2026: What You Will Pay Per Square Metre
- Is It Cheaper to Tile or Use Wall Panels? A UK Cost Comparison
- How to Tile: A Complete Beginner’s Guide (UK)
- How to Cut Tiles: Manual Cutter, Wet Saw and Nippers
- How to Cut Holes in Tiles for Pipes and Taps
- How to Grout Tiles (and Get Clean, Even Lines)
- Cork Flooring: Pros, Cons and Where It Works in UK Homes
- Tiling and Bathroom Trade News: Late July 2026
- How to Mix and Apply Tile Adhesive Correctly
- How to Set Out Tiles for a Perfect Layout
- How to Seal Grout and Tiles in a Bathroom (UK Guide)
- Can You Tile Over Tiles? When It Works and When It Doesn’t
- Tiling Tools List: What You Need for a Professional Finish
- How Much Tile Adhesive Do I Need? Coverage Per Square Metre
- Tiling Trade News: Topps App, Costs Up 6% (Aug 2026)
- Tile Problems: 9 Common Faults and How to Fix Each
- How to Fix Loose Tiles Without Removing Them
- Cracked Grout Repair: Why It Happens and How to Fix It
- Tiling Trade News: TTA Silica Warning, 2% Retentions
- How to Replace a Broken Tile Without Redoing the Wall
- Water Leaking Through Shower Tiles: 6 Causes and Fixes
- Remove Mouldy Silicone Sealant: A 24-Hour Reseal Job
- How to Clean Grout: What Works, and What Etches Stone
- Why Are My Floor Tiles Lifting? The 40m² Bay Rule
- Tiling Trade News: 3,841 Construction Firms Failed
- How to Lay Porcelain Paving: 1:80 Fall, 150mm Below DPC
- Tile Patterns: Why Big Tiles Need a One-Third Offset
- Grout Colour Ideas: How to Get the Shade You Chose
- Can You Paint Tiles? Yes on Walls, No in the Shower
- Decoupling Membrane for Tiles: When You Actually Need One
- Can You Tile Over a Wooden Floor? What Changed in 2024
- Tiling Cost 2026: £25 to £95 per m² Labour, UK Rates
- Tile Ideas: 7 Looks and the One Rule Each Needs
- Metro Tiles: Sizes, Bevels and the 1/3 Offset Rule
- Tile Feature Wall: The Weight Limit That Decides Yours
- Tiling Over Underfloor Heating: 14 Days Before Heat On
- How to Tile a Hallway Floor: Set Out From the Door
- Wood Effect Tiles and Marble Effect: 5 Specs to Check
- Tile Levelling Systems: The 3mm Rule That Decides It
- Tiling Trade News: Repair Work Up 1.7%, Headlam Fails
- Floor Levelling Compound: How Deep and How Long to Dry
- How to Find a Good Tiler: 9 Checks Before You Book
- Tiling Quote: The 10 Lines a Proper One Must Show
- Tile Trim: Sizes, Profiles and the One-Size-Up Rule
- Tile Spacers: 2mm or 3mm, and When to Pull Them Out
- Tiling the Fireplace: 125mm Hearths, Adhesive and Tiles
- Tiling Trade News: Shaws Sinks Reprice on 1 November
- Porcelain vs Stone Paving: Grip, Sealing and Upkeep
- Tiling a Large Floor: Movement Joints Every 10 Metres
- DIY Tiling vs Professional: 6 Jobs to Never Do Yourself
- Terracotta Tiles: Seal Before Grouting, Wait 7 Days
- Tile Drill Bits: Which Bit Won’t Crack Porcelain
- Tiling Corners With Trim: Which Profile, and When to Mitre
- Travertine Tiles: Filled or Unfilled, and How to Seal Them
- Slate Tiles: Calibrated or Riven, and How to Lay Them
- Zellige Tiles: Order 15% Extra and Fix Them Edge to Edge
- Terrazzo Tiles: Real 20mm vs Porcelain, Seal Before Grouting
- Tiling Trade News: 36% Now Add a Bathroom Accent Wall
- Split Face Tiles: Will Your Wall Take 27kg per m²?
- Tile Sealer: Which Tiles Need It and Which Type to Buy
- How to Remove Grout Haze: Which Cleaner for Which Grout
- Efflorescence on Tiles: Why It Comes Back and How to Stop It
- Tile Primer: Which Surfaces Need It and How Much to Dilute
- Epoxy Grout: Where It’s Worth It and How to Apply It
- How to Tile Stairs: Keep Every Riser the Same Height
- Shower Niche: Sizes, Height and Which Wall Can Take One
- How Many Tiles Do I Need? Add 10% to 20% by Layout
- How to Tile a Window Sill: Sill Last, Silicone at the Frame
- Tiling Trade News: Victorian Plumbing Tile Sales Up 76%
- How to Tile Around a Toilet: Lift the Pan or Cut Round It
- Tile to Carpet Transition: Pick the Strip by the Height Gap
- Tile Skirting: Leave a 6mm Gap and Seal, Never Grout
- Tile Backer Board: Cement or Foam, Which Thickness, Fixings
- Quarry Tiles: Seal Them or Not, and How to Clean Them
- Rapid Set Tile Adhesive vs Standard: 30 Mins or 24 Hours
- Can You Tile Onto Plaster? Yes, Up to 20kg per m²
- How to Tile a Balcony: 1.5-2% Fall, Drain Mat, 150mm Upstand
- Electric Tile Cutter: When You Need One and Which Disc
- Victorian Floor Tiles: Sizes, Repairs and When to Replace
- Marble Tiles: White Rapid-Set Adhesive, Seal Before Grouting
- Tiling on Anhydrite Screed: 0.5% Moisture, Sand, Then Prime
- Tiling Trade News: Domus Buyout After Headlam Collapse
- How High to Tile a Bathroom: 1.2m Line vs Floor to Ceiling
- Can You Tile Over Paint? Strip Emulsion, Key Gloss First
- Hollow Sounding Tiles: When to Leave Them, When to Lift
- Tile Movement Joints: Where They Go and the 10m Rule
- Tiling Trade News: Home Improvement Work to Fall 8%
- Outdoor Wall Tiles: 0.5% Absorption and a 100% Adhesive Bed
- Living Room Floor Tiles: Porcelain, Heating and the 3mm Rule
- Pink Tiles: Shades, Grout and Slip Ratings Before You Buy
- Cheap Tiles: 7 Checks Before You Buy From a Clearance Pile
- How Long Does Grout Take to Dry? 3 Hours, 24 Hours, 2 Weeks
- Uncoupling Membrane: When Tiles Need One and Which Type
- Tile Lippage: How Much Is Acceptable and How to Fix It
- Shower Tray Before or After Tiling? Tray First, Tile Down
- Tiling in Cold Weather: The 5°C Rule and How to Beat It
- Limestone Tiles: Seal Before Grouting, Keep Acids Off