



How to tile a window sill comes down to order and edges: tile the wall face first, then the top and sides of the reveal, then the sill itself, and finish with flexible silicone where the tile meets the window frame. Get the order wrong and you end up with cut edges facing the room, a sill that tips water against the frame, or a grout line that cracks the first cold night. This page walks through each stage the way we tackle reveals on kitchen splashbacks, bathroom walls and showers around Bromley, including the decisions you need to make before the first tile goes on.
Before you start: check the sill, the frame and the walls
A window reveal is three short surfaces (top, two sides) plus the sill, all meeting a frame that moves with temperature. Check each one before buying tiles.
- What the sill is made of. A plastered or rendered masonry sill is a good base once it is sound and primed. A painted MDF or softwood window board is not: timber swells and shrinks, and a loose or bouncy board will crack the grout. Most tilers lift a timber board and either tile onto the masonry beneath or fix a cement-based tile backer board in its place.
- Whether it is level or falls. Lay a spirit level across the sill. Some sills are built with a slight fall so condensation runs away from the frame. If yours has one, keep that fall in your tiling rather than levelling it out.
- The reveal depth on each side. Measure top and bottom on both sides. Openings are rarely square, and the two sides can differ by a couple of millimetres, which matters when you are cutting thin strips.
- The surface. Bare plaster, painted plaster and plasterboard each need different preparation. Our tile primer guide covers which surfaces need priming and how much to dilute it.
Plan the layout from the centre of the window
The most common mistake is starting from a room corner and arriving at the window with a thin sliver on one side and nearly a full tile on the other. Instead:
- Draw a vertical line through the centre of the window opening.
- Dry-lay a row of tiles along the sill height, without adhesive, to see where the cuts fall either side of the opening.
- Decide whether a grout joint or the centre of a tile sits on that line. Pick whichever leaves the larger cut at each side of the reveal.
- Set a level horizontal batten or line so the row that meets the sill is a full tile, or as near to full as the wall allows.
Small cuts at the corners of a reveal are the thing people notice. Moving the whole layout by half a tile often turns two 15mm slivers into two cuts of about half a tile, which look deliberate.
The order of work: wall, reveal, sill
This is the sequence that gives clean, factory edges where people look and hides cut edges against the frame.
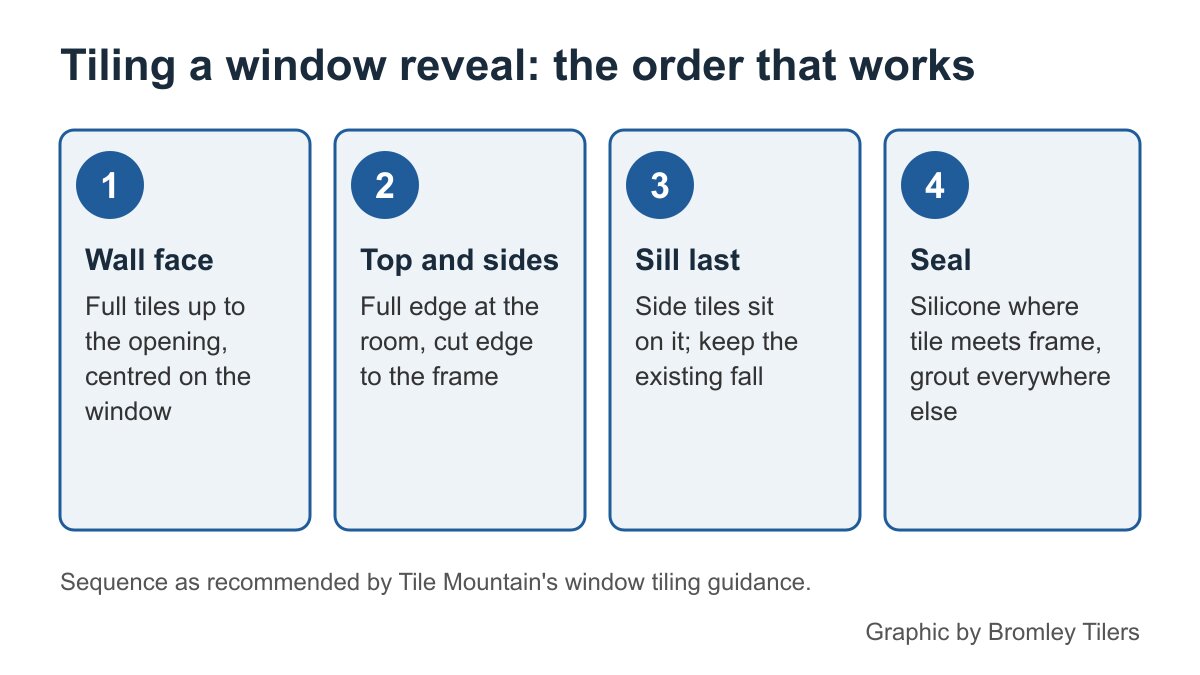
Step 1: tile the wall face up to the opening
Tile the main wall in full tiles up to the window, checking level every few rows. Stop at the edge of the opening. If you are using trim, the wall tiles and the trim go on together (see the next section).
Step 2: tile the top and the sides of the reveal
Measure every reveal cut on its own rather than using one measurement for both sides. A story stick (a straight batten marked with the reveal depth and the tile positions) speeds this up and keeps joints lined up with the wall. Put the factory edge of each tile towards the room and the cut edge against the frame, where silicone will cover it. On the top of the reveal (the soffit), support the tiles with tape or a timber prop while the adhesive grabs, and use a rapid-set or high-grab adhesive for overhead pieces.
Step 3: tile the sill last
The sill goes on after the sides, so the vertical reveal tiles sit on its edge and water running down them lands on the sill rather than in a joint. Fit the sill tile tightly up to the frame at the back. At the front, either finish it flush with the wall tile beneath or let it project slightly if the original sill did. Start with a full tile in the centre of the sill and work out to the sides so any cuts land at the ends, under the reveal tiles.
Step 4: grout, then silicone the frame joint
Grout once the adhesive has cured for the time its maker states. Do not grout the joint between tile and window frame. uPVC and aluminium frames expand and contract with the weather, and rigid grout there cracks. Rake that joint clean and fill it with a flexible silicone instead: mould-resistant in a bathroom, sanitary grade in a shower. If an old bead has gone black, our guide to replacing mouldy silicone shows how to cut it out cleanly.
Trim, mitre or overlap: finishing the edges
Every outside corner on a reveal needs a finish. There are three ways to do it, and the choice depends on the tile.
- Trim. A PVC or metal edge profile is bedded into the adhesive as you tile, so the wall tile and trim go on at the same time. Square profiles such as Schluter’s JOLLY give a crisp edge; rounded ones such as Schluter’s RONDEC soften it. Cut the trim at 45 degrees with a mitre block where the top and side meet. Do not push the trim too far round the corner: it is easy to overlap too much and pack out the reveal so the tiles stand proud. See our tile trim guide for sizes and materials.
- Mitred edges. Both tiles are cut at 45 degrees so they meet in a sharp corner with no visible edge. It looks best with porcelain and stone but needs a wet saw or a cutter with a mitre guide, and the point is fragile in a sill that gets knocked.
- Overlap with a glazed edge. If the tile has a glazed or full-bodied edge (where the colour runs right through), the wall tile can cover the edge of the reveal tile, or the sill tile can overlap the wall tile below. This is the cheapest finish but only works where the exposed edge looks finished.
Our page on tiling around corners covers the same choices on other outside corners in a room.
Tiling a window inside a shower
A window inside a shower is the hardest reveal to get right, because water hits it directly and sits on the sill. Three extra rules apply:
- Waterproof first. Take the tanking membrane over the reveal and the sill and up to the window frame before tiling. Tiles and grout are not waterproof on their own.
- Make the sill shed water. A dead-level shower sill holds a pool against the frame. Build in a fall towards the shower tray with the adhesive bed or by packing out the back of the sill substrate.
- Use sanitary silicone at the frame. Check the joint every year or so and replace it at the first sign of mould or a gap.
If the window is not obscured glass and the shower is in regular use, a frosted window or a recessed shower niche elsewhere may solve more problems than tiling around the existing opening.
Tools and materials for a reveal
- A cutter that can take accurate thin strips; reveal pieces are often under 100mm wide. Our guide to cutting tiles compares manual cutters and wet saws.
- A cement-based flexible adhesive suited to the tile and the background, plus a rapid-set or high-grab one for overhead soffit pieces.
- Trim profiles in the right depth for your tile thickness, a mitre block and a fine hacksaw.
- Spacers, masking tape, a spirit level and a story stick.
- Grout and a silicone matched to the room.
Add a little extra to your tile order for the reveal returns: they eat tiles faster than their area suggests because each strip often comes from its own tile. Our tile quantity guide explains how to allow for returns and wastage.
Mistakes we see on window reveals
- Cut edges facing the room. The factory edge goes outwards, the cut edge goes to the frame.
- Grouting against the frame. It cracks. Silicone only.
- Tiling over a timber window board. Lift it or replace it with backer board.
- Levelling out a sill that was meant to fall. Water then sits against the frame seal.
- Slivers at both sides. Centre the layout on the window before you start the wall.
- Too much trim overlap. The reveal tiles stand proud of the wall and the corner looks bulky.
For a wider walk-through, Tile Mountain’s guide to tiling around a window follows the same sequence with more photos.
Frequently asked questions
Do you tile the window sill first or last?
Last. Tile the wall face, then the top and sides of the reveal, then the sill. The side tiles then sit on the sill tile’s edge, so water running down them lands on the sill rather than into a joint.
Can you tile straight onto a wooden window sill?
It is not a good idea. Timber window boards move with humidity and temperature, which cracks grout and can loosen tiles. Lift the board and tile onto the masonry beneath, or replace it with a cement-based tile backer board.
Should a tiled window sill be level?
Keep whatever fall the original sill had: some are built with a slight fall so condensation runs away from the frame. In a shower the sill should always fall towards the tray.
What goes between the tiles and the window frame?
Flexible silicone, never grout. Frames expand and contract with the weather, and a rigid joint there will crack. Use a mould-resistant silicone in bathrooms and a sanitary grade one in showers.
Do I need trim on a window reveal?
Not always. Trim is the easiest neat finish for most ceramic tiles. Porcelain and stone can be mitred instead, and tiles with a glazed or full-bodied edge can simply overlap.
How do I avoid thin cuts around the window?
Centre the layout on the window rather than starting from a room corner. Dry-lay a row first and move the layout by half a tile if it leaves slivers at the sides of the reveal.
Want a window reveal, splashback or shower tiled properly in Bromley or south-east London? Bromley Tilers can quote for the whole job.
Related guides
- How to Tile a Bathroom Wall: A UK Step-by-Step Guide
- How Much Does Tiling Cost in the UK? A Realistic Price Guide
- How to Remove Old Wall Tiles Without Damaging the Wall
- Porcelain vs Ceramic Tiles: Which Is Right for Your Bathroom or Kitchen?
- How to Tank and Waterproof a Wet Room Before Tiling: A Bromley Homeowner’s Guide
- Do You Need to Seal Natural Stone Tiles Before Grouting? A Tiler Explains
- How to Tile a Bathroom Floor (Including Around the Toilet)
- How to Tile a Shower: Walls, Niche and Waterproofing
- Bathroom Tiling Guide: How to Plan, Prep and Finish a Lasting Job
- Tile Backer Board vs Plasterboard for Bathrooms
- Best Tiles for Small Bathrooms (and How to Make a Space Look Bigger)
- Wall and Floor Tiles for a Wet Room: What Actually Works
- Tiling vs Wall Panels for a Bathroom: Which Is Better?
- Do You Tile the Floor or Walls First in a Bathroom?
- Kitchen Tiling: Splashbacks, Walls and Floors Explained
- How to Tile a Kitchen Splashback: Step-by-Step Bromley Guide
- How to Tile Around Kitchen Sockets, Switches and Worktops
- Kitchen Splashback Tile Ideas: 12 Looks That Work
- How to Lay Metro Tiles in a Herringbone Pattern
- Tiled vs Glass Splashback (and Acrylic): Which Is Best?
- How High Should a Kitchen Splashback Be Tiled? UK Heights Guide
- Types of Tiles: The Complete UK Buyer’s Guide
- Porcelain vs Natural Stone Tiles: Which Should You Choose?
- Natural Stone Tiles Explained: Marble, Travertine, Slate and Limestone
- Mosaic Tiles: Where to Use Them and How They’re Fixed
- Tile Slip Ratings Explained: R Ratings and PTV for UK Floors
- Matt vs Gloss Tiles: Which Finish Is Right for Your Room?
- Cost to Tile a Bathroom in the UK: 2026 Price Breakdown
- Polystyrene Ceiling Tiles: Are They Any Good?
- Cost to Tile a Kitchen in 2026: Floor and Splashback Prices
- Tiling Cost Per Square Metre 2026: Labour and All-In Prices
- Tiler Day Rate UK: What Tilers Charge Per Day in 2026
- Cost to Regrout a Bathroom in 2026: UK Prices Explained
- Floor Tile Prices UK 2026: What You Will Pay Per Square Metre
- Is It Cheaper to Tile or Use Wall Panels? A UK Cost Comparison
- How to Tile: A Complete Beginner’s Guide (UK)
- How to Cut Tiles: Manual Cutter, Wet Saw and Nippers
- How to Cut Holes in Tiles for Pipes and Taps
- How to Grout Tiles (and Get Clean, Even Lines)
- Cork Flooring: Pros, Cons and Where It Works in UK Homes
- How to Mix and Apply Tile Adhesive Correctly
- How to Set Out Tiles for a Perfect Layout
- How to Seal Grout and Tiles in a Bathroom (UK Guide)
- Can You Tile Over Tiles? When It Works and When It Doesn’t
- Tiling Tools List: What You Need for a Professional Finish
- How Much Tile Adhesive Do I Need? Coverage Per Square Metre
- Tile Problems: 9 Common Faults and How to Fix Each
- How to Fix Loose Tiles Without Removing Them
- Cracked Grout Repair: Why It Happens and How to Fix It
- How to Replace a Broken Tile Without Redoing the Wall
- Water Leaking Through Shower Tiles: 6 Causes and Fixes
- Remove Mouldy Silicone Sealant: A 24-Hour Reseal Job
- How to Clean Grout: What Works, and What Etches Stone
- Why Are My Floor Tiles Lifting? The 40m² Bay Rule
- How to Lay Porcelain Paving: 1:80 Fall, 150mm Below DPC
- Tile Patterns: Why Big Tiles Need a One-Third Offset
- Grout Colour Ideas: How to Get the Shade You Chose
- Can You Paint Tiles? Yes on Walls, No in the Shower
- Decoupling Membrane for Tiles: When You Actually Need One
- Can You Tile Over a Wooden Floor? What Changed in 2024
- Tiling Cost 2026: £25 to £95 per m² Labour, UK Rates
- Tile Ideas: 7 Looks and the One Rule Each Needs
- Metro Tiles: Sizes, Bevels and the 1/3 Offset Rule
- Tile Feature Wall: The Weight Limit That Decides Yours
- Tiling Over Underfloor Heating: 14 Days Before Heat On
- How to Tile a Hallway Floor: Set Out From the Door
- Wood Effect Tiles and Marble Effect: 5 Specs to Check
- Tile Levelling Systems: The 3mm Rule That Decides It
- Floor Levelling Compound: How Deep and How Long to Dry
- How to Find a Good Tiler: 9 Checks Before You Book
- Tiling Quote: The 10 Lines a Proper One Must Show
- Tile Trim: Sizes, Profiles and the One-Size-Up Rule
- Tile Spacers: 2mm or 3mm, and When to Pull Them Out
- Tiling the Fireplace: 125mm Hearths, Adhesive and Tiles
- Porcelain vs Stone Paving: Grip, Sealing and Upkeep
- Tiling a Large Floor: Movement Joints Every 10 Metres
- DIY Tiling vs Professional: 6 Jobs to Never Do Yourself
- Terracotta Tiles: Seal Before Grouting, Wait 7 Days
- Tile Drill Bits: Which Bit Won’t Crack Porcelain
- Tiling Corners With Trim: Which Profile, and When to Mitre
- Travertine Tiles: Filled or Unfilled, and How to Seal Them
- Slate Tiles: Calibrated or Riven, and How to Lay Them
- Zellige Tiles: Order 15% Extra and Fix Them Edge to Edge
- Terrazzo Tiles: Real 20mm vs Porcelain, Seal Before Grouting
- Split Face Tiles: Will Your Wall Take 27kg per m²?
- Tile Sealer: Which Tiles Need It and Which Type to Buy
- How to Remove Grout Haze: Which Cleaner for Which Grout
- Efflorescence on Tiles: Why It Comes Back and How to Stop It
- Tile Primer: Which Surfaces Need It and How Much to Dilute
- Epoxy Grout: Where It’s Worth It and How to Apply It
- How to Tile Stairs: Keep Every Riser the Same Height
- Shower Niche: Sizes, Height and Which Wall Can Take One
- How Many Tiles Do I Need? Add 10% to 20% by Layout