


Cracked grout repair is one of those jobs that looks like a twenty minute fix and comes back six months later. The reason is almost always the same: the crack was treated as a cosmetic problem when it was actually a message. Grout is a rigid, brittle material. It does not crack on its own. Something underneath it moved, got wet, or was never suitable in the first place.
Working on bathrooms and kitchens across Bromley and south east London, the same handful of causes come up again and again. This page explains how to read a cracked joint, decide whether grout or flexible sealant belongs there, and repair it so it does not open up again.
Why grout cracks in the first place
There are four common causes, and the crack pattern usually tells you which one you are looking at.
Movement between two different surfaces. This is the big one. Where a tiled wall meets a tiled floor, where a wall meets a bath, or where two walls meet in an internal corner, you have two independent structures that expand, contract and settle at slightly different rates. A rigid grout spanning that junction has nowhere to go, so it shears. If your crack runs neatly along a corner or around the rim of a bath, this is your answer, and no amount of regrouting will hold it.
A substrate that was never right. Standard plasterboard inside a shower enclosure will soften once water gets past the tiles. Timber floors that flex underfoot will crack the grout above them within a season. Chipboard and unbraced floorboards are the usual culprits on upstairs bathrooms. When the background moves, the grout goes first and the tiles follow.
Thermal movement. Underfloor heating cycles a floor through a temperature range every day. Tiles and screed expand and contract with it. If a standard, non-flexible adhesive and grout were used, cracks tend to appear in lines that follow the heating zones rather than the tile pattern.
Missing movement joints. BS 5385, the British Standard series covering wall and floor tiling, calls for movement joints at the perimeter of tiled floors, at changes of background material, and at intervals through large tiled areas. Without them, thermal and structural stress has nowhere to be released, so it concentrates in the weakest line available, which is the grout. On a large open plan kitchen floor tiled wall to wall with no perimeter joint, cracked grout is not bad luck, it is arithmetic. The Tile Association publishes technical guidance on this if you want the detail.
Grout or silicone? Where each one belongs
Most repeat cracks in domestic bathrooms come down to one mistake: grout used in a place that needed a flexible sealant. Grout belongs between tiles that sit on the same plane and the same background. Everywhere two surfaces can move relative to each other, you want a flexible sanitary silicone or a proper movement joint instead.
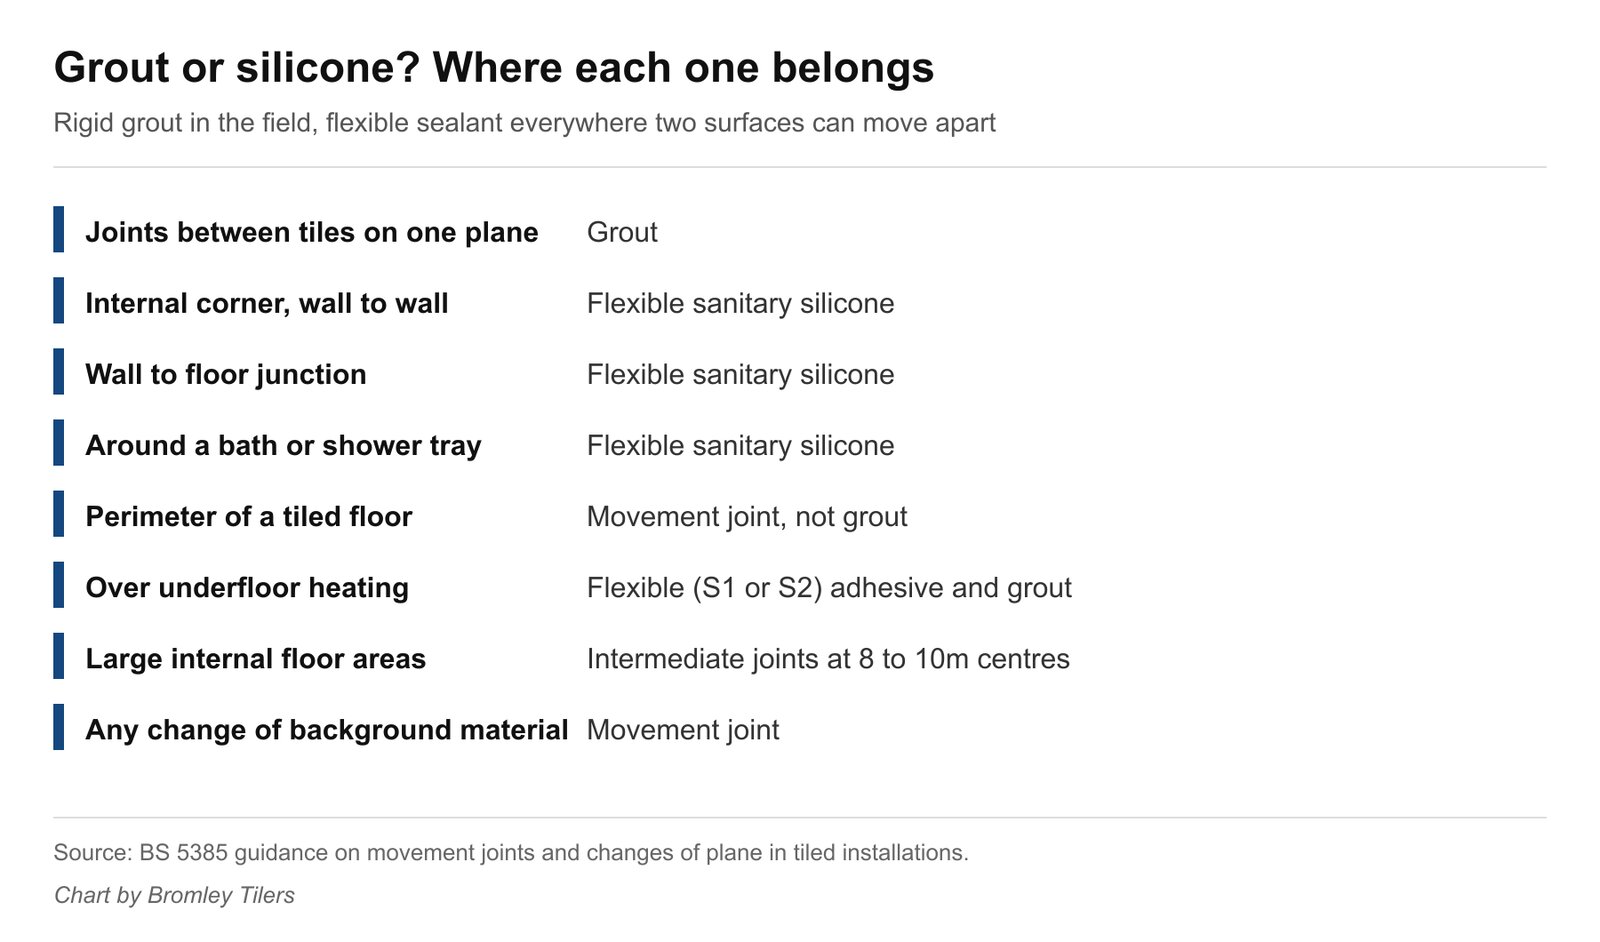
The panel below is the short version of what goes where.
If your cracked joint appears in the flexible column and currently has grout in it, the repair is not to regrout it. It is to rake the grout out entirely and replace it with silicone. Do that once and the problem is gone. Regrout it and you will be back at it before the year is out.
How to tell a cosmetic crack from a structural one
Before you buy anything, spend ten minutes reading the failure.
- Hairline cracks scattered through the field of the tiling usually mean the grout was mixed too wet, dried too fast, or was over-worked when it was polished off. Annoying, but shallow and easy to put right.
- A single clean crack following a corner or a junction is movement. Change the material, not the technique.
- Cracks with tiles that sound hollow when you tap them mean the adhesive bond has failed underneath. Tap across the whole area with a knuckle or the handle of a screwdriver. A dull, drummy note means the tile is no longer stuck down. Regrouting a debonded tile achieves nothing.
- Cracks that run straight through tiles as well as grout point at structural movement in the building or the floor deck. That is a different job, and it needs looking at before anything is retiled.
- Crumbling, powdery grout in a shower means water has been sitting in the joints, often because the joints were never filled to full depth. Check the tiles are still sound before you assume it is a grout problem.
How to repair cracked grout properly
Assuming the tiles are sound and the joint genuinely wants grout, here is the sequence that lasts.
1. Rake out the full depth, not the surface. A grout rake, an oscillating multi-tool with a grout blade, or a carbide scraper will do it. Take out the whole joint, right back to the adhesive bed. Skimming a fresh two millimetres of grout over a cracked joint is the single most common reason repairs fail. Work along the joint, not across it, and keep the blade off the tile edges, especially on glazed ceramics which chip easily.
2. Vacuum and wash out the dust. Grout will not bond to a dusty joint. Vacuum the joints, then wipe with a damp sponge and let the area dry.
3. Deal with anything wet. If the raked out joint is damp, or the substrate behind it is soft, stop. Something is leaking and grout will not fix it. In a shower this often means the tanking was missed or the tray seal has failed, and the tiles need to come off in that area.
4. Choose the right grout. More on the grades below. In a bathroom, use a flexible cement grout with low water absorption as your baseline.
5. Work it in at an angle. Load a rubber grout float, hold it at roughly 45 degrees to the joint, and press the grout in so it fills the joint completely. Then scrape the excess off diagonally so the float does not drag the fresh grout back out.
6. Clean off at the right moment. Wait until the grout has firmed up but not hardened, usually fifteen to thirty minutes, then wipe with a barely damp sponge, rinsing frequently. Too soon and you wash the joint out. Too late and you are scrubbing cured grout off glaze.
7. Leave it alone. Most cement grouts want at least 24 hours before the shower goes back into use, and longer before sealing. Read the bag. Rushing this is why a new joint can crack in its first week.
What to use instead of standard grout
Grout is graded under BS EN 13888, and the code on the bag tells you what you are buying. Cementitious grouts are labelled CG, and reactive resin grouts, usually epoxy, are labelled RG. Cementitious grouts split into CG1, the basic grade, and CG2, the improved grade. CG2 can carry two extra letters: A for high abrasion resistance, and W for reduced water absorption. So a bag marked CG2 W is an improved cement grout with low water absorption, which is what you want in a shower.
Practical translation:
- Bathroom walls and floors: a CG2 W flexible cement grout. Reduced water absorption keeps the joints from acting as a sponge.
- Over underfloor heating, or on a timber floor: a flexible grout paired with a flexible S1 or S2 classified adhesive. Mixing a rigid adhesive with a flexible grout does not help, the movement still has to go somewhere.
- Wet rooms, steam rooms and anywhere chemically aggressive: an epoxy (RG) grout. It is harder to work with and unforgiving on cleaning off, but it does not absorb water and does not stain.
- Every corner, junction and perimeter: flexible sanitary silicone, matched to the grout colour, with a mould inhibitor.
One more thing worth knowing: grout colour will not match exactly between the old and the new, even from the same brand and batch code, because the existing grout has aged and picked up soap and limescale. If you are patching a small visible area, expect a slight difference. On a wall where it will show, regrouting the whole wall gives a far better result than a patch.
When to call a tiler
A single cracked joint in a splashback is a Saturday morning job. Call someone in when you find any of the following: tiles sounding hollow across more than a small patch, damp or soft board behind the joints, cracks running through the tiles themselves, water appearing on a ceiling below a bathroom, or a shower area with no visible tanking. In those cases the grout is a symptom, and repairing it hides the problem while it gets worse and more expensive.
If you are weighing up a repair against a proper regrout or a retile, our other tiling guides and cost pages set out what each option involves.
Frequently asked questions
Can you put new grout over old cracked grout?
You can, and it is the reason most repairs fail. Fresh grout skimmed over a cracked joint has almost no thickness and no key, so it powders out within weeks. Rake the old grout out to the full depth of the joint first, then refill.
Why does the grout in my shower keep cracking in the same corner?
Because a corner is a change of plane, and the two walls move independently. That joint should be flexible sanitary silicone rather than grout. Rake the grout out completely, let the corner dry, and seal it with silicone instead.
Is cracked grout a sign of a leak?
Not always, but it can become one. A cracked joint lets water reach the adhesive and the background. In a shower without proper tanking, that is how a small crack turns into loose tiles and a damp ceiling downstairs. If the grout is crumbling and powdery rather than just cracked, water has already been getting in.
How long should grout last before it cracks?
Well specified and correctly installed grout in a domestic bathroom should last the life of the tiling, which is often fifteen to twenty years or more. Cracking within the first year or two usually points at the specification or the installation rather than wear.
Does flexible grout stop all cracking?
No. Flexible grout absorbs small amounts of movement, which helps over underfloor heating and on slightly springy floors. It does not substitute for a movement joint at a perimeter, or for silicone at a change of plane. Those junctions need a joint designed to move, not a grout that flexes a little.
Should I seal the new grout?
Cement grouts benefit from a penetrating sealer once fully cured, typically after a few days. It slows staining and makes cleaning easier. Epoxy grouts do not need sealing. If your tiles are natural stone, seal the stone before grouting as well, or the grout will stain the tile faces.
Related guides
- How to Tile a Bathroom Wall: A UK Step-by-Step Guide
- How Much Does Tiling Cost in the UK? A Realistic Price Guide
- How to Remove Old Wall Tiles Without Damaging the Wall
- Porcelain vs Ceramic Tiles: Which Is Right for Your Bathroom or Kitchen?
- How to Tank and Waterproof a Wet Room Before Tiling: A Bromley Homeowner’s Guide
- Do You Need to Seal Natural Stone Tiles Before Grouting? A Tiler Explains
- How to Tile a Bathroom Floor (Including Around the Toilet)
- How to Tile a Shower: Walls, Niche and Waterproofing
- Construction Trade News: June 2026
- Bathroom Tiling Guide: How to Plan, Prep and Finish a Lasting Job
- Tile Backer Board vs Plasterboard for Bathrooms
- Best Tiles for Small Bathrooms (and How to Make a Space Look Bigger)
- Wall and Floor Tiles for a Wet Room: What Actually Works
- Tiling vs Wall Panels for a Bathroom: Which Is Better?
- Do You Tile the Floor or Walls First in a Bathroom?
- Tiling and Bathroom Trade News: Mid-June 2026
- Kitchen Tiling: Splashbacks, Walls and Floors Explained
- How to Tile a Kitchen Splashback: Step-by-Step Bromley Guide
- How to Tile Around Kitchen Sockets, Switches and Worktops
- Kitchen Splashback Tile Ideas: 12 Looks That Work
- Tiling and Bathroom Trade News: Late June 2026
- How to Lay Metro Tiles in a Herringbone Pattern
- Tiled vs Glass Splashback (and Acrylic): Which Is Best?
- How High Should a Kitchen Splashback Be Tiled? UK Heights Guide
- Tiling and Bathroom Trade News: Early July 2026
- Types of Tiles: The Complete UK Buyer’s Guide
- Porcelain vs Natural Stone Tiles: Which Should You Choose?
- Natural Stone Tiles Explained: Marble, Travertine, Slate and Limestone
- Tiling and Bathroom Trade News: Mid-July 2026
- Mosaic Tiles: Where to Use Them and How They’re Fixed
- Tile Slip Ratings Explained: R Ratings and PTV for UK Floors
- Matt vs Gloss Tiles: Which Finish Is Right for Your Room?
- Cost to Tile a Bathroom in the UK: 2026 Price Breakdown
- Polystyrene Ceiling Tiles: Are They Any Good?
- Cost to Tile a Kitchen in 2026: Floor and Splashback Prices
- Tiling and Bathroom Trade News: Mid-July 2026
- Tiling Cost Per Square Metre 2026: Labour and All-In Prices
- Tiler Day Rate UK: What Tilers Charge Per Day in 2026
- Cost to Regrout a Bathroom in 2026: UK Prices Explained
- Floor Tile Prices UK 2026: What You Will Pay Per Square Metre
- Is It Cheaper to Tile or Use Wall Panels? A UK Cost Comparison
- How to Tile: A Complete Beginner’s Guide (UK)
- How to Cut Tiles: Manual Cutter, Wet Saw and Nippers
- How to Cut Holes in Tiles for Pipes and Taps
- How to Grout Tiles (and Get Clean, Even Lines)
- Cork Flooring: Pros, Cons and Where It Works in UK Homes
- Tiling and Bathroom Trade News: Late July 2026
- How to Mix and Apply Tile Adhesive Correctly
- How to Set Out Tiles for a Perfect Layout
- How to Seal Grout and Tiles in a Bathroom (UK Guide)
- Can You Tile Over Tiles? When It Works and When It Doesn’t
- Tiling Tools List: What You Need for a Professional Finish
- How Much Tile Adhesive Do I Need? Coverage Per Square Metre
- Tiling Trade News: Topps App, Costs Up 6% (Aug 2026)
- Tile Problems: 9 Common Faults and How to Fix Each
- How to Fix Loose Tiles Without Removing Them
- Tiling Trade News: TTA Silica Warning, 2% Retentions
- How to Replace a Broken Tile Without Redoing the Wall
- Water Leaking Through Shower Tiles: 6 Causes and Fixes
- Remove Mouldy Silicone Sealant: A 24-Hour Reseal Job
- How to Clean Grout: What Works, and What Etches Stone
- Why Are My Floor Tiles Lifting? The 40m² Bay Rule
- Tiling Trade News: 3,841 Construction Firms Failed
- How to Lay Porcelain Paving: 1:80 Fall, 150mm Below DPC
- Tile Patterns: Why Big Tiles Need a One-Third Offset
- Grout Colour Ideas: How to Get the Shade You Chose
- Can You Paint Tiles? Yes on Walls, No in the Shower
- Decoupling Membrane for Tiles: When You Actually Need One
- Can You Tile Over a Wooden Floor? What Changed in 2024
- Tiling Cost 2026: £25 to £95 per m² Labour, UK Rates
- Tile Ideas: 7 Looks and the One Rule Each Needs
- Metro Tiles: Sizes, Bevels and the 1/3 Offset Rule
- Tile Feature Wall: The Weight Limit That Decides Yours
- Tiling Over Underfloor Heating: 14 Days Before Heat On
- How to Tile a Hallway Floor: Set Out From the Door
- Wood Effect Tiles and Marble Effect: 5 Specs to Check
- Tile Levelling Systems: The 3mm Rule That Decides It
- Tiling Trade News: Repair Work Up 1.7%, Headlam Fails
- Floor Levelling Compound: How Deep and How Long to Dry
- How to Find a Good Tiler: 9 Checks Before You Book
- Tiling Quote: The 10 Lines a Proper One Must Show
- Tile Trim: Sizes, Profiles and the One-Size-Up Rule
- Tile Spacers: 2mm or 3mm, and When to Pull Them Out
- Tiling the Fireplace: 125mm Hearths, Adhesive and Tiles
- Tiling Trade News: Shaws Sinks Reprice on 1 November
- Porcelain vs Stone Paving: Grip, Sealing and Upkeep
- Tiling a Large Floor: Movement Joints Every 10 Metres
- DIY Tiling vs Professional: 6 Jobs to Never Do Yourself
- Terracotta Tiles: Seal Before Grouting, Wait 7 Days
- Tile Drill Bits: Which Bit Won’t Crack Porcelain
- Tiling Corners With Trim: Which Profile, and When to Mitre
- Travertine Tiles: Filled or Unfilled, and How to Seal Them
- Slate Tiles: Calibrated or Riven, and How to Lay Them
- Zellige Tiles: Order 15% Extra and Fix Them Edge to Edge
- Terrazzo Tiles: Real 20mm vs Porcelain, Seal Before Grouting
- Tiling Trade News: 36% Now Add a Bathroom Accent Wall
- Split Face Tiles: Will Your Wall Take 27kg per m²?
- Tile Sealer: Which Tiles Need It and Which Type to Buy
- How to Remove Grout Haze: Which Cleaner for Which Grout
- Efflorescence on Tiles: Why It Comes Back and How to Stop It
- Tile Primer: Which Surfaces Need It and How Much to Dilute
- Epoxy Grout: Where It’s Worth It and How to Apply It
- How to Tile Stairs: Keep Every Riser the Same Height
- Shower Niche: Sizes, Height and Which Wall Can Take One
- How Many Tiles Do I Need? Add 10% to 20% by Layout
- How to Tile a Window Sill: Sill Last, Silicone at the Frame
- Tiling Trade News: Victorian Plumbing Tile Sales Up 76%
- How to Tile Around a Toilet: Lift the Pan or Cut Round It
- Tile to Carpet Transition: Pick the Strip by the Height Gap