


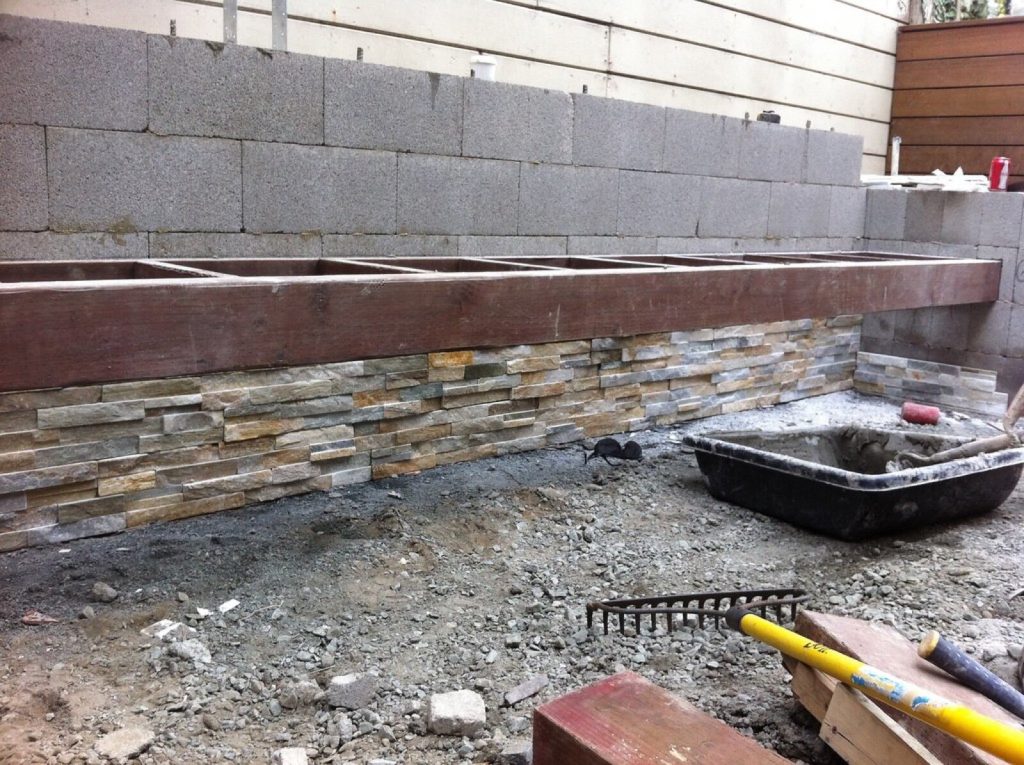
Split face tiles are strips of natural stone, usually slate, quartzite, sandstone or marble, that have been split rather than sawn across the face, so each piece shows a rough, layered edge. They are sold glued into interlocking panels, and on a wall they read as dry stacked stone. The look is the easy part. The parts that go wrong are weight, the wall behind, the corners and the sealing, and those are what this page covers, with the numbers a tiler in Bromley would actually check before quoting.
What split face tiles are, and the main types
Most split face products share one format: thin strips of stone bonded to each other (or to a mesh) to make a panel roughly 150 mm high and 300 to 600 mm long, often with staggered or Z-shaped ends so the panels lock together without a straight vertical joint. The face is irregular, so the thickness quoted on the box is a nominal figure; the thickest strips can stand proud by several millimetres more.
- Slate: black, grey, rust and green tones. Usually the lightest and most forgiving of the natural options, and the easiest to cut.
- Quartzite: silvery and sparkly, very hard and dense. Hard on cutting blades and heavier per square metre.
- Sandstone and limestone: warm, soft colours, but more porous, so they stain more easily and need sealing with care.
- Marble: whites and creams. Pretty, but sensitive to acidic cleaners.
- Porcelain and ceramic split face effect: moulded tiles that copy the texture. Much lighter, consistent in colour, no sealing, and the safer choice for a shower or a stud wall.
- Composite and PU panels: lightweight resin or polyurethane panels that imitate stone. Fixed with adhesive or screws, with none of the weight problem, though they do not feel like stone up close.
If you are still weighing natural stone against porcelain in general, our natural stone tiles guide sets out the trade-offs for floors and walls.
How heavy are split face tiles?
This is the question that decides the whole job. Take a typical real example: a 300 x 150 mm black slate split face panel listed by one UK retailer at 1.2 kg a piece, with 22.22 pieces to the square metre. That is roughly 27 kg/m² of stone before any adhesive goes on. Quartzite and thicker sandstone panels can be heavier again, and some ledgestone ranges go well past that.
Now compare it with what the wall can carry. Instarmac, the maker of Tilemaster and UltraTile adhesives, publishes these maximum tile weights by wall substrate, including adhesive and grout:
- Gypsum plaster: 20 kg/m²
- Plasterboard (gypsum), unskimmed: 32 kg/m²
- Exterior grade plywood: 30 kg/m²
- Gypsum fibre boards: 40 kg/m²
- Tile backer boards: 40 kg/m²
- Glass reinforced cement sheets: 50 kg/m²
The same table allows 2 to 4 kg/m² for adhesive and grout. Split face stone uses the heavier end of that, because you need a full bed of adhesive to fill the back of an irregular panel. So the 27 kg/m² slate example lands at around 30 to 31 kg/m² on the wall. That is already over the limit for plaster, and right at the edge for bare plasterboard. Heavier stone goes over it.
The practical rule we work to: if the wall is plastered, or is plasterboard with a skim, natural split face stone does not go straight on it. Either the plaster comes off back to masonry, or the wall is boarded with a cement backer board fixed through to the studs or masonry, at the spacing the board maker specifies. Our comparison of tile backer board vs plasterboard covers the boards themselves. Backer board limits vary by brand and thickness, so check the board manufacturer’s own figure against the weight of your chosen stone.
Where split face tiles work, and where they do not
Split face stone suits walls you look at rather than walls you touch or splash. Good places:
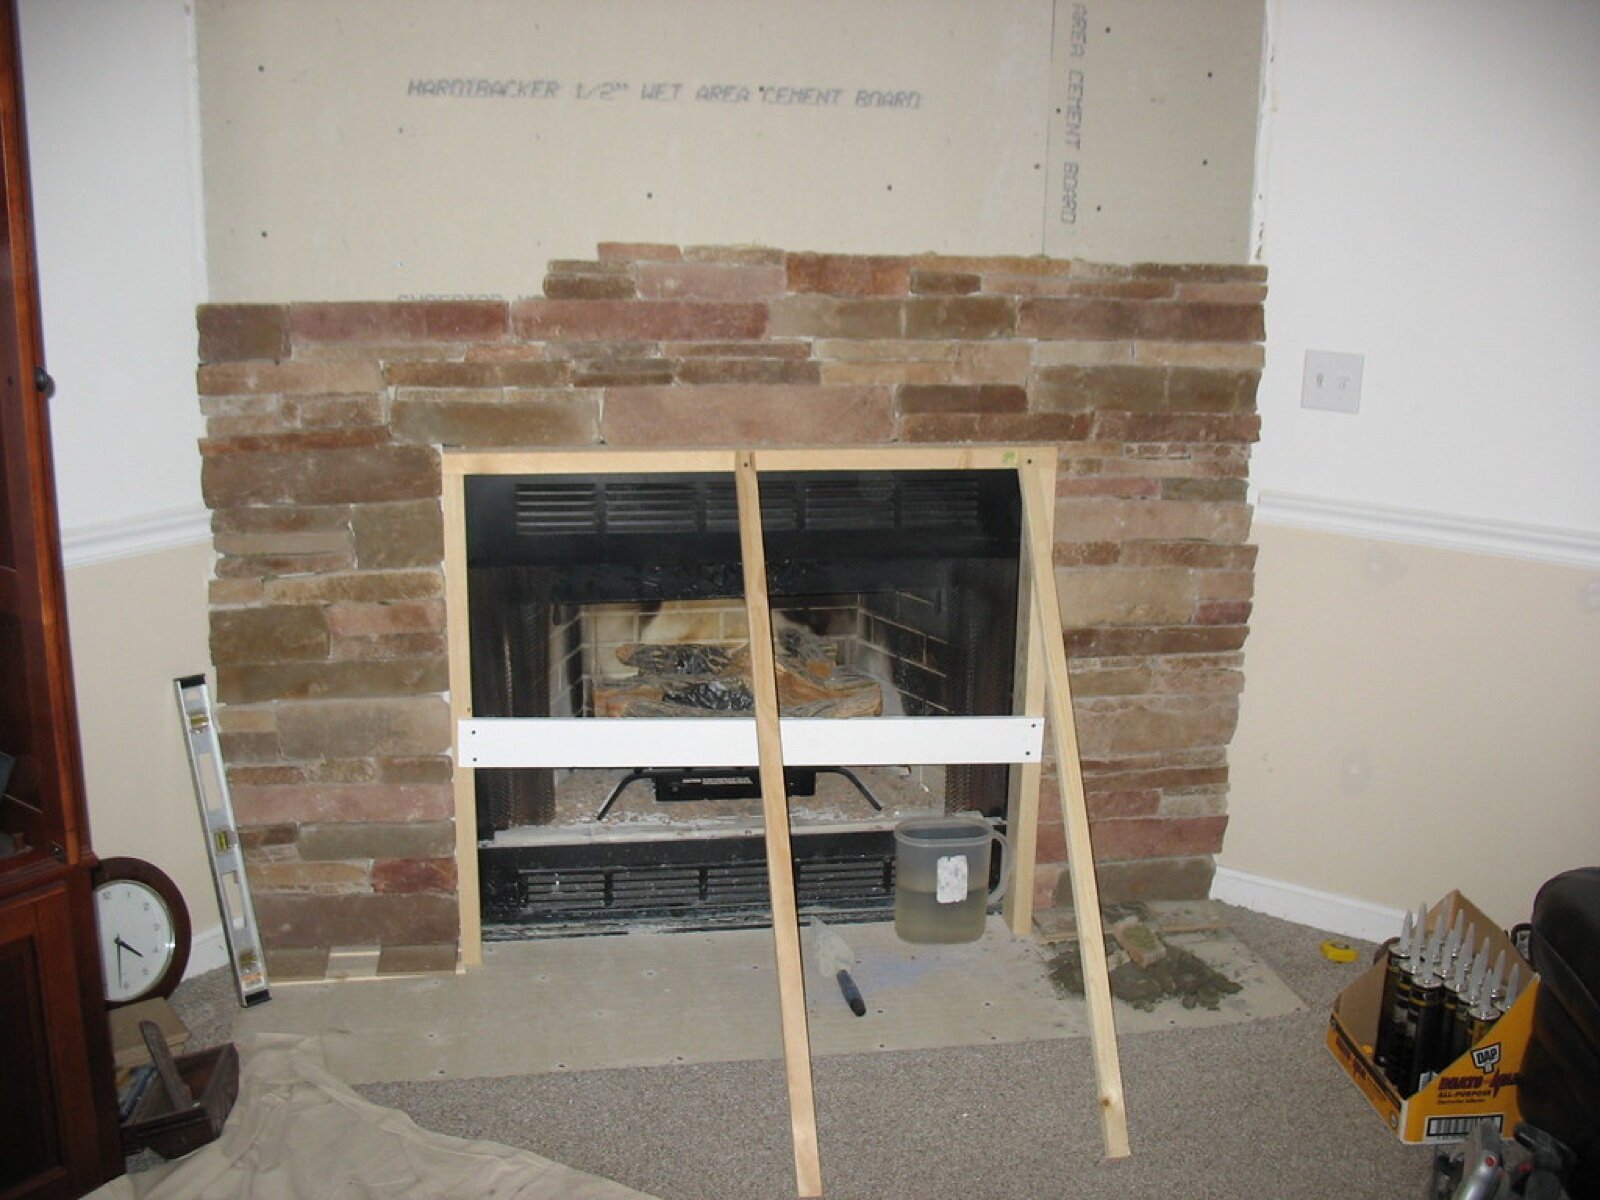
- Chimney breasts and fireplace surrounds: the classic use. Real stone handles heat well, provided the adhesive is rated for it (see below).
- Living room and bedroom feature walls: one wall, lit from above or the side to throw shadow across the texture. More ideas in our tile feature wall ideas.
- Behind a TV or bed: fine, as long as you plan the cable route and any fixings before tiling, because drilling through split face later is awkward.
- Outdoors: garden walls, planters and house fronts, using stone and adhesive both rated for external use and frost. High external cladding needs a specialist system, not adhesive alone.
Places to avoid or think twice:
- Inside a shower enclosure: the rough face traps soap and limescale and is miserable to clean. Some retailers advise against natural split face where it takes direct water. A porcelain split face effect tile is the sensible swap.
- Kitchen splashbacks behind the hob: grease settles into the texture. If you want it, seal heavily and accept extra cleaning.
- Narrow corridors: the face projects, and sharp edges snag coats and knuckles.
Installing split face tiles: the steps that matter
Split face is not difficult to fix, but it punishes shortcuts. In order:
1. Prepare the wall
Sound, flat, clean and dry, as for any tiling, and strong enough for the weight worked out above. Prime according to the adhesive maker’s instructions, especially on porous sand and cement render or on backer board.
2. Dry lay and blend
Natural stone varies from box to box. Open several boxes and mix panels as you go so you do not end up with a light band halfway up the wall.
3. Start level, from the bottom
Fix a level batten for the first row. Split face panels are heavy and slip on wet adhesive, and once the first row is out, every joint above it will show it.
4. Use the right adhesive, and plenty of it
A cementitious adhesive classed C2 (improved) with slip resistance, and a flexible S1 rated product on boards or timber, is the usual specification. White adhesive avoids shadowing through pale marble and limestone. Back butter each panel as well as notching the wall so the hollows in the back are filled; voids behind heavy stone are how panels come loose. Check the adhesive’s data sheet for heat resistance if it is going on a chimney breast.
5. Cut with a wet saw or a diamond blade
Use a wet tile saw or an angle grinder with a diamond blade, outside or with dust extraction. Stone dust, particularly from quartzite, contains crystalline silica, so wear a proper dust mask (FFP3) and eye protection.
6. Clean as you go
Adhesive squeezed onto a rough face sets hard in the texture and is almost impossible to remove later. Wipe it off while it is wet.
Corners, ends and edges
Corners are where split face jobs look cheap or expensive. There are three ways to finish them:
- Matching L-shaped corner pieces: most ranges sell them. They alternate long and short returns so the corner looks like interlocked stone. The neatest option, and the one to buy at the same time as the main stock so the colour matches.
- Mitred edges: both panels cut at 45 degrees and butted. Clean, but fiddly on an irregular face and easy to chip.
- Exposed ends: on a feature wall that stops mid-room, panels can end on a natural edge, or a metal trim can cap the run. Decide this before the first row goes up, because it changes your setting out.
On a chimney breast you have two external corners per side, so the corner pieces add up quickly. Count them separately from the flat area when ordering, and add 10 to 15 percent extra to the flat area for cuts and colour blending.
Grouting and sealing split face tiles
Most split face panels are designed to butt together with no grout at all; the joints are hidden in the layered face. If your range has wider joints by design, follow its own instructions, and seal the stone first so grout does not stain the face. The same principle is explained in our page on sealing natural stone before grouting.
Natural stone is porous, so seal it once the adhesive has cured, using an impregnating sealer made for natural stone. Choose a matt, invisible finish if you want it to look untouched, or a colour enhancing sealer to deepen slate and sandstone. Apply with a brush rather than a cloth, so it reaches into the texture, and wipe off the surplus before it dries on the high points. Porcelain split face effect tiles do not need sealing.
Looking after a split face wall
- Dust it with a soft brush or the brush attachment on a vacuum cleaner. The ridges collect dust, particularly above a fire.
- Use pH neutral stone cleaner. Acidic and limescale products etch marble, limestone and sandstone.
- Reseal when water stops beading on the surface, typically every few years indoors, more often near a fire or outdoors.
Frequently asked questions
Can you put split face tiles on plasterboard?
Only if the total weight, stone plus adhesive, stays under the plasterboard limit of 32 kg/m² for unskimmed board, and never on a plaster skim, which is limited to 20 kg/m². Many natural split face ranges come close to or exceed that, so a cement backer board fixed to the studs is the safer base.
Do split face tiles need grouting?
Usually not. Most panels are made to butt tightly together, and the joints disappear into the layered face. Follow the instructions for your range, as a few designs are intended to be grouted.
Can split face tiles go around a wood burner?
Yes, natural stone handles heat well, and a chimney breast is the most common place for it. Check that the adhesive is suitable for the temperatures involved and keep any clearances your stove manufacturer and installer specify.
Do I need to seal split face tiles?
Natural stone versions, yes. Use an impregnating sealer for natural stone after the adhesive has cured. Porcelain split face effect tiles are not porous and do not need it.
How do you cut split face tiles?
With a wet tile saw or an angle grinder fitted with a diamond blade. Work outside or with dust extraction, and wear an FFP3 mask, because cutting stone releases silica dust.
Are split face tiles suitable for a shower?
Natural split face is a poor choice in a shower: the rough face holds soap and limescale and is hard to keep clean. A porcelain split face effect tile gives the same look with none of the upkeep.
Planning a stone chimney breast or a feature wall in Bromley or south east London? Bromley Tilers can check the wall, work out the weight and fit it properly.
Related guides
- How to Tile a Bathroom Wall: A UK Step-by-Step Guide
- How Much Does Tiling Cost in the UK? A Realistic Price Guide
- How to Remove Old Wall Tiles Without Damaging the Wall
- Porcelain vs Ceramic Tiles: Which Is Right for Your Bathroom or Kitchen?
- How to Tank and Waterproof a Wet Room Before Tiling: A Bromley Homeowner’s Guide
- Do You Need to Seal Natural Stone Tiles Before Grouting? A Tiler Explains
- How to Tile a Bathroom Floor (Including Around the Toilet)
- How to Tile a Shower: Walls, Niche and Waterproofing
- Construction Trade News: June 2026
- Bathroom Tiling Guide: How to Plan, Prep and Finish a Lasting Job
- Tile Backer Board vs Plasterboard for Bathrooms
- Best Tiles for Small Bathrooms (and How to Make a Space Look Bigger)
- Wall and Floor Tiles for a Wet Room: What Actually Works
- Tiling vs Wall Panels for a Bathroom: Which Is Better?
- Do You Tile the Floor or Walls First in a Bathroom?
- Tiling and Bathroom Trade News: Mid-June 2026
- Kitchen Tiling: Splashbacks, Walls and Floors Explained
- How to Tile a Kitchen Splashback: Step-by-Step Bromley Guide
- How to Tile Around Kitchen Sockets, Switches and Worktops
- Kitchen Splashback Tile Ideas: 12 Looks That Work
- Tiling and Bathroom Trade News: Late June 2026
- How to Lay Metro Tiles in a Herringbone Pattern
- Tiled vs Glass Splashback (and Acrylic): Which Is Best?
- How High Should a Kitchen Splashback Be Tiled? UK Heights Guide
- Tiling and Bathroom Trade News: Early July 2026
- Types of Tiles: The Complete UK Buyer’s Guide
- Porcelain vs Natural Stone Tiles: Which Should You Choose?
- Natural Stone Tiles Explained: Marble, Travertine, Slate and Limestone
- Tiling and Bathroom Trade News: Mid-July 2026
- Mosaic Tiles: Where to Use Them and How They’re Fixed
- Tile Slip Ratings Explained: R Ratings and PTV for UK Floors
- Matt vs Gloss Tiles: Which Finish Is Right for Your Room?
- Cost to Tile a Bathroom in the UK: 2026 Price Breakdown
- Polystyrene Ceiling Tiles: Are They Any Good?
- Cost to Tile a Kitchen in 2026: Floor and Splashback Prices
- Tiling and Bathroom Trade News: Mid-July 2026
- Tiling Cost Per Square Metre 2026: Labour and All-In Prices
- Tiler Day Rate UK: What Tilers Charge Per Day in 2026
- Cost to Regrout a Bathroom in 2026: UK Prices Explained
- Floor Tile Prices UK 2026: What You Will Pay Per Square Metre
- Is It Cheaper to Tile or Use Wall Panels? A UK Cost Comparison
- How to Tile: A Complete Beginner’s Guide (UK)
- How to Cut Tiles: Manual Cutter, Wet Saw and Nippers
- How to Cut Holes in Tiles for Pipes and Taps
- How to Grout Tiles (and Get Clean, Even Lines)
- Cork Flooring: Pros, Cons and Where It Works in UK Homes
- Tiling and Bathroom Trade News: Late July 2026
- How to Mix and Apply Tile Adhesive Correctly
- How to Set Out Tiles for a Perfect Layout
- How to Seal Grout and Tiles in a Bathroom (UK Guide)
- Can You Tile Over Tiles? When It Works and When It Doesn’t
- Tiling Tools List: What You Need for a Professional Finish
- How Much Tile Adhesive Do I Need? Coverage Per Square Metre
- Tiling Trade News: Topps App, Costs Up 6% (Aug 2026)
- Tile Problems: 9 Common Faults and How to Fix Each
- How to Fix Loose Tiles Without Removing Them
- Cracked Grout Repair: Why It Happens and How to Fix It
- Tiling Trade News: TTA Silica Warning, 2% Retentions
- How to Replace a Broken Tile Without Redoing the Wall
- Water Leaking Through Shower Tiles: 6 Causes and Fixes
- Remove Mouldy Silicone Sealant: A 24-Hour Reseal Job
- How to Clean Grout: What Works, and What Etches Stone
- Why Are My Floor Tiles Lifting? The 40m² Bay Rule
- Tiling Trade News: 3,841 Construction Firms Failed
- How to Lay Porcelain Paving: 1:80 Fall, 150mm Below DPC
- Tile Patterns: Why Big Tiles Need a One-Third Offset
- Grout Colour Ideas: How to Get the Shade You Chose
- Can You Paint Tiles? Yes on Walls, No in the Shower
- Decoupling Membrane for Tiles: When You Actually Need One
- Can You Tile Over a Wooden Floor? What Changed in 2024
- Tiling Cost 2026: £25 to £95 per m² Labour, UK Rates
- Tile Ideas: 7 Looks and the One Rule Each Needs
- Metro Tiles: Sizes, Bevels and the 1/3 Offset Rule
- Tile Feature Wall: The Weight Limit That Decides Yours
- Tiling Over Underfloor Heating: 14 Days Before Heat On
- How to Tile a Hallway Floor: Set Out From the Door
- Wood Effect Tiles and Marble Effect: 5 Specs to Check
- Tile Levelling Systems: The 3mm Rule That Decides It
- Tiling Trade News: Repair Work Up 1.7%, Headlam Fails
- Floor Levelling Compound: How Deep and How Long to Dry
- How to Find a Good Tiler: 9 Checks Before You Book
- Tiling Quote: The 10 Lines a Proper One Must Show
- Tile Trim: Sizes, Profiles and the One-Size-Up Rule
- Tile Spacers: 2mm or 3mm, and When to Pull Them Out
- Tiling the Fireplace: 125mm Hearths, Adhesive and Tiles
- Tiling Trade News: Shaws Sinks Reprice on 1 November
- Porcelain vs Stone Paving: Grip, Sealing and Upkeep
- Tiling a Large Floor: Movement Joints Every 10 Metres
- DIY Tiling vs Professional: 6 Jobs to Never Do Yourself
- Terracotta Tiles: Seal Before Grouting, Wait 7 Days
- Tile Drill Bits: Which Bit Won’t Crack Porcelain
- Tiling Corners With Trim: Which Profile, and When to Mitre
- Travertine Tiles: Filled or Unfilled, and How to Seal Them
- Slate Tiles: Calibrated or Riven, and How to Lay Them
- Zellige Tiles: Order 15% Extra and Fix Them Edge to Edge
- Terrazzo Tiles: Real 20mm vs Porcelain, Seal Before Grouting
- Tiling Trade News: 36% Now Add a Bathroom Accent Wall
- Tile Sealer: Which Tiles Need It and Which Type to Buy
- How to Remove Grout Haze: Which Cleaner for Which Grout
- Efflorescence on Tiles: Why It Comes Back and How to Stop It
- Tile Primer: Which Surfaces Need It and How Much to Dilute
- Epoxy Grout: Where It’s Worth It and How to Apply It
- How to Tile Stairs: Keep Every Riser the Same Height
- Shower Niche: Sizes, Height and Which Wall Can Take One
- How Many Tiles Do I Need? Add 10% to 20% by Layout
- How to Tile a Window Sill: Sill Last, Silicone at the Frame
- Tiling Trade News: Victorian Plumbing Tile Sales Up 76%
- How to Tile Around a Toilet: Lift the Pan or Cut Round It
- Tile to Carpet Transition: Pick the Strip by the Height Gap
- Tile Skirting: Leave a 6mm Gap and Seal, Never Grout
- Tile Backer Board: Cement or Foam, Which Thickness, Fixings
- Quarry Tiles: Seal Them or Not, and How to Clean Them
- Rapid Set Tile Adhesive vs Standard: 30 Mins or 24 Hours
- Can You Tile Onto Plaster? Yes, Up to 20kg per m²