


Tile spacers are the small plastic crosses, T-pieces and wedges that hold an even gap between tiles while the adhesive sets, and the two decisions that matter are what size to use and when to take them out. Pick the wrong size and you either break the British Standard minimum joint or end up with grout lines far wider than the tile needs. Leave them in and grout over them, and small cracks appear over each one within months. This page covers the sizes, the types, the joint widths BS 5385 sets for walls, and the way we use spacers on jobs across Bromley and South East London.
What tile spacers do, and what they cannot do
A spacer holds a joint open while the adhesive is soft, which gives you three things:
- Even grout lines. The eye picks up a joint that wanders from 2mm to 4mm across a wall far more readily than it notices the joint width itself.
- Room for movement. Tiles, adhesive and the wall or floor behind all expand and contract slightly. A grouted joint absorbs some of that; tiles butted tight together have nowhere to go and can crack or lift.
- Allowance for size variation. Tiles from the same box are rarely identical. A joint lets you absorb a fraction of a millimetre on each tile without the courses drifting.
What spacers do not do is keep tiles flat to each other. A spacer sets the width of the gap, not the height of one tile edge against the next. If you are laying large porcelain and worried about one edge sitting proud of its neighbour (lippage), that is a job for clips and wedges, which we cover in our page on tile levelling systems.
How wide should the gap be?
The code of practice for wall tiling in the UK is BS 5385-1:2018. BAL, one of the main UK adhesive manufacturers, summarises its minimum joint widths like this:
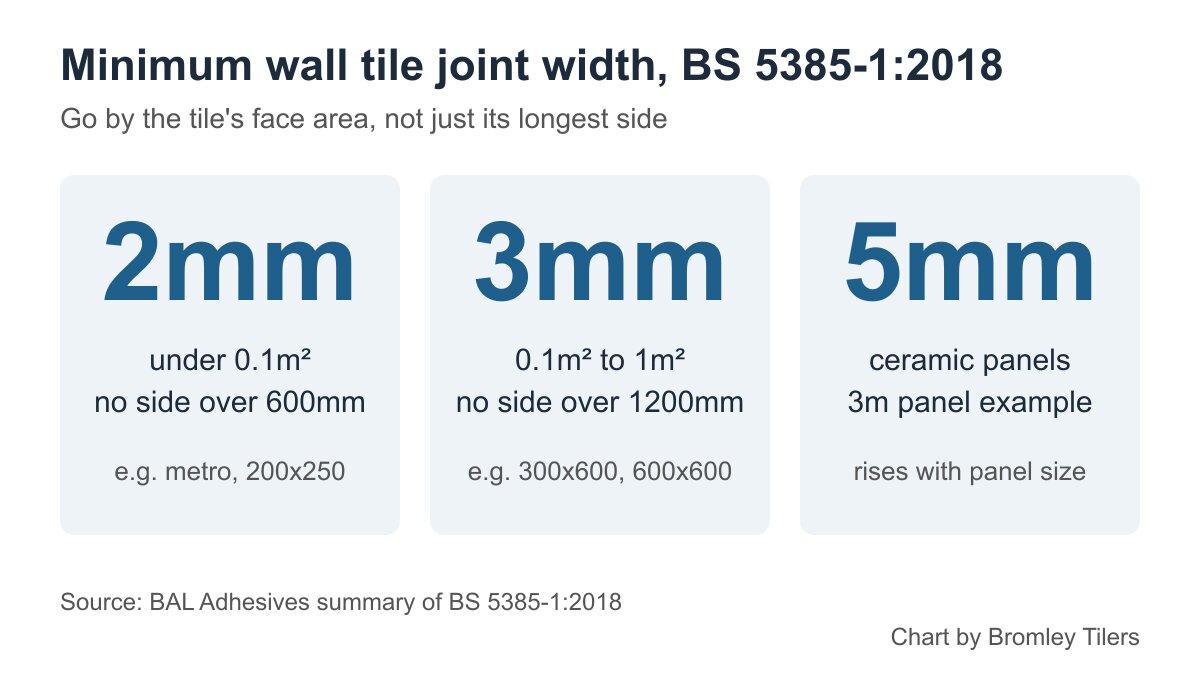
- 2mm minimum for tiles with a face area under 0.1m² and no side longer than 600mm. That covers metro tiles and most small wall tiles, such as 200 x 250mm.
- 3mm minimum for tiles with a face area from 0.1m² to 1m² and no side longer than 1200mm. A 600 x 600mm tile is 0.36m², so it sits in this band even though no side exceeds 600mm.
- Wider again for ceramic panels, increased in proportion to panel size. The example given is a 3m long panel, which needs at least a 5mm joint.
The trap is the face-area rule. People assume a tile with no side over 600mm takes 2mm, but a 300 x 600mm tile is 0.18m² and a 500 x 500mm tile is 0.25m², so both need 3mm. Work out the area, not just the longest side.
These are minimums, not targets. Tiles with a pressed, slightly uneven edge, such as handmade-look ceramics and many cheaper wall tiles, usually look better with a joint a millimetre wider than the minimum, because a tight joint shows every variation in the edge. Rectified porcelain, which is ground to a precise size after firing, is what allows narrow joints to look crisp. Always check the tile maker’s recommended joint on the box or data sheet and use whichever is wider: theirs or the standard’s.
On floors we work to 3mm as a minimum inside. Floors carry foot traffic, furniture loads and often underfloor heating, all of which put more movement through the joints than a wall sees. Outside, joints are wider still; our guide to laying outdoor porcelain paving goes through that.
Types of tile spacer
Cross spacers
The standard plus-shaped spacer sits where four tile corners meet. Laid flat and pressed into the joint, it holds both directions at once. It works well on a straight grid, but where tiles are offset, as with a brick bond, there is no four-way junction, so you either snap one arm off or use T-spacers.
T-spacers
A T-shape for three-way junctions. They save a lot of snapping on offset patterns like metro and brick bond, and they are handy along the top of a skirting line or a bath edge, where the tile meets a surface rather than another tile.
Standing the spacer on its end
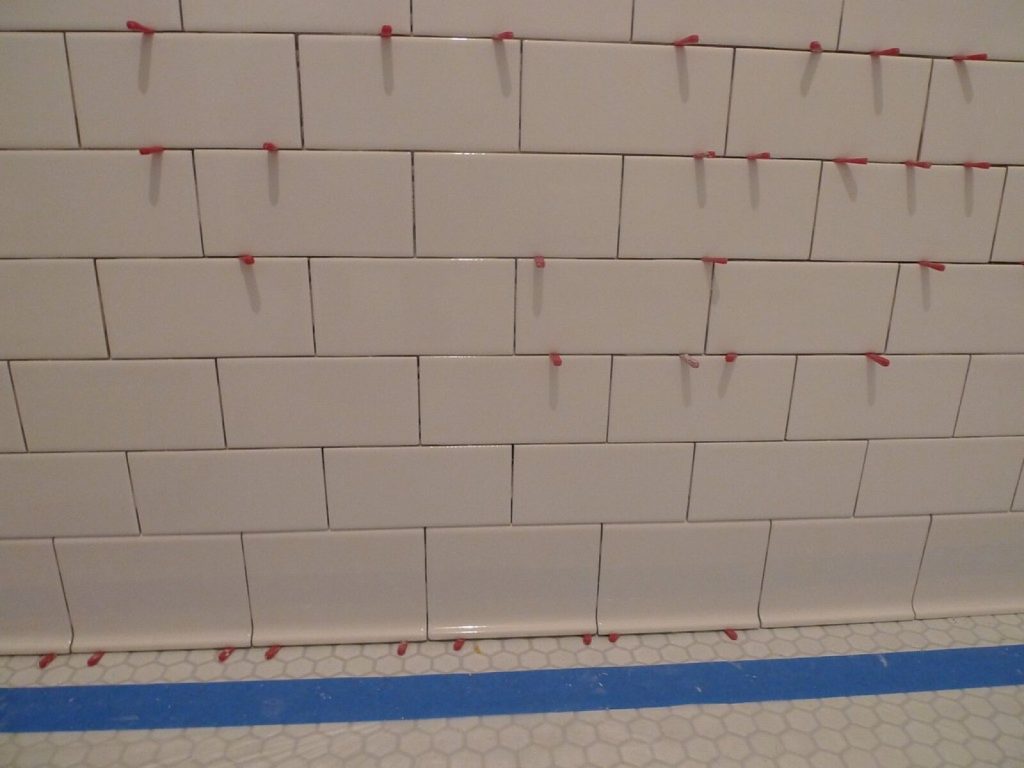
Many tilers do not lay cross spacers flat in the corner at all. They push one arm into the joint so the spacer stands out from the wall, as in the photo at the top of this page. The advantage is that it cannot sink into the adhesive, and it pulls out with your fingers once the tiles are holding. The disadvantage is that it only spaces one joint, so you use more of them, usually two along each long edge of a larger tile.
Wedge spacers
A tapered plastic wedge that you push in until it gives the gap you want. Because the width depends on how far it goes in, one bag covers several joint sizes, and wedges are useful for taking up small differences between tiles. They are also the easiest way to hold a gap under the bottom row of wall tiles above a bath, shower tray or worktop, where you need a clean space for silicone.
Spacers for hexagon and shaped tiles
Hexagons meet at three-way junctions at 120 degrees, so ordinary crosses do not fit. Angled spacers made for hexagons exist, and for small hexagons on a mesh sheet the backing sets the gap for you, so no spacers are needed within a sheet, only between sheets.
Common spacer sizes and what they suit
Tile Mountain puts the usual range at 2mm to 6mm. How we use them:
- 2mm. Metro tiles and other small wall tiles under 0.1m², as long as the maker agrees.
- 3mm. The everyday size for floors indoors, for any tile of 0.1m² or more (including 300 x 600mm wall tiles), and for small tiles with a less precise edge.
- 4mm to 5mm. Rustic and handmade-look tiles with irregular edges, some natural stone, and larger ceramic panels.
- Wider. Outdoor paving and some reclaimed or terracotta floors. At this width the grout choice matters as much as the spacer.
Before buying, check the grout bag. Every grout states the joint widths it is designed for, and a fine wall grout can crack or shrink in a wide joint. Our page on how to grout tiles covers matching grout to joint.
How to use tile spacers properly
- Set out first. Dry-lay a row of tiles with spacers between them and measure. On a 2.4m wall, a 1mm change in joint width across ten tiles moves the last tile by 10mm, which can be the difference between a neat edge cut and a sliver.
- Fix a level batten for the first wall row rather than starting off a bath or floor, which are rarely level. Spacers keep joints even, but they will faithfully copy a crooked starting line all the way up the wall.
- Place spacers as each tile goes on, not after a whole area is laid, while the tile can still slide into position.
- Keep spacers out of the adhesive bed. A flat spacer pushed deep into the joint gets glued in. Set flat spacers just below the tile face, or stand them on end.
- Check with a level and a straight edge every few rows. Spacers only guarantee width. They do not stop a course drifting if a tile is slightly out of square.
- Leave a gap at the perimeter. Where tiles meet a wall, a bath or a change of surface, leave a movement gap for silicone rather than butting tight or grouting.
When to take tile spacers out
Take spacers out before you grout, every time. Grout over a spacer is only as deep as the gap above the plastic, and that thin skin tends to crack in a small cross or line shape above each one.
Timing depends on the adhesive. The aim is to remove them once the tiles are holding their position, but before the adhesive has hardened around the plastic. Standing spacers can usually be pulled out once the adhesive has firmed up enough to hold the tiles. Flat spacers set into the joint are easiest to lift before full cure, with a spacer removal tool or the tip of a grout rake. Fast-setting adhesives shorten that window a lot, so read the adjustment and working times printed on the bag.
If a spacer is stuck, do not lever it against the tile edge, which chips glaze. Rake out the joint around it, or cut it back below the surface so there is at least a few millimetres of grout depth over what is left. Once the spacers are out, rake any adhesive out of the joints, because adhesive in a joint causes the same shallow-grout problem. If you already have fine cracks in a grouted joint, our page on cracked grout repair explains the fix.
Frequently asked questions
What size tile spacers should I use for wall tiles?
For wall tiles with a face area under 0.1m² and no side over 600mm, BS 5385-1:2018 allows a 2mm minimum joint, so 2mm spacers are common. Larger tiles, from 0.1m² to 1m², need at least 3mm. Use the tile maker’s recommendation if it is wider.
What size tile spacers for floor tiles?
We use 3mm as the minimum on internal floors. Large format porcelain and tiles with irregular edges often suit a slightly wider joint, and outdoor paving needs wider joints again.
Do you remove tile spacers before grouting?
Yes. Grout laid over a spacer is too thin to last and usually cracks above it. Take spacers out once the tiles are holding, and rake adhesive out of the joints before grouting.
Can you tile without spacers?
Some wall tiles have small lugs moulded on their edges that set the joint. Experienced tilers also space large tiles by eye with wedges. For anyone else, spacers are the reliable way to get even joints, and butting tiles tight together with no joint at all goes against the British Standard minimums.
Should tile spacers go on the corners or the sides?
Both work. Cross spacers laid flat go at the corners where four tiles meet. Standing spacers go along the sides, usually two per long edge. On offset patterns, side spacers or T-spacers are easier because corners do not line up.
Are 2mm tile spacers too small?
Not for small wall tiles under 0.1m², where 2mm is the standard minimum. They are too small for any tile of 0.1m² or more, such as a 300 x 600mm or 600 x 600mm tile, which needs at least 3mm.
If you would rather have the setting out, spacing and grouting done for you, see our work and get in touch through the Bromley Tilers homepage.
Related guides
- How to Tile a Bathroom Wall: A UK Step-by-Step Guide
- How Much Does Tiling Cost in the UK? A Realistic Price Guide
- How to Remove Old Wall Tiles Without Damaging the Wall
- Porcelain vs Ceramic Tiles: Which Is Right for Your Bathroom or Kitchen?
- How to Tank and Waterproof a Wet Room Before Tiling: A Bromley Homeowner’s Guide
- Do You Need to Seal Natural Stone Tiles Before Grouting? A Tiler Explains
- How to Tile a Bathroom Floor (Including Around the Toilet)
- How to Tile a Shower: Walls, Niche and Waterproofing
- Bathroom Tiling Guide: How to Plan, Prep and Finish a Lasting Job
- Tile Backer Board vs Plasterboard for Bathrooms
- Best Tiles for Small Bathrooms (and How to Make a Space Look Bigger)
- Wall and Floor Tiles for a Wet Room: What Actually Works
- Tiling vs Wall Panels for a Bathroom: Which Is Better?
- Do You Tile the Floor or Walls First in a Bathroom?
- Kitchen Tiling: Splashbacks, Walls and Floors Explained
- How to Tile a Kitchen Splashback: Step-by-Step Bromley Guide
- How to Tile Around Kitchen Sockets, Switches and Worktops
- Kitchen Splashback Tile Ideas: 12 Looks That Work
- How to Lay Metro Tiles in a Herringbone Pattern
- Tiled vs Glass Splashback (and Acrylic): Which Is Best?
- How High Should a Kitchen Splashback Be Tiled? UK Heights Guide
- Types of Tiles: The Complete UK Buyer’s Guide
- Porcelain vs Natural Stone Tiles: Which Should You Choose?
- Natural Stone Tiles Explained: Marble, Travertine, Slate and Limestone
- Mosaic Tiles: Where to Use Them and How They’re Fixed
- Tile Slip Ratings Explained: R Ratings and PTV for UK Floors
- Matt vs Gloss Tiles: Which Finish Is Right for Your Room?
- Cost to Tile a Bathroom in the UK: 2026 Price Breakdown
- Polystyrene Ceiling Tiles: Are They Any Good?
- Cost to Tile a Kitchen in 2026: Floor and Splashback Prices
- Tiling Cost Per Square Metre 2026: Labour and All-In Prices
- Tiler Day Rate UK: What Tilers Charge Per Day in 2026
- Cost to Regrout a Bathroom in 2026: UK Prices Explained
- Floor Tile Prices UK 2026: What You Will Pay Per Square Metre
- Is It Cheaper to Tile or Use Wall Panels? A UK Cost Comparison
- How to Tile: A Complete Beginner’s Guide (UK)
- How to Cut Tiles: Manual Cutter, Wet Saw and Nippers
- How to Cut Holes in Tiles for Pipes and Taps
- How to Grout Tiles (and Get Clean, Even Lines)
- Cork Flooring: Pros, Cons and Where It Works in UK Homes
- How to Mix and Apply Tile Adhesive Correctly
- How to Set Out Tiles for a Perfect Layout
- How to Seal Grout and Tiles in a Bathroom (UK Guide)
- Can You Tile Over Tiles? When It Works and When It Doesn’t
- Tiling Tools List: What You Need for a Professional Finish
- How Much Tile Adhesive Do I Need? Coverage Per Square Metre
- Tile Problems: 9 Common Faults and How to Fix Each
- How to Fix Loose Tiles Without Removing Them
- Cracked Grout Repair: Why It Happens and How to Fix It
- How to Replace a Broken Tile Without Redoing the Wall
- Water Leaking Through Shower Tiles: 6 Causes and Fixes
- Remove Mouldy Silicone Sealant: A 24-Hour Reseal Job
- How to Clean Grout: What Works, and What Etches Stone
- Why Are My Floor Tiles Lifting? The 40m² Bay Rule
- How to Lay Porcelain Paving: 1:80 Fall, 150mm Below DPC
- Tile Patterns: Why Big Tiles Need a One-Third Offset
- Grout Colour Ideas: How to Get the Shade You Chose
- Can You Paint Tiles? Yes on Walls, No in the Shower
- Decoupling Membrane for Tiles: When You Actually Need One
- Can You Tile Over a Wooden Floor? What Changed in 2024
- Tiling Cost 2026: £25 to £95 per m² Labour, UK Rates
- Tile Ideas: 7 Looks and the One Rule Each Needs
- Metro Tiles: Sizes, Bevels and the 1/3 Offset Rule
- Tile Feature Wall: The Weight Limit That Decides Yours
- Tiling Over Underfloor Heating: 14 Days Before Heat On
- How to Tile a Hallway Floor: Set Out From the Door
- Wood Effect Tiles and Marble Effect: 5 Specs to Check
- Tile Levelling Systems: The 3mm Rule That Decides It
- Floor Levelling Compound: How Deep and How Long to Dry
- How to Find a Good Tiler: 9 Checks Before You Book
- Tiling Quote: The 10 Lines a Proper One Must Show
- Tile Trim: Sizes, Profiles and the One-Size-Up Rule
- Tiling the Fireplace: 125mm Hearths, Adhesive and Tiles
- Porcelain vs Stone Paving: Grip, Sealing and Upkeep
- Tiling a Large Floor: Movement Joints Every 10 Metres
- DIY Tiling vs Professional: 6 Jobs to Never Do Yourself
- Terracotta Tiles: Seal Before Grouting, Wait 7 Days
- Tile Drill Bits: Which Bit Won’t Crack Porcelain
- Tiling Corners With Trim: Which Profile, and When to Mitre
- Travertine Tiles: Filled or Unfilled, and How to Seal Them
- Slate Tiles: Calibrated or Riven, and How to Lay Them
- Zellige Tiles: Order 15% Extra and Fix Them Edge to Edge
- Terrazzo Tiles: Real 20mm vs Porcelain, Seal Before Grouting
- Split Face Tiles: Will Your Wall Take 27kg per m²?
- Tile Sealer: Which Tiles Need It and Which Type to Buy
- How to Remove Grout Haze: Which Cleaner for Which Grout
- Efflorescence on Tiles: Why It Comes Back and How to Stop It
- Tile Primer: Which Surfaces Need It and How Much to Dilute
- Epoxy Grout: Where It’s Worth It and How to Apply It
- How to Tile Stairs: Keep Every Riser the Same Height
- Shower Niche: Sizes, Height and Which Wall Can Take One
- How Many Tiles Do I Need? Add 10% to 20% by Layout
- How to Tile a Window Sill: Sill Last, Silicone at the Frame