


How many tiles do I need? Measure the area in square metres, divide by the area of one tile, then add 10% for a straight lay, 15% for diagonal or herringbone, and up to 20% for large-format tiles in a small room. Round up to whole boxes from one batch. That is the whole method, and the rest of this page is about the places where people get it wrong: openings, niches, layouts and batch numbers.
We price tiling jobs across Bromley and south-east London every week, and the most common delay on a job is not the tiler. It is the customer who ordered exactly the area of the room, runs out three rows from the end, and finds the same tile is now a different shade or out of stock. The numbers below are how to avoid that.
Step 1: measure the area properly
Work in metres and keep each surface separate.
- Floors: length x width. Split an L-shaped room into two rectangles and add them. A hallway of 3.0m x 1.2m plus a 1.5m x 1.0m section is 3.6m² + 1.5m² = 5.1m².
- Walls: width x the height you are actually tiling. Half-height tiling behind a basin is not the full wall.
- Openings: take off windows and doors by measuring the opening. A 0.6m x 0.5m window removes 0.30m² from the wall.
- Fixed items: on a floor, take off a hearth, kitchen units or a bath you are tiling around, not under.
One judgement call: if an opening is smaller than a couple of tiles, do not bother subtracting it. The cuts around a small window or a soil pipe use up nearly as much tile as the hole saves.
Step 2: convert area into tiles
Divide the area by the area of one tile. A 600 x 300mm tile covers 0.6 x 0.3 = 0.18m². These are the figures for common sizes, before any wastage and ignoring grout joints:
- 1200 x 600mm: 1.39 tiles per m²
- 600 x 600mm: 2.78 tiles per m²
- 600 x 300mm: 5.56 tiles per m²
- 300 x 300mm: 11.11 tiles per m²
- 100 x 300mm: 33.33 tiles per m²
- 75 x 300mm or 150 x 150mm: 44.44 tiles per m²
- 100 x 200mm: 50 tiles per m²
Round the result up to a whole tile before you add wastage, then round up again after.
Step 3: add wastage for your layout
Every room needs cuts at the edges, and some tiles arrive chipped or break on the cutter. How much extra you need depends mostly on the layout, because angled patterns turn every edge tile into a cut and leave offcuts too small to reuse. Tile Mountain’s published tile calculation guidance uses these allowances, and they match what we see on site:
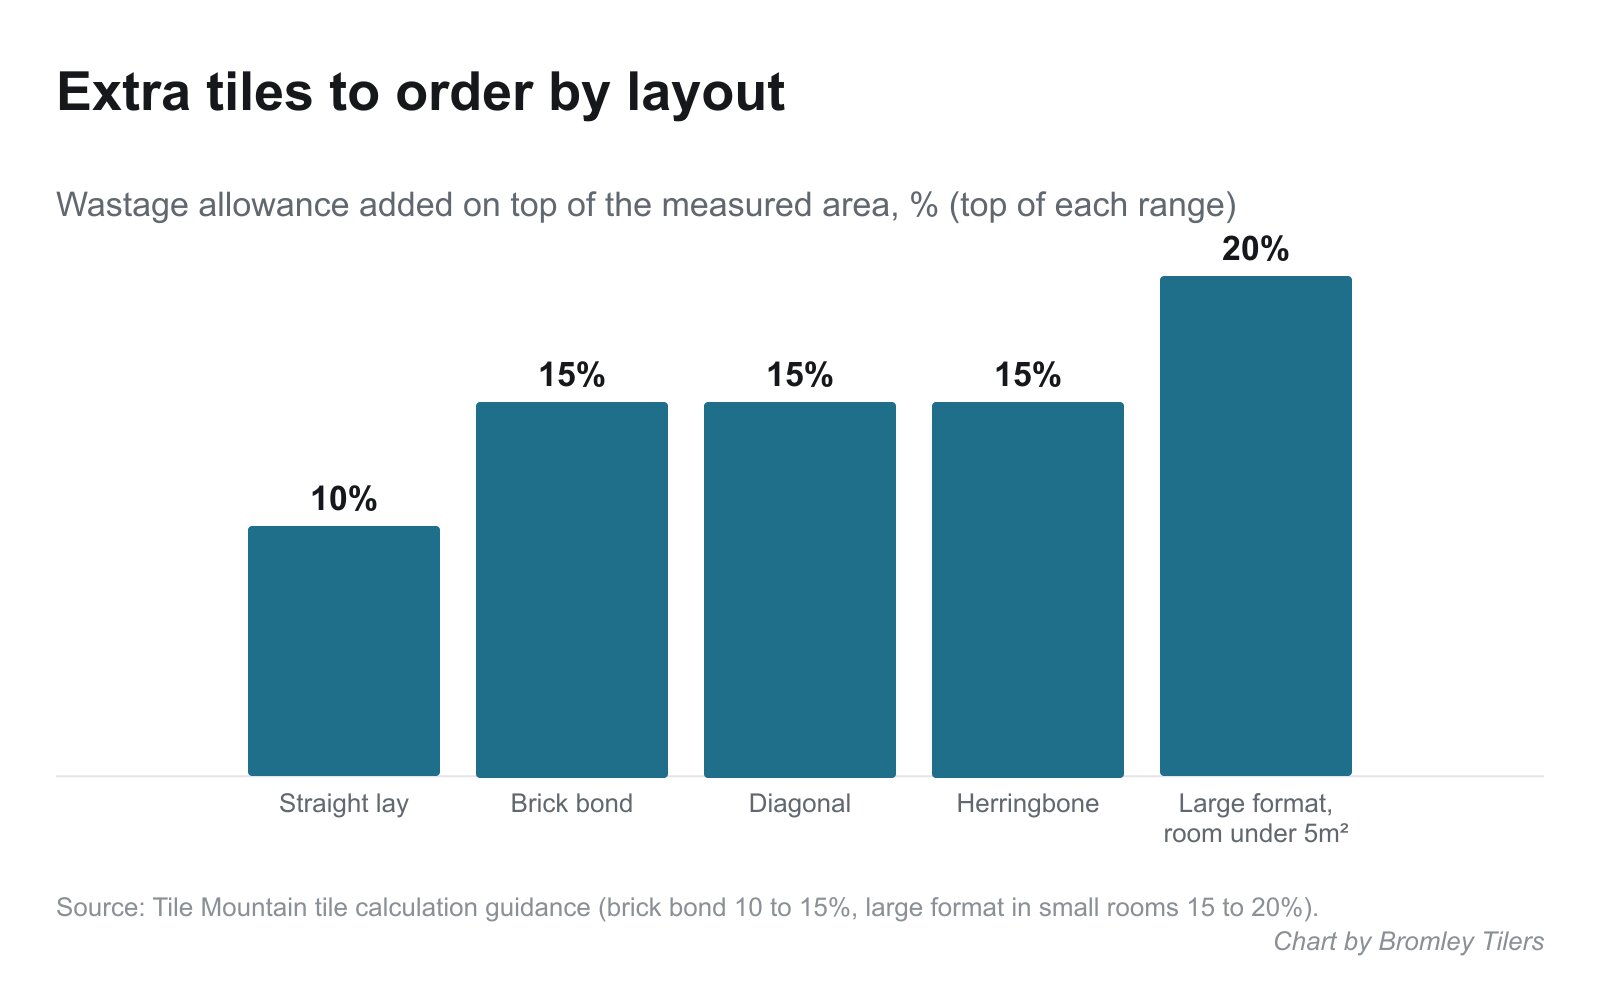
- Straight lay (grid): 10%. The least wasteful layout, because an offcut from one wall often fits the opposite side.
- Brick bond: 10 to 15%. Use the higher figure with long rectangular tiles, where every other row starts on a part tile.
- Diagonal: 15%. Every perimeter tile is a triangle cut.
- Herringbone: 15%. For a complicated room or a small herringbone tile, go higher: some suppliers advise 20 to 25%.
- Large-format tiles (600 x 600mm and above) in a room under 5m²: 15 to 20%. A single wasted 1200 x 600mm tile is 0.72m² gone, and offcuts from big tiles rarely fit anywhere else.
With long rectangular tiles in brick bond, many manufacturers advise a one-third offset rather than half, because the slight bow in a long tile shows up as lippage when two high edges meet at the centre point. That changes where your cuts land, so set the pattern before you order.
Worked examples
A bathroom floor, straight lay
Floor 2.0m x 1.7m = 3.4m². Tile 600 x 300mm (0.18m²). 3.4 / 0.18 = 18.9, so 19 tiles. Add 10%: 19 x 1.10 = 20.9, so 21 tiles. If a box holds 1.44m² (eight of these tiles), 21 / 8 = 2.6, so you buy 3 boxes, which is 24 tiles. The spare three are your repair stock.
A bathroom wall with a window, brick bond
Wall 2.4m wide x 2.2m high = 5.28m². Less a 0.6m x 0.5m window (0.30m²) = 4.98m². Tile 600 x 300mm: 4.98 / 0.18 = 27.7, so 28 tiles. Add 15% for brick bond: 28 x 1.15 = 32.2, so 33 tiles.
A hallway in herringbone
The L-shaped 5.1m² hallway from Step 1, in a 75 x 300mm herringbone tile (0.0225m²). 5.1 / 0.0225 = 226.7, so 227 tiles. Add 15%: 227 x 1.15 = 261.05, so 262 tiles. At 20%, the figure we would use for an L-shape with two doorways, it is 273.
Niches, window reveals and upstands
This is where measured quantities fall short, because these surfaces never appear on a floor plan. A shower niche takes tile off the wall but puts more back. A 600 x 300mm niche that is 100mm deep has a back of 0.18m², two sides of 0.3 x 0.1m (0.06m²) and a top and bottom of 0.6 x 0.1m (0.12m²): 0.36m² of tiling in place of the 0.18m² of wall it replaces. The same applies to tiled window reveals and sills, boxed-in pipework and bath panels. Measure every return face and add it to the wall area, and remember that these narrow strips are almost all cuts, so they push wastage up rather than down. Budget for edge tile trim on every external corner while you are at it.
Grout joints: when to deduct
A grout joint takes up space, so in theory you need fewer tiles. In practice it only matters on big areas with wide joints. Tile Mountain’s figures: with 2 to 3mm joints there is nothing to deduct under 30m²; with 5mm joints the saving over 20m² is 1 to 2%, which the standard 10% already covers; with 8 to 10mm joints over 30m², you can take off a further 3 to 5%. For a domestic bathroom or kitchen, ignore joints and keep the wastage figure as it is.
Boxes, batches and spare tiles
- Round up to whole boxes. Never round down and plan to pop back for one more box.
- Buy one batch. Shade and sometimes size vary between production runs. Order every box in one transaction and check that the batch number is the same on each box before the first tile goes on the wall, not when you open the last one.
- Open several boxes at once. Mixing tiles from three or four boxes as you go spreads any variation within the batch across the room.
- Keep spares. Hold back 5 to 10% of the order, stored flat in the original box somewhere dry, with the batch number written on it. Tile Mountain notes ranges are often discontinued within two to five years, and a single cracked tile is a ten-minute repair if you have a match and a strip-out job if you do not.
If you are using a tiler, ask them to check your quantities before you order. A good tiler will set out the room in their head and tell you where the cuts fall; that is part of what you are paying for. If you would like us to measure up and quote a job in Bromley or nearby, start at the Bromley Tilers homepage.
Frequently asked questions
How many tiles do I need for 1m²?
Divide 1 by the area of one tile in square metres. For 600 x 600mm that is 2.78 tiles, for 600 x 300mm 5.56, and for 300 x 300mm 11.11. Then add your wastage allowance and round up.
Is 10% wastage enough?
For a straight grid lay in a simple room, yes. Use 15% for diagonal, herringbone or brick bond with long tiles, and 15 to 20% for large-format tiles in a small room or any room with lots of returns, niches and boxing.
Should I subtract windows and doors from the tile area?
Subtract doors and large windows. Leave small openings in, because the cuts around them use almost as much tile as they save. Add back any reveals or sills you are tiling.
Can I return unopened boxes of tiles?
Many suppliers accept unopened boxes back within a set period, but terms vary and some charge a restocking fee or exclude clearance lines. Check the returns policy before you order the extra box, and keep at least a few spare tiles whatever you return.
Why do tiles from different batches look different?
Each production run is fired separately, so colour, shade and sometimes the exact size can shift slightly. Side by side on one wall, the difference shows. Buy everything from one batch and check the batch code on every box.
Do I need extra tiles for a niche or window reveal?
Yes. A niche or reveal adds return faces, and nearly every piece on them is a cut. Measure each return surface, add it to the wall area, and lean towards the higher wastage figure.
Related guides
- How to Tile a Bathroom Wall: A UK Step-by-Step Guide
- How Much Does Tiling Cost in the UK? A Realistic Price Guide
- How to Remove Old Wall Tiles Without Damaging the Wall
- Porcelain vs Ceramic Tiles: Which Is Right for Your Bathroom or Kitchen?
- How to Tank and Waterproof a Wet Room Before Tiling: A Bromley Homeowner’s Guide
- Do You Need to Seal Natural Stone Tiles Before Grouting? A Tiler Explains
- How to Tile a Bathroom Floor (Including Around the Toilet)
- How to Tile a Shower: Walls, Niche and Waterproofing
- Bathroom Tiling Guide: How to Plan, Prep and Finish a Lasting Job
- Tile Backer Board vs Plasterboard for Bathrooms
- Best Tiles for Small Bathrooms (and How to Make a Space Look Bigger)
- Wall and Floor Tiles for a Wet Room: What Actually Works
- Tiling vs Wall Panels for a Bathroom: Which Is Better?
- Do You Tile the Floor or Walls First in a Bathroom?
- Kitchen Tiling: Splashbacks, Walls and Floors Explained
- How to Tile a Kitchen Splashback: Step-by-Step Bromley Guide
- How to Tile Around Kitchen Sockets, Switches and Worktops
- Kitchen Splashback Tile Ideas: 12 Looks That Work
- How to Lay Metro Tiles in a Herringbone Pattern
- Tiled vs Glass Splashback (and Acrylic): Which Is Best?
- How High Should a Kitchen Splashback Be Tiled? UK Heights Guide
- Types of Tiles: The Complete UK Buyer’s Guide
- Porcelain vs Natural Stone Tiles: Which Should You Choose?
- Natural Stone Tiles Explained: Marble, Travertine, Slate and Limestone
- Mosaic Tiles: Where to Use Them and How They’re Fixed
- Tile Slip Ratings Explained: R Ratings and PTV for UK Floors
- Matt vs Gloss Tiles: Which Finish Is Right for Your Room?
- Cost to Tile a Bathroom in the UK: 2026 Price Breakdown
- Polystyrene Ceiling Tiles: Are They Any Good?
- Cost to Tile a Kitchen in 2026: Floor and Splashback Prices
- Tiling Cost Per Square Metre 2026: Labour and All-In Prices
- Tiler Day Rate UK: What Tilers Charge Per Day in 2026
- Cost to Regrout a Bathroom in 2026: UK Prices Explained
- Floor Tile Prices UK 2026: What You Will Pay Per Square Metre
- Is It Cheaper to Tile or Use Wall Panels? A UK Cost Comparison
- How to Tile: A Complete Beginner’s Guide (UK)
- How to Cut Tiles: Manual Cutter, Wet Saw and Nippers
- How to Cut Holes in Tiles for Pipes and Taps
- How to Grout Tiles (and Get Clean, Even Lines)
- Cork Flooring: Pros, Cons and Where It Works in UK Homes
- How to Mix and Apply Tile Adhesive Correctly
- How to Set Out Tiles for a Perfect Layout
- How to Seal Grout and Tiles in a Bathroom (UK Guide)
- Can You Tile Over Tiles? When It Works and When It Doesn’t
- Tiling Tools List: What You Need for a Professional Finish
- How Much Tile Adhesive Do I Need? Coverage Per Square Metre
- Tile Problems: 9 Common Faults and How to Fix Each
- How to Fix Loose Tiles Without Removing Them
- Cracked Grout Repair: Why It Happens and How to Fix It
- How to Replace a Broken Tile Without Redoing the Wall
- Water Leaking Through Shower Tiles: 6 Causes and Fixes
- Remove Mouldy Silicone Sealant: A 24-Hour Reseal Job
- How to Clean Grout: What Works, and What Etches Stone
- Why Are My Floor Tiles Lifting? The 40m² Bay Rule
- How to Lay Porcelain Paving: 1:80 Fall, 150mm Below DPC
- Tile Patterns: Why Big Tiles Need a One-Third Offset
- Grout Colour Ideas: How to Get the Shade You Chose
- Can You Paint Tiles? Yes on Walls, No in the Shower
- Decoupling Membrane for Tiles: When You Actually Need One
- Can You Tile Over a Wooden Floor? What Changed in 2024
- Tiling Cost 2026: £25 to £95 per m² Labour, UK Rates
- Tile Ideas: 7 Looks and the One Rule Each Needs
- Metro Tiles: Sizes, Bevels and the 1/3 Offset Rule
- Tile Feature Wall: The Weight Limit That Decides Yours
- Tiling Over Underfloor Heating: 14 Days Before Heat On
- How to Tile a Hallway Floor: Set Out From the Door
- Wood Effect Tiles and Marble Effect: 5 Specs to Check
- Tile Levelling Systems: The 3mm Rule That Decides It
- Floor Levelling Compound: How Deep and How Long to Dry
- How to Find a Good Tiler: 9 Checks Before You Book
- Tiling Quote: The 10 Lines a Proper One Must Show
- Tile Trim: Sizes, Profiles and the One-Size-Up Rule
- Tile Spacers: 2mm or 3mm, and When to Pull Them Out
- Tiling the Fireplace: 125mm Hearths, Adhesive and Tiles
- Porcelain vs Stone Paving: Grip, Sealing and Upkeep
- Tiling a Large Floor: Movement Joints Every 10 Metres
- DIY Tiling vs Professional: 6 Jobs to Never Do Yourself
- Terracotta Tiles: Seal Before Grouting, Wait 7 Days
- Tile Drill Bits: Which Bit Won’t Crack Porcelain
- Tiling Corners With Trim: Which Profile, and When to Mitre
- Travertine Tiles: Filled or Unfilled, and How to Seal Them
- Slate Tiles: Calibrated or Riven, and How to Lay Them
- Zellige Tiles: Order 15% Extra and Fix Them Edge to Edge
- Terrazzo Tiles: Real 20mm vs Porcelain, Seal Before Grouting
- Split Face Tiles: Will Your Wall Take 27kg per m²?
- Tile Sealer: Which Tiles Need It and Which Type to Buy
- How to Remove Grout Haze: Which Cleaner for Which Grout
- Efflorescence on Tiles: Why It Comes Back and How to Stop It
- Tile Primer: Which Surfaces Need It and How Much to Dilute
- Epoxy Grout: Where It’s Worth It and How to Apply It
- How to Tile Stairs: Keep Every Riser the Same Height
- Shower Niche: Sizes, Height and Which Wall Can Take One
- How to Tile a Window Sill: Sill Last, Silicone at the Frame