


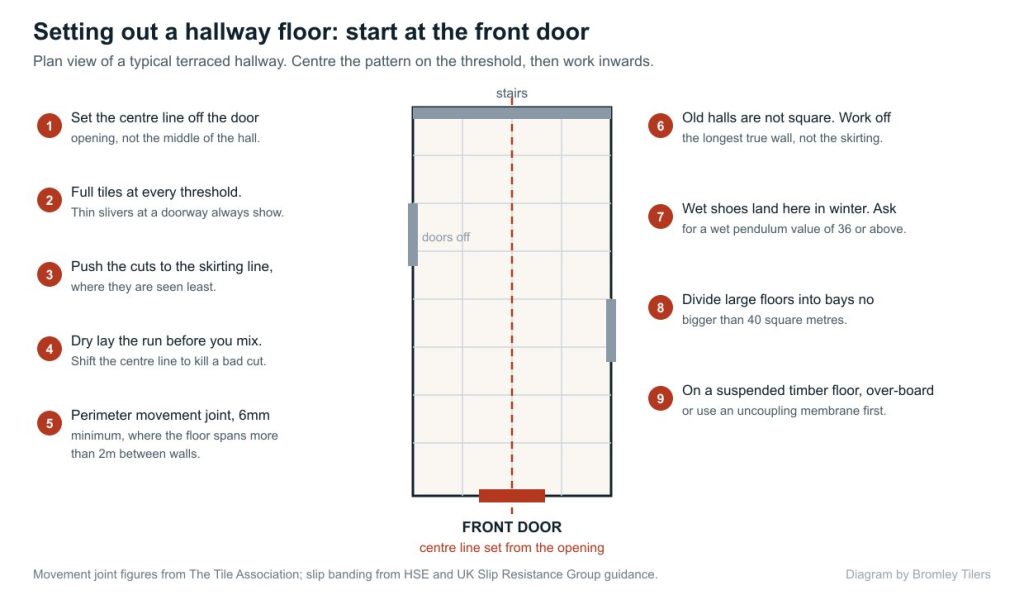
Knowing how to tile a hallway floor comes down to one decision most guides get wrong: where you start. A hallway is not a bathroom. It is long, narrow, rarely square, and it has a front door at one end that every visitor looks straight down. Set out from the middle of the room, as you would in a bathroom, and you finish with a lopsided cut at the threshold that you will notice every single day.
Conservatory floors have their own problem. They sit in full sun, so they expand and contract far more than any other floor in the house, which makes movement joints a requirement rather than a refinement. This covers both, from substrate to grout.
Start at the front door, not the middle of the hall
Snap your centre line off the front door opening and run it down the length of the hall. The tiles either side of that line will be full, symmetrical and the first thing anyone sees. Then work back towards the stairs and push the awkward cuts to the far end and along the skirting line.
Two refinements are worth the extra half hour:
- Get full tiles at every threshold. A sliver of tile in a doorway is the single most obvious sign of a rushed job. Nudge the whole layout by a few centimetres to avoid one.
- Do not square off the skirting. Victorian and Edwardian halls are almost never parallel. Measure the hall at both ends, find the longest wall that is genuinely straight, and set your lines from that. If the walls diverge, split the difference so the taper is shared between both sides rather than dumped on one.
Dry lay the first run before you open a bag of adhesive. It costs twenty minutes and it is the only chance you get to move the centre line.
What is under the floor decides most of the job
Hallway floors in older Bromley and south east London housing are usually suspended timber. Conservatories are usually a solid slab. They are completely different jobs.
Suspended timber. Floorboards move, and tiles do not, so you cannot tile straight onto them. The Tile Association recognises three ways to deal with it: overlay with 15mm exterior-grade plywood, sealed and screwed at 300mm centres; fit an uncoupling membrane; or use tile backer board. Whichever you pick, use a flexible C2 adhesive and a CG2 grout. Check the joists first as well, since a springy floor will crack tiles regardless of what you put on top.
Solid concrete or screed. The trap here is moisture, not movement. New concrete should be at least six weeks old and thoroughly dry before tiling. A Portland cement screed needs to cure for seven days and then dry for a further two weeks. Tiling too early traps moisture, which pushes up through the tile as efflorescence or lifts the whole bay a year later.
Either way, level before you tile. A large-format tile on a dipped floor gives you lippage on every joint, and you cannot bury a dip in adhesive.
Conservatories move more than any other floor in the house
A conservatory floor can swing thirty degrees between a July afternoon and a January night. That movement has to go somewhere, and if you have not given it a joint it will find one by cracking a tile or debonding a corner.
The Tile Association’s guidance is straightforward. Movement joints should be a minimum of 6mm wide. They are needed around the perimeter of the floor and wherever the tiling abuts walls, columns, kerbs and steps, and large floors should be divided into bays not exceeding 40 square metres. A floor with less than two metres between walls normally needs no movement joint, with one exception: if there is heating under the tiles, it does.
In practice that means a perimeter joint hidden under the skirting or beading on almost every conservatory, plus a joint at the threshold where the conservatory meets the house. That threshold joint is the one people skip, and it is the one that fails, because the two structures move independently.
Choose the tile on slip resistance first
A hallway takes wet shoes for five months of the year and a conservatory takes condensation. The UK measure that matters is the pendulum test value. The Health and Safety Executive reproduces the UK Slip Resistance Group bands in its guidance on assessing the slip resistance of flooring:
- 0 to 24: high slip potential
- 25 to 35: moderate slip potential
- 36 and above: low slip potential
Ask for the wet pendulum value and look for 36 or above. Suppliers often quote an R rating instead, which comes from a ramp test done in oil with a boot on, and it tells you very little about a wet shoe on a hall floor. Polished porcelain and honed stone are the worst performers when wet, and are exactly what people choose for hallways because they look best dry.
Setting out a Victorian or geometric pattern
Period hallway patterns are laid as a central field with a border and a margin tile against the wall. The order matters. Set out the border first, from the door, and let the field fill inside it. If you lay the field first and try to fit a border afterwards, the border will pinch and widen down the hall as the walls wander.
Small geometric tiles also generate far more cutting than a plain floor, so order 15 per cent extra rather than the usual 10. And measure a full pattern repeat before you commit: a repeat that lands badly at the door is worth shifting the whole layout to fix.
Laying it, in order
- Prepare the substrate. Over-board, membrane or backer board on timber; check moisture and level on solid floors.
- Prime. Follow the adhesive manufacturer’s instructions for the specific substrate. Skipping primer on a porous screed pulls water out of the adhesive and weakens the bond.
- Snap the centre line from the door and dry lay. Adjust before you mix anything.
- Bed solid. Floor tiles need full coverage, not five dabs. Use a notched trowel sized for the tile, and back-butter anything large format.
- Leave the movement joints as you go. Retrofitting one means cutting out finished tiles.
- Level as you lay. A tile levelling system pays for itself on any tile over 300mm.
- Grout once the adhesive has fully cured, not the same evening. Use CG2 grout on a floor that moves.
- Silicone, not grout, at every movement joint and internal corner. Grout in a movement joint is the same as having no joint at all.
Underfloor heating under a hallway or conservatory floor
Under-tile heating changes three things. It makes movement joints necessary even in a small hall. It requires the system to be commissioned before tiling and again afterwards. And it must be switched off and cooled to ambient temperature while the adhesive and grout cure, which usually means leaving it off for several days after grouting.
Electric mats should be encapsulated first, either in a self-levelling compound or a thin bed of adhesive, before the tiles go on. The electrical connection is notifiable work under Part P, so it needs a qualified electrician. Use a flexible C2 adhesive in a solid bed throughout.
Where DIY stops paying
Tiling a small square hall in plain porcelain is a realistic weekend job for a competent DIYer. Three things push it the other way: a geometric or Victorian pattern, where the setting out is unforgiving and mistakes are visible from the front door; a conservatory, where the movement joints and threshold detail decide whether the floor survives; and any floor over about 300mm tile size, where flatness tolerance and lippage become the whole job.
If you want it done properly, Bromley Tilers works across Bromley and south east London on hallways, conservatories and period floors. The workmanship standards behind all of the above are published by The Tile Association.
Frequently asked questions
Where do you start tiling a hallway floor?
At the front door. Snap a centre line off the door opening and run it down the hall, so the tiles either side of it are full and symmetrical where everyone sees them. Push the cuts to the far end and to the skirting. Starting from the centre of the room, as you would in a bathroom, usually leaves an off-centre cut at the threshold.
Can you tile straight onto floorboards?
No. Boards move independently and will crack the tiles or the grout. The recognised options are 15mm exterior-grade plywood sealed and screwed at 300mm centres, an uncoupling membrane, or tile backer board, with a flexible C2 adhesive and CG2 grout over any of them.
Do I need movement joints in a conservatory floor?
Almost certainly. Conservatories see large temperature swings, so you need a perimeter joint of at least 6mm around the floor and wherever tiling meets walls, kerbs or steps, plus a joint at the threshold where the conservatory meets the house. Divide floors larger than 40 square metres into bays. Fill them with silicone, never grout.
How long after screeding can you tile?
A Portland cement screed should cure for seven days and then dry for a further two weeks. New concrete should be at least six weeks old and thoroughly dry. Tiling early traps moisture, which shows later as efflorescence, staining or a debonded bay.
What tiles are best for a hallway floor?
Porcelain, in a finish with a wet pendulum test value of 36 or above. It is dense, hard wearing and does not need sealing. Avoid polished porcelain and honed natural stone in an entrance hall, since both perform poorly wet, which is exactly the condition an English hallway sees from October to March.
How much extra tile should I order for a hallway?
Ten per cent on a plain layout, and 15 per cent for a geometric or Victorian pattern or anything laid diagonally, because the perimeter cutting is much heavier. Buy it all in one batch: shade varies between production runs, and a top-up box six months later rarely matches.
Related guides
- How to Tile a Bathroom Wall: A UK Step-by-Step Guide
- How Much Does Tiling Cost in the UK? A Realistic Price Guide
- How to Remove Old Wall Tiles Without Damaging the Wall
- Porcelain vs Ceramic Tiles: Which Is Right for Your Bathroom or Kitchen?
- How to Tank and Waterproof a Wet Room Before Tiling: A Bromley Homeowner’s Guide
- Do You Need to Seal Natural Stone Tiles Before Grouting? A Tiler Explains
- How to Tile a Bathroom Floor (Including Around the Toilet)
- How to Tile a Shower: Walls, Niche and Waterproofing
- Construction Trade News: June 2026
- Bathroom Tiling Guide: How to Plan, Prep and Finish a Lasting Job
- Tile Backer Board vs Plasterboard for Bathrooms
- Best Tiles for Small Bathrooms (and How to Make a Space Look Bigger)
- Wall and Floor Tiles for a Wet Room: What Actually Works
- Tiling vs Wall Panels for a Bathroom: Which Is Better?
- Do You Tile the Floor or Walls First in a Bathroom?
- Tiling and Bathroom Trade News: Mid-June 2026
- Kitchen Tiling: Splashbacks, Walls and Floors Explained
- How to Tile a Kitchen Splashback: Step-by-Step Bromley Guide
- How to Tile Around Kitchen Sockets, Switches and Worktops
- Kitchen Splashback Tile Ideas: 12 Looks That Work
- Tiling and Bathroom Trade News: Late June 2026
- How to Lay Metro Tiles in a Herringbone Pattern
- Tiled vs Glass Splashback (and Acrylic): Which Is Best?
- How High Should a Kitchen Splashback Be Tiled? UK Heights Guide
- Tiling and Bathroom Trade News: Early July 2026
- Types of Tiles: The Complete UK Buyer’s Guide
- Porcelain vs Natural Stone Tiles: Which Should You Choose?
- Natural Stone Tiles Explained: Marble, Travertine, Slate and Limestone
- Tiling and Bathroom Trade News: Mid-July 2026
- Mosaic Tiles: Where to Use Them and How They’re Fixed
- Tile Slip Ratings Explained: R Ratings and PTV for UK Floors
- Matt vs Gloss Tiles: Which Finish Is Right for Your Room?
- Cost to Tile a Bathroom in the UK: 2026 Price Breakdown
- Polystyrene Ceiling Tiles: Are They Any Good?
- Cost to Tile a Kitchen in 2026: Floor and Splashback Prices
- Tiling and Bathroom Trade News: Mid-July 2026
- Tiling Cost Per Square Metre 2026: Labour and All-In Prices
- Tiler Day Rate UK: What Tilers Charge Per Day in 2026
- Cost to Regrout a Bathroom in 2026: UK Prices Explained
- Floor Tile Prices UK 2026: What You Will Pay Per Square Metre
- Is It Cheaper to Tile or Use Wall Panels? A UK Cost Comparison
- How to Tile: A Complete Beginner’s Guide (UK)
- How to Cut Tiles: Manual Cutter, Wet Saw and Nippers
- How to Cut Holes in Tiles for Pipes and Taps
- How to Grout Tiles (and Get Clean, Even Lines)
- Cork Flooring: Pros, Cons and Where It Works in UK Homes
- Tiling and Bathroom Trade News: Late July 2026
- How to Mix and Apply Tile Adhesive Correctly
- How to Set Out Tiles for a Perfect Layout
- How to Seal Grout and Tiles in a Bathroom (UK Guide)
- Can You Tile Over Tiles? When It Works and When It Doesn’t
- Tiling Tools List: What You Need for a Professional Finish
- How Much Tile Adhesive Do I Need? Coverage Per Square Metre
- Tiling Trade News: Topps App, Costs Up 6% (Aug 2026)
- Tile Problems: 9 Common Faults and How to Fix Each
- How to Fix Loose Tiles Without Removing Them
- Cracked Grout Repair: Why It Happens and How to Fix It
- Tiling Trade News: TTA Silica Warning, 2% Retentions
- How to Replace a Broken Tile Without Redoing the Wall
- Water Leaking Through Shower Tiles: 6 Causes and Fixes
- Remove Mouldy Silicone Sealant: A 24-Hour Reseal Job
- How to Clean Grout: What Works, and What Etches Stone
- Why Are My Floor Tiles Lifting? The 40m² Bay Rule
- Tiling Trade News: 3,841 Construction Firms Failed
- How to Lay Porcelain Paving: 1:80 Fall, 150mm Below DPC
- Tile Patterns: Why Big Tiles Need a One-Third Offset
- Grout Colour Ideas: How to Get the Shade You Chose
- Can You Paint Tiles? Yes on Walls, No in the Shower
- Decoupling Membrane for Tiles: When You Actually Need One
- Can You Tile Over a Wooden Floor? What Changed in 2024
- Tiling Cost 2026: £25 to £95 per m² Labour, UK Rates
- Tile Ideas: 7 Looks and the One Rule Each Needs
- Metro Tiles: Sizes, Bevels and the 1/3 Offset Rule
- Tile Feature Wall: The Weight Limit That Decides Yours
- Tiling Over Underfloor Heating: 14 Days Before Heat On
- Wood Effect Tiles and Marble Effect: 5 Specs to Check
- Tile Levelling Systems: The 3mm Rule That Decides It
- Tiling Trade News: Repair Work Up 1.7%, Headlam Fails
- Floor Levelling Compound: How Deep and How Long to Dry
- How to Find a Good Tiler: 9 Checks Before You Book
- Tiling Quote: The 10 Lines a Proper One Must Show
- Tile Trim: Sizes, Profiles and the One-Size-Up Rule
- Tile Spacers: 2mm or 3mm, and When to Pull Them Out
- Tiling the Fireplace: 125mm Hearths, Adhesive and Tiles
- Tiling Trade News: Shaws Sinks Reprice on 1 November
- Porcelain vs Stone Paving: Grip, Sealing and Upkeep
- Tiling a Large Floor: Movement Joints Every 10 Metres
- DIY Tiling vs Professional: 6 Jobs to Never Do Yourself
- Terracotta Tiles: Seal Before Grouting, Wait 7 Days
- Tile Drill Bits: Which Bit Won’t Crack Porcelain
- Tiling Corners With Trim: Which Profile, and When to Mitre
- Travertine Tiles: Filled or Unfilled, and How to Seal Them
- Slate Tiles: Calibrated or Riven, and How to Lay Them
- Zellige Tiles: Order 15% Extra and Fix Them Edge to Edge
- Terrazzo Tiles: Real 20mm vs Porcelain, Seal Before Grouting
- Tiling Trade News: 36% Now Add a Bathroom Accent Wall
- Split Face Tiles: Will Your Wall Take 27kg per m²?
- Tile Sealer: Which Tiles Need It and Which Type to Buy
- How to Remove Grout Haze: Which Cleaner for Which Grout
- Efflorescence on Tiles: Why It Comes Back and How to Stop It
- Tile Primer: Which Surfaces Need It and How Much to Dilute
- Epoxy Grout: Where It’s Worth It and How to Apply It
- How to Tile Stairs: Keep Every Riser the Same Height
- Shower Niche: Sizes, Height and Which Wall Can Take One
- How Many Tiles Do I Need? Add 10% to 20% by Layout
- How to Tile a Window Sill: Sill Last, Silicone at the Frame
- Tiling Trade News: Victorian Plumbing Tile Sales Up 76%
- How to Tile Around a Toilet: Lift the Pan or Cut Round It
- Tile to Carpet Transition: Pick the Strip by the Height Gap
- Tile Skirting: Leave a 6mm Gap and Seal, Never Grout
- Tile Backer Board: Cement or Foam, Which Thickness, Fixings
- Quarry Tiles: Seal Them or Not, and How to Clean Them
- Rapid Set Tile Adhesive vs Standard: 30 Mins or 24 Hours