


Tile trim is the thin metal or plastic profile that finishes an exposed tile edge, and choosing it comes down to three things: the profile shape, the material and the size. Get the size wrong and the trim either stands proud of the tile, catching sleeves and towels, or sits below it and leaves a sharp tile edge exposed. This page covers all three, how to fit tile trim on an external corner, and when a mitred edge or a bullnose tile is the better finish. It is the same advice we give customers across Bromley before a job starts.
What tile trim actually does
A cut tile edge is the weakest part of any tiled surface. The glaze stops at the face, the body underneath is exposed, and a knock from a vacuum or a door handle chips it. Tile trim does two jobs at once: it protects that edge, and it hides the cut.
You need it wherever a tiled surface stops without meeting another surface:
- External corners, such as the edge of a window reveal, a boxed-in pipe or a chimney breast.
- The top of a half-height tiled wall or a splashback that stops short of the ceiling or wall units.
- The exposed edge of a bath panel, a shower niche or a tiled shelf.
- Floor edges where tile meets a lower surface, such as carpet or a threshold.
Internal corners are different. Two walls meeting at an inside corner move slightly independently, so that joint is normally finished with a flexible sealant rather than trim.
Tile trim profiles: round, square and angle
The profile is the shape you see from the front. Most ranges come in three broad families.
Round edge (quadrant)
A curved face that wraps the corner. It is the most forgiving choice on walls where people brush past, and it is what most people picture when they think of bathroom tile edging. Schlüter’s RONDEC, for example, forms a symmetrically rounded outer corner with a 6mm radius.
Square edge (box)
A crisp, squared reveal that suits large format tiles, porcelain and modern bathrooms. Schlüter’s QUADEC is a well-known example. It looks sharper than a round profile, and it shows any misalignment more clearly, so the setting out has to be accurate.
Angle (L-shape)
A thin 90 degree strip where only a narrow line of metal shows. Schlüter’s JOLLY is the classic version for outside wall corners and edges. It is the most minimal look, but it offers a little less protection than a full round or square profile.
Tile trim materials: plastic, aluminium, stainless steel and brass
The material decides the finish, the durability and where the trim can safely go.
- Plastic (PVC). The budget option. Bends slightly, comes in many colours to match white or coloured tiles, and cuts easily with a fine-toothed saw. It dents and scuffs more easily than metal, so keep it to light-use walls.
- Aluminium. The everyday metal trim. Sold anodised or colour-coated, including matt black, brushed and bright silver finishes. Light, easy to cut with a junior hacksaw, and fine for most domestic walls.
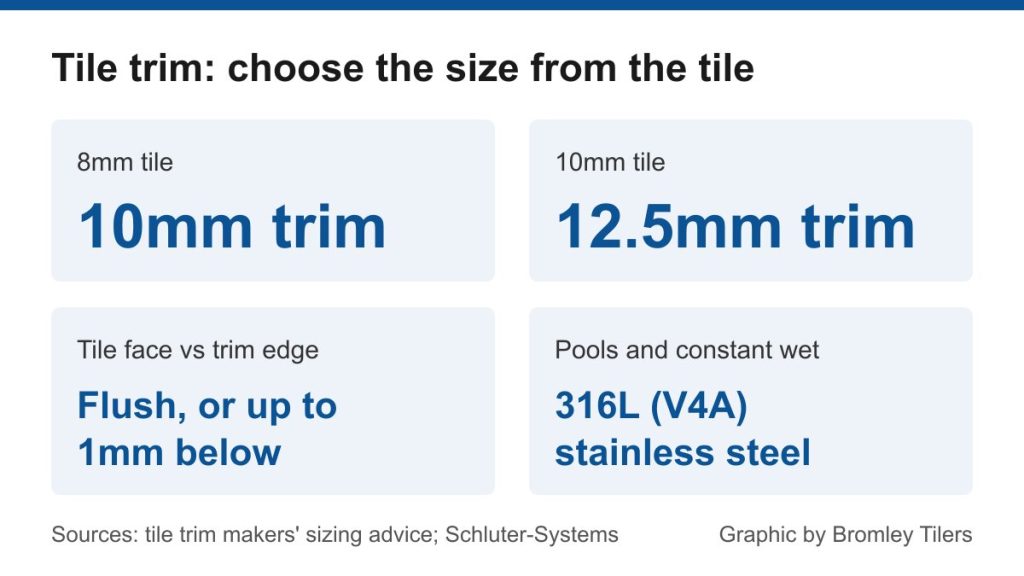
- Stainless steel. The hard-wearing choice for floors, commercial kitchens and anywhere constantly wet. Schlüter recommends its 316L grade (sold as V4A) where exposure is constant, such as swimming pools, rather than the standard grade.
- Brass. Solid brass is sold chrome plated or in a brushed brass look, and suits period and high-end bathrooms. It is usually the most expensive of the four.
If you are matching taps and shower fittings, choose the trim last, once the brassware is in hand. Brushed brass finishes vary between manufacturers, and a trim that looked right in a showroom can read noticeably yellower or pinker next to your actual mixer.
What size tile trim do you need?
Tile trim is sold by depth, and the depth has to suit the tile. The trim sits on the wall with its perforated leg under the tile, bedded in the same adhesive, so the tile ends up slightly raised by the adhesive bed. That is why the usual rule is to go one size up from the tile thickness.
- An 8mm tile takes a 10mm trim.
- A 10mm tile takes a 12.5mm trim.
- Common trim depths run 6mm, 8mm, 10mm, 11mm, 12.5mm and 15mm.
Measure the tile yourself with a steel rule or calipers rather than trusting the box, because thicknesses listed in a catalogue are often rounded. Floor tiles usually sit on a thicker adhesive bed than wall tiles, so allow a little more depth on floors.
The check that matters on the wall is where the tile face ends up. Schlüter’s own fitting advice is that the tile should finish flush with the top of the profile, or up to about 1mm lower. Never proud of it: a tile edge sitting above the trim defeats the whole point, because the edge is exposed again.
How to fit tile trim on an external corner
Trim goes on as you tile, not afterwards. The sequence we use:
- Cut the trim to length. Use a junior hacksaw and a mitre block, and file off the burr so the ends sit tight.
- Comb adhesive along the corner. Spread it with a notched trowel along the full length where the trim leg will sit.
- Press the leg in. Push the perforated leg into the adhesive and check it for plumb with a spirit level.
- Cover the leg. Trowel a little more adhesive over the perforations so adhesive pushes through the holes and locks the trim in.
- Set the tiles against it. Butter the back of the edge tile, bed it, and check the face is flush or just below the trim.
- Leave a grout line. Keep a small gap between tile and trim, around 2mm in wet areas, and grout it with the rest of the wall.
Where two trims meet at a corner, either cut both at 45 degrees so they meet in a neat mitre, or use the matching corner pieces most ranges sell. Corner pieces are quicker and hide small errors; a mitre looks cleaner but shows every half millimetre. Our guide on how to grout tiles covers the finishing stage, and the tiling tools checklist lists the hacksaw, mitre block and file you will want to hand.
Tile trim, mitred edges or bullnose tiles?
Trim is not the only way to finish an edge. There are two alternatives worth knowing about.
Mitred tile edges
Both tiles are cut at 45 degrees so they meet in a sharp corner with no metal showing. It is the most expensive finish because it needs a good wet cutter or a mitring tool and time. It only really works with through-body porcelain, where the colour runs all the way through; on a glazed ceramic tile the clay body shows at the slightest chip. A mitred corner is also more vulnerable to knocks, so it suits feature walls rather than busy hallways.
Bullnose and edge tiles
Some tile ranges, particularly metro and traditional ceramic ranges, include matching tiles with a rounded, glazed edge. Where they exist they give the neatest period finish, but you are limited to whatever the range offers.
For most bathrooms and kitchens, a decent metal trim is the right balance of protection, cost and looks. We tend to reserve mitres for large porcelain feature walls where the client specifically wants no metal line.
Common tile trim mistakes
- Buying trim before the tiles arrive. Order it once you can measure the actual tile.
- Fixing trim after tiling. A trim glued or siliconed on afterwards has no leg locked under the tile and is far weaker.
- Adhesive left on the face. Wipe it off the visible profile immediately; dried adhesive scratches anodised and plated finishes when you scrape it.
- Standard grade stainless in a pool or steam room. Use the higher grade the manufacturer specifies for constant wet exposure.
- Trimming an internal corner. Use flexible sealant there instead.
If you are also cutting around pipes and sockets on the same wall, our guide to cutting holes in tiles will save you a few broken tiles. And if you would rather have it done properly first time, Bromley Tilers fits trim as part of every bathroom and kitchen job. For the manufacturer’s full fitting notes, see Schlüter’s JOLLY profile page.
Frequently asked questions
What size tile trim do I need for 8mm tiles?
A 10mm trim. The extra depth allows for the adhesive bed under the tile, so the tile face finishes flush with the trim or just below it.
Do you grout between tile trim and the tile?
Yes. Leave a small joint, around 2mm in wet areas, and grout it along with the rest of the wall so water cannot get behind the edge tile.
Can you add tile trim after the tiles are fixed?
Not properly. A standard trim has a perforated leg that sits under the tile in the adhesive. Anything stuck on afterwards relies on glue or silicone alone. The sound fix is to remove the edge tiles, fit the trim and re-tile the edge.
Does tile trim go on internal corners?
Normally no. Internal corners are finished with a flexible sealant, because the two walls move slightly differently and a rigid trim or grout line there tends to crack.
Which tile trim is best for a shower?
Aluminium or stainless steel suit most domestic showers. For swimming pools and anywhere constantly wet, Schlüter recommends 316L (V4A) stainless steel over the standard grade.
Is round or square tile trim better?
Round edge trim is more forgiving to knocks and suits traditional bathrooms. Square edge trim looks sharper with large format porcelain, but needs very accurate setting out because it shows misalignment.
Related guides
- How to Tile a Bathroom Wall: A UK Step-by-Step Guide
- How Much Does Tiling Cost in the UK? A Realistic Price Guide
- How to Remove Old Wall Tiles Without Damaging the Wall
- Porcelain vs Ceramic Tiles: Which Is Right for Your Bathroom or Kitchen?
- How to Tank and Waterproof a Wet Room Before Tiling: A Bromley Homeowner’s Guide
- Do You Need to Seal Natural Stone Tiles Before Grouting? A Tiler Explains
- How to Tile a Bathroom Floor (Including Around the Toilet)
- How to Tile a Shower: Walls, Niche and Waterproofing
- Construction Trade News: June 2026
- Bathroom Tiling Guide: How to Plan, Prep and Finish a Lasting Job
- Tile Backer Board vs Plasterboard for Bathrooms
- Best Tiles for Small Bathrooms (and How to Make a Space Look Bigger)
- Wall and Floor Tiles for a Wet Room: What Actually Works
- Tiling vs Wall Panels for a Bathroom: Which Is Better?
- Do You Tile the Floor or Walls First in a Bathroom?
- Tiling and Bathroom Trade News: Mid-June 2026
- Kitchen Tiling: Splashbacks, Walls and Floors Explained
- How to Tile a Kitchen Splashback: Step-by-Step Bromley Guide
- How to Tile Around Kitchen Sockets, Switches and Worktops
- Kitchen Splashback Tile Ideas: 12 Looks That Work
- Tiling and Bathroom Trade News: Late June 2026
- How to Lay Metro Tiles in a Herringbone Pattern
- Tiled vs Glass Splashback (and Acrylic): Which Is Best?
- How High Should a Kitchen Splashback Be Tiled? UK Heights Guide
- Tiling and Bathroom Trade News: Early July 2026
- Types of Tiles: The Complete UK Buyer’s Guide
- Porcelain vs Natural Stone Tiles: Which Should You Choose?
- Natural Stone Tiles Explained: Marble, Travertine, Slate and Limestone
- Tiling and Bathroom Trade News: Mid-July 2026
- Mosaic Tiles: Where to Use Them and How They’re Fixed
- Tile Slip Ratings Explained: R Ratings and PTV for UK Floors
- Matt vs Gloss Tiles: Which Finish Is Right for Your Room?
- Cost to Tile a Bathroom in the UK: 2026 Price Breakdown
- Polystyrene Ceiling Tiles: Are They Any Good?
- Cost to Tile a Kitchen in 2026: Floor and Splashback Prices
- Tiling and Bathroom Trade News: Mid-July 2026
- Tiling Cost Per Square Metre 2026: Labour and All-In Prices
- Tiler Day Rate UK: What Tilers Charge Per Day in 2026
- Cost to Regrout a Bathroom in 2026: UK Prices Explained
- Floor Tile Prices UK 2026: What You Will Pay Per Square Metre
- Is It Cheaper to Tile or Use Wall Panels? A UK Cost Comparison
- How to Tile: A Complete Beginner’s Guide (UK)
- How to Cut Tiles: Manual Cutter, Wet Saw and Nippers
- How to Cut Holes in Tiles for Pipes and Taps
- How to Grout Tiles (and Get Clean, Even Lines)
- Cork Flooring: Pros, Cons and Where It Works in UK Homes
- Tiling and Bathroom Trade News: Late July 2026
- How to Mix and Apply Tile Adhesive Correctly
- How to Set Out Tiles for a Perfect Layout
- How to Seal Grout and Tiles in a Bathroom (UK Guide)
- Can You Tile Over Tiles? When It Works and When It Doesn’t
- Tiling Tools List: What You Need for a Professional Finish
- How Much Tile Adhesive Do I Need? Coverage Per Square Metre
- Tiling Trade News: Topps App, Costs Up 6% (Aug 2026)
- Tile Problems: 9 Common Faults and How to Fix Each
- How to Fix Loose Tiles Without Removing Them
- Cracked Grout Repair: Why It Happens and How to Fix It
- Tiling Trade News: TTA Silica Warning, 2% Retentions
- How to Replace a Broken Tile Without Redoing the Wall
- Water Leaking Through Shower Tiles: 6 Causes and Fixes
- Remove Mouldy Silicone Sealant: A 24-Hour Reseal Job
- How to Clean Grout: What Works, and What Etches Stone
- Why Are My Floor Tiles Lifting? The 40m² Bay Rule
- Tiling Trade News: 3,841 Construction Firms Failed
- How to Lay Porcelain Paving: 1:80 Fall, 150mm Below DPC
- Tile Patterns: Why Big Tiles Need a One-Third Offset
- Grout Colour Ideas: How to Get the Shade You Chose
- Can You Paint Tiles? Yes on Walls, No in the Shower
- Decoupling Membrane for Tiles: When You Actually Need One
- Can You Tile Over a Wooden Floor? What Changed in 2024
- Tiling Cost 2026: £25 to £95 per m² Labour, UK Rates
- Tile Ideas: 7 Looks and the One Rule Each Needs
- Metro Tiles: Sizes, Bevels and the 1/3 Offset Rule
- Tile Feature Wall: The Weight Limit That Decides Yours
- Tiling Over Underfloor Heating: 14 Days Before Heat On
- How to Tile a Hallway Floor: Set Out From the Door
- Wood Effect Tiles and Marble Effect: 5 Specs to Check
- Tile Levelling Systems: The 3mm Rule That Decides It
- Tiling Trade News: Repair Work Up 1.7%, Headlam Fails
- Floor Levelling Compound: How Deep and How Long to Dry
- How to Find a Good Tiler: 9 Checks Before You Book
- Tiling Quote: The 10 Lines a Proper One Must Show
- Tile Spacers: 2mm or 3mm, and When to Pull Them Out
- Tiling the Fireplace: 125mm Hearths, Adhesive and Tiles
- Tiling Trade News: Shaws Sinks Reprice on 1 November
- Porcelain vs Stone Paving: Grip, Sealing and Upkeep
- Tiling a Large Floor: Movement Joints Every 10 Metres